Hoover UH70820 Support Question
Hoover UH70820 Support Question
Find answers below for this question about Hoover UH70820.Need a Hoover UH70820 manual? We have 1 online manual for this item!
Question posted by mokuoke on May 31st, 2014
My Vacuum Doesn't Pick Up But Brushes Are Still Rotating. Model Uh70820
The person who posted this question about this Hoover product did not include a detailed explanation. Please use the "Request More Information" button to the right if more details would help you to answer this question.
Current Answers
Related Hoover UH70820 Manual Pages
Product Manual - Page 3
Please enter the complete model and Manufacturing Code in the spaces provided. CODE
Hint: Attach your ...8am- 7pm EST. MANUFACTURING CODE
(Label located on back of vacuum)
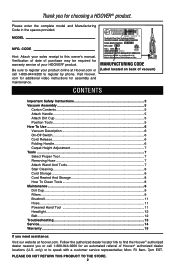
CONTENTS
Important Safety Instructions 3 Vacuum Assembly 5
Carton Contents 5 Attach Handle 5 Attach Dirt Cup 5 Position Tools 5 How To Use ...6 Vacuum Description 6 On-Off Switch 6 Cord Release 6 Folding Handle ...
Product Manual - Page 6
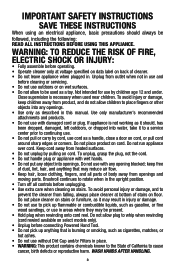
... or appliance with damaged cord or plug. Brushroll continues to rotate when in the upright position. • Turn off all ... Fully assemble before connecting Powered Hand Tool. • Do not pick up flammable or combustible liquids, such as gasoline, or fine wood... age 12 and under. Do not place cleaner on select models only). • Unplug before operating. • Operate cleaner...
Product Manual - Page 7
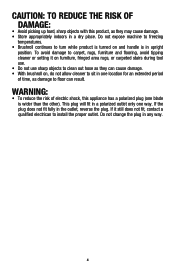
CAUTION: TO REDUCE THE RISK OF DAMAGE:
• Avoid picking up hard, sharp objects with this appliance has a polarized plug (one way. WARNING:
• To reduce the risk of time, as damage to floor can ...
Product Manual - Page 10
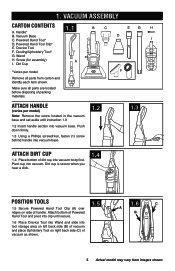
... Hand Tool Clip* E. Dirt Cup
1.1
A
*Varies per model) Note: Remove the screw located in the vacuum base and set aside until secure.
1.6 Place Crevice Tool into Wand and slide into vacuum. Push down firmly.
1.3 Using a Phillips screwdriver, fasten (1) screw behind handle into vacuum base. Dusting/Upholstery Tool* G.
VACUUM ASSEMBLY
CARTON CONTENTS
A. Dirt cup is secure...
Product Manual - Page 11
...)
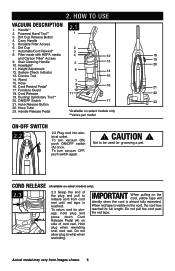
2.3 Grasp the end of cord reel. Actual model may vary from cord reel until red tape is reached. Dirt Cup
2
7. Hose Release Button
17
23
22. Hose Tube
23. To turn vacuum OFF,
push switch again.
! CAUTION ! Hose
7 8
16. CORD RELEASE
2.3
A
(Available on the cord, the cord has reached its full length...
Product Manual - Page 14
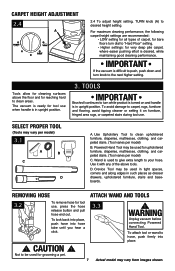
... the above the floor and for reaching hard to be used in tight spaces, corners and along edges in upright position.
3.
The vacuum is ready for grooming a pet.
7 Actual model may be used for tool use when handle is turned on furniture, fringed area rugs, or carpeted stairs during tool use , press...
Product Manual - Page 15
...for clogging -
Hold plug when rewinding onto cord reel.
reference pg. 9
3. Actual model may vary from wall. Clean forward to whip when rewinding. When using tools, always...Never leave the vacuum standing on side of your vacuum will ensure continued cleaning effectiveness.
4.1
A
4.1 The System Check Indicator located at bottom of stairs on select models only)
2.4
...
Product Manual - Page 18
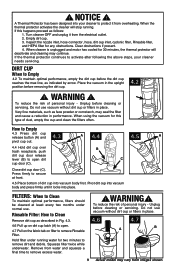
... water for 30 minutes, the thermal protector will deactivate and cleaning may seal the filter and cause a reduction in place.
4.6
4.7
A
B
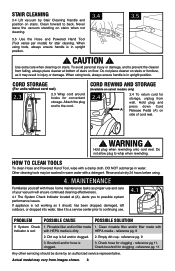
9 Actual model may vary from the electrical outlet. 2. When using the vacuum for any obstructions. How to Empty
4.3 Press dirt cup release button (A) and pivot cup out.
4.3
A 4.4
4.5
A
4.4 Hold dirt cup over trash...
Product Manual - Page 19
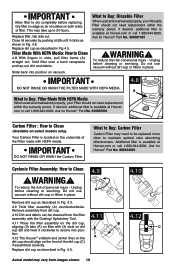
... Filter should align on both sides of personal injury - Actual model may need replacement within the warranty period. WARNING ! Do not use vacuum without dirt cup or filters in Fig. 4.3.
4.9 Twist filter... to 24 hours.
IMPORTANT
DO NOT RINSE OR WASH the Carbon Filter. Do not use vacuum without dirt cup or filters in place.
4.9
A
4.10
Remove dirt cup as described ...
Product Manual - Page 22
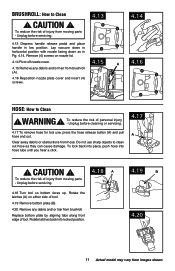
... - To lock back into place, push hose into locked position.
4.19 B 4.20
11 Actual model may vary from moving parts
- To reduce the risk of injury from hose. Unplug before servicing.... from brushroll. To reduce the risk of tool. CAUTION ! Rotate latches back into hose tube until you hear a click.
4.17
A
! Lay vacuum down in hortizontal position with nozzle facing down as they can...
Product Manual - Page 23
...24
4.25
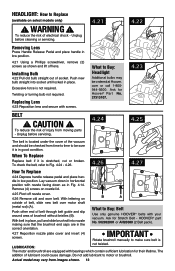
The belt is located under the cover of the vacuum and should be checked from time to time to Replace
(available on select models only)
! Replacing Lens
4.23 Reposition lens and secure with ...Push other end of belt through belt guide and slip around area of socket. WARNING ! IMPORTANT
Rotate brushroll manually to Fig. 4.24 - 4.26.
4.26
4.27
How To Replace
4.24 Depress handle ...
Product Manual - Page 26
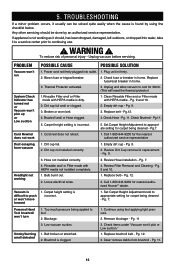
... 1. smell detected 2. Continue using the checklist below. Pg. 11
3. Review Filter Removal and Cleaning - Unplug vacuum before servicing. Carpet height setting is dirty.
1. Pg. 7.
4. Vacuum is found by an authorized service representative. Powered Hand Tool brushroll won 't pick up or Low suction Cord Rewind does not work
1. Blockage.
3. PROBLEM POSSIBLE CAUSE
POSSIBLE SOLUTION...
Product Manual - Page 27

... representative call 1-800-944-9200. If you . • For an automated referral of the vacuum.) PLEASE DO NOT RETURN THIS PRODUCT TO THE STORE.
14 Customers) or hoover.ca (Canadian customers...174; Warranty Service Dealer (Depot) by the complete model number when requesting information or ordering parts. (The model number appears on the bottom of authorized service outlet locations call 1-800-944...
Product Manual - Page 30
..., cost of warranty service outlets, phone the Hoover® Consumer Response Center, Phone 1-800-9449200, Mon-Fri 8am-7pm EST. This warranty does not cover pick up, delivery, transportation or house calls. Military Exchange and outside of purchase. During the Warranty Period, Hoover® will provide labor and parts, at www...
Similar Questions

Vacuum Does Not Turn On I Checked For Blocks Everything Is Clear
(Posted by Jabrialiya 4 years ago)

Replace Release Pedak
Bought a replacement release pedal but have no instructions how to replace: Hoover UH70820
Bought a replacement release pedal but have no instructions how to replace: Hoover UH70820
(Posted by langermanmj 9 years ago)

Have A Hoover Windtunnel Rewind Uh70820, Not Sucking But Spinning Air Out. Help
(Posted by jenowens6732 9 years ago)

Brush Turns But The Vacuum Shuts Off
Our platinum will turn on, the brush rotates, then the cleaner shuts off. We replaced the bag, clean...
Our platinum will turn on, the brush rotates, then the cleaner shuts off. We replaced the bag, clean...
(Posted by dbelbot 10 years ago)

My Vacuum Will Not Pick Up What Could Cause This
(Posted by Anonymous-125923 10 years ago)