Hoover UH70820 Support Question
Hoover UH70820 Support Question
Find answers below for this question about Hoover UH70820.Need a Hoover UH70820 manual? We have 1 online manual for this item!
Question posted by Jabrialiya on April 4th, 2020
Vacuum Does Not Turn On I Checked For Blocks Everything Is Clear
The person who posted this question about this Hoover product did not include a detailed explanation. Please use the "Request More Information" button to the right if more details would help you to answer this question.
Current Answers
Answer #1: Posted by Troubleshooter101 on April 5th, 2020 5:13 AM
Troubleshooter101

Member since:
September 30th, 2015 Points: 2,927,030

Member since:
September 30th, 2015 Points: 2,927,030
Device Not Turning On
Your device is not receiving power.
Device is not plugged inThe devices cord has a limited length and can be pulled out of the outlet. Check to see if the plug has been pulled and plug it back in. The device should now turn on.
May have blown a fuseCheck to see if the outlet is working if other electronics are not receiving a charge from the outlet, then the fuse is blown. If this is the case, go to the fuse box and turn the fuse, for which outlet the device is plugged into, off and then back on. This resets the fuse and now the device should turn on.
Please check this link below:-
https://www.ifixit.com/Wiki/Hoover_WindTunnel_2_Rewind_Troubleshooting
Thanks
Please respond to my effort to provide you with the best possible solution by using the "Acceptable Solution" and/or the "Helpful" buttons when the answer has proven to be helpful. Please feel free to submit further info for your question, if a solution was not provided. I appreciate the opportunity to serve you!
Troublshooter101
Related Hoover UH70820 Manual Pages
Product Manual - Page 3
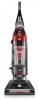
... for additional video instructions for assembly and maintenance. MANUFACTURING CODE
(Label located on back of vacuum)
CONTENTS
Important Safety Instructions 3 Vacuum Assembly 5
Carton Contents 5 Attach Handle 5 Attach Dirt Cup 5 Position Tools 5 How To Use ...6 Vacuum Description 6 On-Off Switch 6 Cord Release 6 Folding Handle 6 Carpet Height Adjustment 7 Tools ...7 Select Proper Tool...
Product Manual - Page 6
... handle plug or appliance with wet hands. • Do not put any object into any opening blocked; keep children away from openings and moving parts. IMPORTANT SAFETY INSTRUCTIONS SAVE THESE INSTRUCTIONS
When using an... such as gasoline, or fine wood sandings, or use in the upright position. • Turn off all parts of body away from product, and do not allow children to whip when ...
Product Manual - Page 7
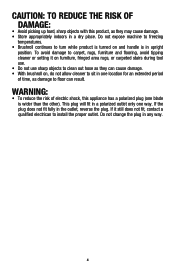
... not change the plug in a polarized outlet only one way. If it on and handle is turned on furniture, fringed area rugs, or carpeted stairs during tool use. • Do not use sharp objects to turn while product is in the outlet, reverse the plug. CAUTION: TO REDUCE THE RISK OF DAMAGE...
Product Manual - Page 10
... Handle* B.
Push down firmly.
1.3 Using a Phillips screwdriver, fasten (1) screw behind handle into vacuum base.
1.2
1.3
ATTACH DIRT CUP
1.4 Place bottom of vacuum as shown.
1.5
1.6
C
A
B
5 Actual model may vary from carton and identify each item shown. Vacuum Base C. Pivot cup into vacuum body first. Wand H. B
C
EG
H
D I . Dirt cup is secure when you hear a click...
Product Manual - Page 11
... tape is visible on the cord, yellow tape will identify when the cord is reached. 2. System Check Indicator
14
13. Cord Release
11
22
19. Do not allow plug to release cord from images ...media
4
12
18
and Carbon Filter* Access
9. Hose Release Button
17
23
22. CAUTION ! To turn vacuum ON,
A
push ON/OFF switch
(A) once. Actual model may vary from cord reel until red tape...
Product Manual - Page 14
... may be used to give extra length to desired height setting.
TOOLS
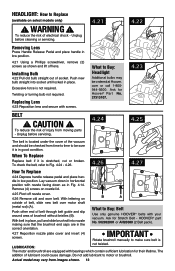
IMPORTANT
Brushroll continues to turn knob to push, push down and turn while product is difficult to the next higher setting.
IMPORTANT
If the vacuum is turned on furniture, fringed area rugs, or carpeted stairs during tool use.
Powered Hand Tool may...
Product Manual - Page 15
...: with these home maintenance tasks as it to a service center prior to back.
Clean forward to continuing use and care of your vacuum will ensure continued cleaning effectiveness.
4.1
A
4.1 The System Check Indicator located at bottom of cord reel.
! Attach the plug
end to prevent the cleaner
from falling, always place cleaner at...
Product Manual - Page 18
Turn cleaner OFF and unplug it locks into vacuum body and press firmly until it from images shown. When using the vacuum for 30 minutes, the thermal ...
NOTICE ! When the thermal protector activates the cleaner will deactivate and cleaning may continue. Clear obstructions if present. 4. Place the vacuum in Fig. 4.3.
4.6 Pull up on dirt cup latch (A) to Clean
Remove dirt ...
Product Manual - Page 19
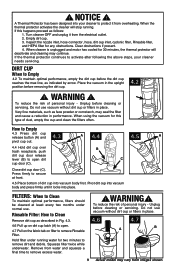
...
When used and maintained properly, your Rinsable Filter should not need to Clean
(Available on vacuum. Ask for Hoover® Part No. 902404001.
Carbon Filter : How to be cleaned from... replacing. Replace dirt cup as described in slots, pull filter frame (A) straight out. Do not use vacuum without dirt cup or filters in place.
4.9
A
4.10
Remove dirt cup as shown in Fig. ...
Product Manual - Page 22
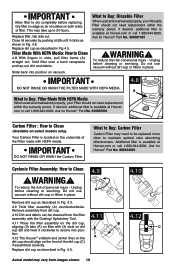
CAUTION !
Clear away debris ...Depress handle release pedal and place handle in Fig. 4.14. Unplug before servicing.
4.18 A
4.18 Turn tool so bottom faces up. To reduce the risk of tool. To lock back into place, push ...14 Pivot off nozzle cover.
4.15 Remove any debris and/ or hair from hose. Lay vacuum down in hortizontal position with nozzle facing down as they can cause damage. Do not use ...
Product Manual - Page 23
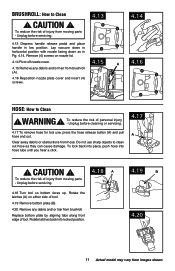
...lens. LUBRICATION:
The motor and brushroll are in low position.
Excessive force is stretched, cut or broken.
Twisting or turning bulb not required. To reduce the risk of lubricant could cause damage. Ask for Stretch Belt - Unplug before cleaning or... time to time to motor or brushroll. To reduce the risk of the vacuum and should be checked from images shown. 12
Product Manual - Page 26
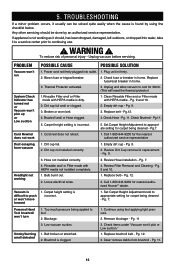
... cup - Remove blockage - PROBLEM POSSIBLE CAUSE
POSSIBLE SOLUTION
Vacuum won't run
System Check Indicator has turned red or Vacuum won 't move forward
1. Replace belt - Brushroll and/...Replace bulb - Pg. 7. Clear/ remove debris from vacuum
1. Any other servicing should , has been dropped, damaged, left outdoors, or dropped into outlet. 1. Check Hose - 5. Call 1-800-...
Product Manual - Page 27

... the service outlet nearest you need further assistance: To speak with a customer service representative call 1-800-944-9200. Do not send your vacuum by :
• Checking the Yellow Pages under "Vacuum Cleaners" or "Household". • Visit our website at hoover.com (U.S. SERVICE
To obtain approved Hoover® service and genuine Hoover® parts...
Similar Questions

Have A Hoover Windtunnel Rewind Uh70820, Not Sucking But Spinning Air Out. Help
(Posted by jenowens6732 9 years ago)

My Vacuum Doesn't Pick Up But Brushes Are Still Rotating. Model Uh70820
(Posted by mokuoke 9 years ago)

Hoover Windtunnel Vacuum Wont Turn On
(Posted by JWSiqra 10 years ago)


My Hoover Windtunnel T-series Pet Rewind Bagless Upright Vacuum Wont Turn On.
I cleaned out underneath and emptied it and it won't turn on. Plugged into different plugs and still...
I cleaned out underneath and emptied it and it won't turn on. Plugged into different plugs and still...
(Posted by megancorgan 11 years ago)