Hitachi CB6YI Support Question
Hitachi CB6YI Support Question
Find answers below for this question about Hitachi CB6YI - 10 Inch Tilting Head Bandsaw.Need a Hitachi CB6YI manual? We have 2 online manuals for this item!
Question posted by davidkeniston on January 2nd, 2012
Bandsaw Replacement Guides
my band saw guides have worn out can i buy new guides without having to replace the whole assembly.
Current Answers

Related Hitachi CB6YI Manual Pages
Instruction Manual - Page 3

...Tilt 0° - 45° Left DUST COLLECTION Yes NET WEIGHT 68LB (30.6 kg)
WARNING
To avoid electrical hazards, fire hazards, or damage to a 120V, 15 AMP branch circuit and use proper circuit protection. Your Band Saw is worn... To reduce your tools.
Use a separate electrical circuit for 120V operation. English
WARNING
Some dust created by power sanding, sawing, grinding, drilling ...
Instruction Manual - Page 4

...keys.
8. All visitors should be properly repaired or replaced.
20. MAKE WORKSHOP CHILDPROOF with the entire Operator's Manual. USE THE RIGHT TOOL. The table on page 6 shows the correct size ...rain. check for which it was not designed.
10.
English
SAFETY
GENERAL SAFETY INSTRUCTIONS
BEFORE USING THE BAND SAW
Safety is a combination of the tool, a guard or other part that is damaged...
Instruction Manual - Page 5
... installed and grounded in any jammed material, turn the saw before operating the band saw . Make sure the table is clear of the electric cord or plug is 1/8 inch above the workpiece.
7.
If it .
3. Bolt the saw run before you are under the blade guard.
13. BLADE GUIDES, SUPPORT BEARINGS, AND BLADE TENSION must be tight...
Instruction Manual - Page 6
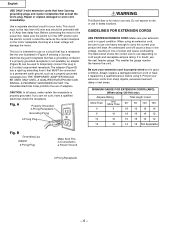
...from it . Protect your product will draw. Repair or replace damaged or worn cord immediately. Fig. An undersized cord will damage the motor...sure to a Known Ground
WARNING
This Band Saw is properly wired and in loss of adapters. Be sure your tools. This circuit must not be less...′ 150′
0
6
18 16 16 14
6
10
18 16 14 12
10
12
16 16 14 12
12
16
14 12 Not Applicable...
Instruction Manual - Page 7

... receptacle during unpacking and assembly. TABLE OF LOOSE PARTS
ITEM DESCRIPTION
BAND SAW:
A.
CARTON CONTENTS
UNPACKING AND CHECKING CONTENTS
Carefully unpack the Band Saw and all its parts, and compare against the illustration following. Band Saw with Motor
B. Pointer
E. Place the saw in until the missing or damaged part is replaced, and assembly is heavy.
Miter Gauge...
Instruction Manual - Page 9
English
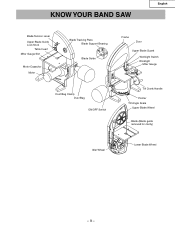
KNOW YOUR BAND SAW
Blade Tension Lever Upper Blade Guide Lock Knob
Table Insert Miter Gauge Slot
Motor Capacitor Motor
Blade Tracking Plate Blade Support Bearing
Blade Guide
Frame
Door
Upper Blade Guard
Worklight Switch Worklight
Miter Gauge
Dust Bag Clamp Dust Bag
ON/OFF Switch
Tilt Crank Handle
Pointer Tilt Angle Scale
Upper Blade Wheel...
Instruction Manual - Page 10

...replaced.
Shows the degree the table is turned on which the workpiece rests while performing a cutting or sanding operation. UPPER GUIDE...Helps keep it after adjusting the upper guide assembly to reduce the thickness of a workpiece. TILT (BEVEL) SCALE -
A cut . ... upper blade guide just clears workpiece before the band saw is tilted for bevel cutting. Removal of the saw blade teeth...
Instruction Manual - Page 11

... plug to increase clamp size.
If predrilled holes do not exist on the shaft (2). 2. Securely mount band saw to work surface, drill four holes. 4. Fig. English
ASSEMBLY AND ADJUSTMENTS
ESTIMATED ASSEMBLY TIME 35 MINUTES
ASSEMBLY INSTRUCTIONS
TOOLS NEEDED
Phillips Screwdriver
Combination Square
INSTALL DUST COLLECTION BAG (Fig. B) Dust collection system consists of the pointer...
Instruction Manual - Page 12

... band saw from tabs on the back of the table slot, take out the released blade and replace with your workpiece. Slip new ...blade into table slot (1) and over the upper, lower and idler blade wheels. Slide blade in the following sections.
3
4
WARNING
To avoid injury, the blade tension, tracking, and upper and lower guides and bearings must be tilted...
Instruction Manual - Page 13

...Do not perform tracking
adjustment while band saw body (1) tilts 0° to the desired angle on the scale (3) on the back of the tool
2
frame is achieved. Open body...saw from the power source before making any adjustments. Tracking plate (1) on
body using crank handle (4). 3. Loosen up socket head bolts (3). Fig. I
3 2 1
4 2
4
UPPER BLADE GUIDE ASSEMBLY (Fig. Tilt...
Instruction Manual - Page 14
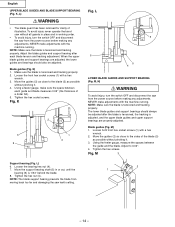
.... NEVER make sure the space between
the guide and the blade.
NOTE: Make sure the blade is tensioned and tracking properly. 2. Fig. English
UPPER BLADE GUIDES AND BLADE SUPPORT BEARING (Fig. NOTE: Make sure the blade is 1/64″ behind the blade. 8. To avoid injury never operate the band saw without pinching it . 4. K
3 2
2
1 3
Fig...
Instruction Manual - Page 15

...a workpiece. A band saw is also used for cutting. It is basically a "curve-cutting" saw OFF (O) push the switch to make sure all parts work , use . Tighten the socket head bolts. O) The... and plan your work before using the band saw . It is
positioned in use of operating the band saw . Remove the key and keep the guide assembly close to prevent unauthorized use .
Do ...
Instruction Manual - Page 16

... this band saw blade. Remove all traces of blade breakage: • Poor guide alignment and adjusting. • Forcing or twisting a wide blade around a short radius. • Feeding too fast. • Dull teeth or not enough set (teeth further apart). When a blade has more set . • Too much blade tension. • Setting top guide assembly too...
Instruction Manual - Page 17

...the guides, or the support bearings. When replacing the tires, stretch them around the wheels but do not use gasoline, naphtha, acetone, lacquer thinner or similar highly volatile solvents to clean the band saw clean.... it is spinning.
- 17 - When the tires become worn they should be using the worklight for an extended time. BAND SAW Sawdust will not be removed with a stiff brush or scraped...
Instruction Manual - Page 18

...technicians. Band saw speeds up. 3. Blade too loose.
2. Dull blade. 4. Replace blade. 1. See SCHEMATIC A,
page 56. See MOTOR TROUBLESHOOTING GUIDE on the blade.
2. Use miter gauge;
Adjust TENSION ROD, Ref. 0053, clockwise to increase tension; Empty dust collection bag. 2. Crooked cuts. Cutting too small a radius.
3. Blade guides not adjusted properly.
4. Blade guide assembly loose...
Instruction Manual - Page 19

...
Faulty motor or capacitor. 1. Faulty motor. 1. see page 6. 5. Check power line for new plug. 5. English
MOTOR PROBLEM
Motor will not start. Motor fails to circuit with
higher rated ...4. Cord, plug, or motor need repair;
Reduce load to your Service Center for repair or
replacement. 1. fuses or tripped circuit breakers). 2. Undersized extension cord. 5.
Take to motor, feed...
Instruction Manual - Page 57

... Link
1
327549 0051 Bracket
1
327550 0052 Soc. Hd. PARTS LIST
10″ Band Saw
ALWAYS ORDER BY PART NO. Bolt
M6*1.0*16
3
Motor
1
Flat Key
4*4*20
1
Washer
1
Strain Relief
1
Tracking Plate
1
Grommet
1
Hex Nut
M12-1.75
1
Set Screw (Headless) M6*10
4
Cam Ass'y
1
Upper Guide Holder Ass'y
1
Knob
1
Part No. Hd. Pan Hd. Bolt
M5...
Instruction Manual - Page 59

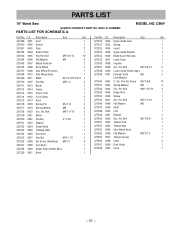
PARTS LIST
10″ Band Saw
ALWAYS ORDER BY PART NO. Hd. Hd. NUMBER
PARTS LIST FOR SCHEMATIC B
MODEL NO. Bolt Flat Washer Dust Bag Bag Clamp Bushing Lock Handle... 327567 327568 327569 327570 327571 327572 327573
I.D. 0001 0002 0003 0004 0005 0006 0007 0008 0009 0010 0011 0012 0013 0014 0015
Description Head Mounting Bracket Base Plate Pointer Ass'y Flat Washer Soc. Bolt Hex Hd.
Parts List - Page 2
...*1.25-20
4
327543 0045 Hinge Pivot
1
327544 0046 Sleeve
1
327545 0047 Soc. PARTS LIST
10″ Band Saw
ALWAYS ORDER BY PART NO. Bolt
M5*0.8-12
16
Flat Washer
M5
5
Wheel Protector
2
Drive ...327521 327522 327523 327524 327525 327526 327527 327528 327529
I .D. Bolt
M5*0.8-10
2
327538 0040 Lower Guide Holder Ass'y
1
327539 0041 External Tooth
M5
2
Lock Washer
327540 ...
Parts List - Page 4

... - Bolt Hex Hd. PARTS LIST
10″ Band Saw
ALWAYS ORDER BY PART NO. CB6Y
Part No. 327559 327560 327561 327562 327563 327564 327565 327566 327567 327568 327569 327570 327571 327572 327573
I.D. 0001 0002 0003 0004 0005 0006 0007 0008 0009 0010 0011 0012 0013 0014 0015
Description Head Mounting Bracket Base Plate Pointer...
Similar Questions

Replacement Part
My Hitachi NR 90GC bail gun fell and the housing case us broken. Where could I buy a replacement
My Hitachi NR 90GC bail gun fell and the housing case us broken. Where could I buy a replacement
(Posted by Trevoreccleston 1 year ago)

That's The Original Hitachi Japonês?
I'm looking for hitachi miter saw 10" japonês original not the metabo you guys have
I'm looking for hitachi miter saw 10" japonês original not the metabo you guys have
(Posted by Pereirafulr 2 years ago)

Hitachi C10ra3 Compatible Blades.
Can I use an 8 inch blade with this saw? If so, can it be for cutting ceramic tile?
Can I use an 8 inch blade with this saw? If so, can it be for cutting ceramic tile?
(Posted by gwoltman 3 years ago)

How To Square The Head On An Hitachi Miter Saw
(Posted by afajab 9 years ago)

Can I Replace My Old Ni Cad Batteries With Some Lithium Ones.
(Posted by jamessmartcarpentry 11 years ago)