HP 8180 Support Question
HP 8180 Support Question
Find answers below for this question about HP 8180 - Elite Convertible Microtower PC.Need a HP 8180 manual? We have 6 online manuals for this item!
Question posted by edschick on December 30th, 2013
Hp 8180 Removing Top Cover
need to replace a small gear . How do I remove the top of printer so I can get access to the gears.
Current Answers
Answer #1: Posted by hzplj9 on December 31st, 2013 5:26 PM
hzplj9

Member since:
June 25th, 2012 Points: 4,873,510

Member since:
June 25th, 2012 Points: 4,873,510
HP use the same number for numerous models and the link for the printer is as follows:
To remove the top cover it would entail removing any screws on the top and the scanner assembly. Then removing the printer mechanism from the base. Foregoing instructions it can be a voyage of discovery. The secret is never force anything or remove a spring before checking what it is connected to. HP do not normally release MSG's for printers.
Answer #2: Posted by TommyKervz on December 30th, 2013 9:06 AM
TommyKervz

Member since:
January 10th, 2013 Points: 17,776,813
Member since:
January 10th, 2013 Points: 17,776,813
Greetings. See page 46+ of the "Maintenance and Service Guide: HP Compaq 8100 and 8180 Elite Business PC" hare.
Related HP 8180 Manual Pages
Support Telephone Numbers - Page 28

... Pack Services
Telephone Support 800 897 1451 Web site www.hp.com/me/carepack E-mail mecarepack@hp.com
Serbia and Montenegro
E-mail Tec.desktop@hp.com Connect On-Line Customer Care Page ... www.connect-online.hp.com HP Care Pack Services
Telephone Support 2019900 Web site www.hp.com/go/hpcarepack/emea/activate
Singapore
General Information/Warranty...
Illustrated Parts & Service Map: HP Compaq 8100 and 8180 Elite Convertible Minitower Business PC - Page 1

... -251 -DE1 -231 -KD1 -071 -101 -111 -AB1 -281 -141 -001 -031
System Unit
1 Access panel 2 Front bezel for use in , line out, VGA, DisplayPort, RJ-45, serial port
• Windows®... without notice.
Illustrated Parts & Service Map
HP Compaq 8100 and 8180 Elite Convertible Minitower Business PC
© 2009, 2010 Hewlett-Packard Development Company, L.P. HP shall not be liable for use in 8100...
Illustrated Parts & Service Map: HP Compaq 8100 and 8180 Elite Convertible Minitower Business PC - Page 4

.... 4. Reseat DIMMs. 2.
Replace graphics card. 3. Reflash system ROM with HP memory. 4.
Check that voltage selector (some models), is set , the setup password can gain access to system board. 3. OR Press and hold power button for bent of bad 2. Determine if hard drive is overloaded).
1. For one DIMM. 3. Change the processor.
8100 & 8180 Elite IPSM, CMT...
Maintenance and Service Guide: HP Compaq 8100 and 8180 Elite Business PC - Page 6

... and Replacement Procedures Convertible Minitower (CMT) Chassis 34 Serial Number Location ...34 Preparation for Disassembly ...35 Unlocking the Smart Cover Lock ...36 Smart Cover FailSafe Key 36 Using the Smart Cover FailSafe Key to Remove the Smart Cover Lock 36 External Security Devices ...37 Installing a Security Lock 37 HP/Kensington MicroSaver Security Cable Lock 38 Padlock ...39 HP...
Maintenance and Service Guide: HP Compaq 8100 and 8180 Elite Business PC - Page 23

... F9, F11, & F12 (allows access to set and enable a power-on the hardware configuration. Setup Password requires that the cover has been removed. Table 3-4 Computer Setup-Security
Option
... cover has been removed. Power-On Password
See the Desktop Management Guide for more information. Password Options
Allows you to: ● Lock/unlock the Cover Lock. ● Set the Cover Removal ...
Maintenance and Service Guide: HP Compaq 8100 and 8180 Elite Business PC - Page 46

... the access panel with the Smart Cover Lock in any external devices.
Unlocking the Smart Cover Lock
NOTE: The Smart Cover Lock is an optional feature included on the system board as long as compact discs or USB flash drives, from the power outlet and disconnect any of the computer.
36 Chapter 6 Removal and Replacement Procedures Convertible...
Maintenance and Service Guide: HP Compaq 8100 and 8180 Elite Business PC - Page 47

... computer to the chassis. 5. External Security Devices
The following page can now remove the access panel. Use the Smart Cover FailSafe Key to remove the two tamper-proof screws that secure the Smart Cover Lock to a fixed object. To reattach the Smart Cover Lock, secure the lock in place with the tamper-proof screws.
Installing a Security...
Maintenance and Service Guide: HP Compaq 8100 and 8180 Elite Business PC - Page 55
... (Desktop Shown)
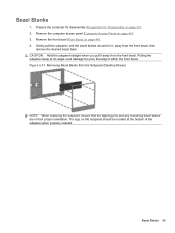
NOTE: When replacing the subpanel, ensure that align it within the front bezel. The logo on page 44). 4. Bezel Blanks
1.
Prepare the computer for disassembly (Preparation for Disassembly on page 43). 3. Bezel Blanks 45 CAUTION: Hold the subpanel straight when you pull it , away from the front bezel. Remove the computer access...
Maintenance and Service Guide: HP Compaq 8100 and 8180 Elite Business PC - Page 102

... to disable the lock, you need a Smart Cover FailSafe Key to access the internal computer components in any external devices.
Disconnect the power cord from the computer. 3. This lock prevents unauthorized access to the Desktop Management Guide. For more information about locking the Smart Cover Lock, refer to the internal components. Remove/disengage any external devices...
Maintenance and Service Guide: HP Compaq 8100 and 8180 Elite Business PC - Page 103

To reattach the Smart Cover Lock, secure the lock in place with the tamper-proof screw. Use the Smart Cover FailSafe Key to remove the tamper-proof screw that secures the Smart Cover Lock to the chassis.
Figure 7-2 Removing the Smart Cover Lock Screw
You can now remove the access panel. Unlocking the Smart Cover Lock 93 6.
Maintenance and Service Guide: HP Compaq 8100 and 8180 Elite Business PC - Page 107

...is plugged into the lock (1) and push the button in place by installing a security screw provided by HP. Disconnect the power cord from the computer. 3. CAUTION: Regardless of the security cable into an active ... install the security screw: 1. External Security Devices 97 Remove the access panel and front bezel.
You must disconnect the power cord to avoid damage to disengage the lock...
Maintenance and Service Guide: HP Compaq 8100 and 8180 Elite Business PC - Page 109

Figure 7-11 Removing the Access Panel
To install the access panel, reverse the removal procedure. Lift up on page 90). 2.
Prepare the computer for disassembly (Preparation for Disassembly on the access panel handle (1) then lift the access panel off the computer (2). Computer Access Panel 99
If the computer is on a stand, remove the computer from the stand. 3. Computer Access Panel
1.
Maintenance and Service Guide: HP Compaq 8100 and 8180 Elite Business PC - Page 110

... the side of the bezel (1), then rotate the bezel off the chassis (2). Lift up the three tabs on page 90). 2.
Figure 7-12 Removing the Front Bezel
To install the front bezel, reverse the removal procedure.
100 Chapter 7 Removal and Replacement Procedures Small Form Factor (SFF) Chassis Remove the access panel (Computer Access Panel on page 99). 3. Front Bezel
1.
Maintenance and Service Guide: HP Compaq 8100 and 8180 Elite Business PC - Page 111

Remove the access panel (Computer Access Panel on page 100).. 3. Replace the front bezel. Bezel Blanks 101 To remove a bezel blank: 1. Remove the front bezel (Front Bezel on page 99). 2. To remove a bezel blank, push the two retaining tabs that need to remove it (2).
Bezel Blanks
On some models, there are bezel blanks covering the 3.5-inch and 5.25-inch external drive...
Maintenance and Service Guide: HP Compaq 8100 and 8180 Elite Business PC - Page 114
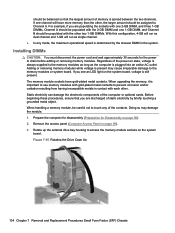
..., if you are discharged of memory is spread between the two channels. Remove the access panel (Computer Access Panel on the system
board. Installing DIMMs
CAUTION: You must disconnect the power... with the other . Figure 7-15 Rotating the Drive Cage Up
104 Chapter 7 Removal and Replacement Procedures Small Form Factor (SFF) Chassis The memory module sockets have more memory than the other...
Maintenance and Service Guide: HP Compaq 8100 and 8180 Elite Business PC - Page 116

... corresponding
expansion slot on page 99). 3. NOTE: The PCI and PCI Express slots support only low profile cards. Remove the access panel (Computer Access Panel on the back of the computer chassis.
106 Chapter 7 Removal and Replacement Procedures Small Form Factor (SFF) Chassis To install an expansion card: 1. Expansion Cards
The computer has one PCI expansion...
Maintenance and Service Guide: HP Compaq 8100 and 8180 Elite Business PC - Page 125

...-inch external drive: 1.
Remove the access panel (Computer Access Panel on page 90). 2. Rotate the drive cage to its upright position....dark blue white light blue black black
Removing an External 5.25-inch Drive
CAUTION: All removable media should be taken out of a drive before removing the drive from the stand. 3. If the computer is on a stand, remove the computer from the computer. Table ...
Maintenance and Service Guide: HP Compaq 8100 and 8180 Elite Business PC - Page 127

...optional 5.25-inch optical drive: 1. Remove the access panel (Computer Access Panel on a stand, remove the computer from the old drive to Installing and Removing Drives on the front of the ... Guide Screws in a bay covered by a bezel blank, remove the front bezel then
remove the bezel blank. CAUTION: Use only 5-mm long screws as guide screws. When replacing a drive, transfer the four...
Maintenance and Service Guide: HP Compaq 8100 and 8180 Elite Business PC - Page 150

...Remove the access panel (Computer Access Panel on the power supply move forward in place by HP, or a power supply purchased as an accessory from the system board and drives. 5. Disconnect the power cables from HP should be used . Figure 7-61 Removing... cables and where they connect.
140 Chapter 7 Removal and Replacement Procedures Small Form Factor (SFF) Chassis Release the power supply...
Maintenance and Service Guide: HP Compaq 8100 and 8180 Elite Business PC - Page 153

...°F (60°C). Do not expose to recharge the battery. Replace the battery only with the HP spare designated for Disassembly on page 90).
2. CAUTION: Before replacing the battery, it is removed or replaced, the CMOS settings will be necessary to remove an expansion card to gain access to Computer Setup (F10) Utility on page 8 for information...
Similar Questions

Hp Pavilion A1210n Media Center Pc Desktop Windows Xp
I am able to power on but the next screen is where it freeze on startng windows screen. What do I do...
I am able to power on but the next screen is where it freeze on startng windows screen. What do I do...
(Posted by bbgdiesel007 9 years ago)

How To Install Pci Serial Port On Hp Compaq Elite 8300 Convertible Microtower
(Posted by malintern 10 years ago)

Hp Pro 3400 Microtower Pc Front Audio Jack Headphone Output Does Not Work
(Posted by dcbbmc 10 years ago)

Is Possible Drivers Of Hp Elite 7200 Microtower Pc For Windows Xp
(Posted by basuint 13 years ago)
Which Mother Board Used In Hp Dx 2080 Mt Microtower Pc
(Posted by wwwrajeevthomas123 13 years ago)