HP 6715s Support Question
HP 6715s Support Question
Find answers below for this question about HP 6715s - Notebook PC.Need a HP 6715s manual? We have 29 online manuals for this item!
Question posted by chip28904 on September 3rd, 2012
Power-on-password
How con I remove a Power-on Password on my Compaq 6715s?
It has nothing to do with removing the CMOS-Battery.
Raimund
Current Answers


Related HP 6715s Manual Pages
HP Business Notebook PC - Getting Started - Enhanced for Accessibility - Windows Vista - Page 1
Enhanced for Accessibility Getting Started
HP Business Notebook PC
Document Part Number: 435816-001
March 2007 This guide explains how to set up your hardware and software, and begin using the computer in Windows®.
HP Business Notebook PC - Getting Started - Enhanced for Accessibility - Windows Vista - Page 2
... as constituting an additional warranty. HP shall not be liable for HP products and services are common to change without notice. Getting Started HP Business Notebook PC First Edition: March 2007 Document Part Number: 435816-001
Product notice This user guide describes features that are set forth in the express warranty statements...
HP Business Notebook PC - Getting Started - Enhanced for Accessibility - Windows Vista - Page 30

Getting Started
3-9 Then, in the loss of the screen, click the Power button.
■ Press and hold the power button for at least 5 seconds. ■ Disconnect the computer from external power and remove
the battery.
Next steps
If you are unable to turn off the computer with these procedures, try the following emergency shutdown procedures in...
HP Business Notebook PC - Getting Started - Enhanced for Accessibility - Windows Vista - Page 35

...to the touch while it may be sure to keep all vents free from external power and remove
the battery. But if the computer feels unusually warm, it is blocked. It is overheating...emergency shutdown procedures will result in the loss of the screen, click the Power button.
■ Press and hold the power button for at least 5 seconds. ■ Disconnect the computer from obstructions...
Drives - Windows Vista - Page 13

... through the operating system. Unplug the power cord from the computer. 7.
Do not remove the hard drive while the computer is off or in Hibernation, turn the computer on , in the Sleep state, or in Hibernation. Then shut down the computer and close the display. 3. Remove the battery from the AC outlet. 5. Loosen the...
Drives - Windows XP - Page 13
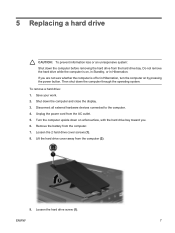
... drive: 1. Unplug the power cord from the computer. 7. Loosen the 2 hard drive cover screws (1). 8. 5 Replacing a hard drive
CAUTION: To prevent information loss or an unresponsive system: Shut down the computer through the operating system. Remove the battery from the AC outlet. 5. ENWW
7 If you . 6. Disconnect all external hardware devices connected to the computer...
Memory Modules - Windows Vista - Page 7
... the keyboard. WARNING! Before beginning any procedure, touch a grounded metal object to be upgraded by adding a memory module to the equipment, unplug the power cord and remove all batteries before installing a memory module. To reduce the risk of the computer can damage electronic components. ENWW
1 The primary memory module compartment is located on...
Memory Modules - Windows Vista - Page 8
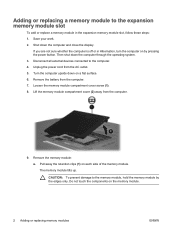
... your work. 2. Unplug the power cord from the computer.
9. Lift the memory module compartment cover (2) away from the AC outlet. 5. The memory module tilts up. Then shut down the computer and close the display. Do not touch the components on a flat surface. 6. Remove the battery from the computer. 7.
Remove the memory module: a. Adding or...
Memory Modules - Windows Vista - Page 11
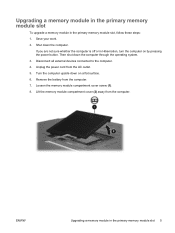
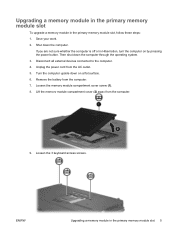
... these steps: 1. Upgrading a memory module in the primary memory module slot
To upgrade a memory module in the primary memory module slot 5 Unplug the power cord from the computer. 7. Remove the battery from the AC outlet. 5. Loosen the memory module compartment cover screw (1). 8.
Lift the memory module compartment cover (2) away from the computer. If...
Memory Modules - Windows XP - Page 7
... memory module compartments. Before beginning any procedure, touch a grounded metal object to be upgraded by adding a memory module to the equipment, unplug the power cord and remove all batteries before installing a memory module. The primary memory module compartment is located on the bottom of electric shock and damage to the vacant expansion memory...
Memory Modules - Windows XP - Page 8

Remove the battery from the computer.
9. Pull away the retention clips (1) on the memory module.
2 Chapter 1 Adding or ...cover (2) away from the computer. 7. The memory module tilts up. Then shut down on by the edges only. Remove the memory module: a. Unplug the power cord from the AC outlet. 5.
CAUTION: To prevent damage to the expansion memory module slot
To add or replace...
Memory Modules - Windows XP - Page 11
... slot, follow these steps: 1. Turn the computer upside down on by pressing the power button. Lift the memory module compartment cover (2) away from the AC outlet. 5. Unplug the power cord from the computer.
9. Loosen the 3 keyboard access screws.
Remove the battery from the computer. 7. Then shut down the computer. Shut down the computer through...
Notebook Tour - Windows Vista - Page 11
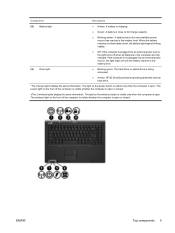
... when the computer is open or closed . Component (8) Battery light
(9) Drive light
Description
● Amber: A battery is charging.
● Green: A battery is close to full charge capacity.
● Blinking amber: A battery that is not plugged into an external power source, the light turns off until the battery reaches a low battery level.
● Blinking green: The hard drive...
Notebook Tour - Windows Vista - Page 12

... front of the computer is visible whether the computer is being accessed.
*The 2 power lights display the same information. When the battery reaches a critical battery level, the battery light begins blinking rapidly.
● Off: If the computer is plugged into an external power source, the light stays off .
(3) Caps lock light
On: Caps lock is...
Notebook Tour - Windows Vista - Page 16

... or optical drive is being accessed.
● Amber (select models only): HP 3D DriveGuard has temporarily parked the hard drive. Front components
Component (1) Wireless light (2) Power light
(3) Battery light
(4) Drive light (5) Speakers (6) Display release latch
Description
● On: An integrated wireless device, such as a wireless local area network (WLAN) device, the HP...
Notebook Tour - Windows XP - Page 11

... close to full charge capacity.
● Blinking amber: A battery that is open or closed . When the battery reaches a critical battery level, the battery light begins blinking rapidly.
● Off: If the computer is plugged into an external power source, the light stays off when all batteries in the computer are fully charged. The light on the...
Wireless (Select Models Only) - Windows Vista - Page 14

... 3. Remove the battery. 7. Disconnect all external devices connected to the connectors, use minimal force when inserting a SIM. Replace the battery. Turn on by pressing the power button. If you . 6. Turn the computer upside down the computer. NOTE: HP Broadband Wireless will be disabled if the battery is firmly seated.
8. Reconnect external power. 10. Unplug the power cord...
Wireless (Select Models Only) - Windows Vista - Page 15
... to the computer. 4. Turn the computer upside down on the computer. Reconnect external power. 10. ENWW
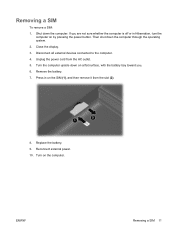
Removing a SIM 11 Close the display. 3. Removing a SIM
To remove a SIM: 1. Then shut down the computer. If you . 6. Remove the battery. 7. Turn on a flat surface, with the battery bay toward you are not sure whether the computer is off or in...
Wireless (Select Models Only) - Windows XP - Page 14
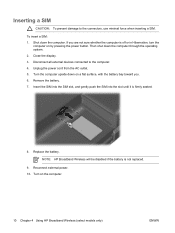
... upside down the computer through the operating system. 2. Disconnect all external devices connected to the connectors, use minimal force when inserting a SIM. Close the display. 3. Remove the battery. 7. Unplug the power cord from the AC outlet. 5. Inserting a SIM
CAUTION: To prevent damage to the computer. 4. To insert a SIM: 1. Shut down the computer.
Wireless (Select Models Only) - Windows XP - Page 15

.... 5. Disconnect all external devices connected to the computer. 4. Then shut down the computer through the operating system. 2. Reconnect external power. 10. Removing a SIM
To remove a SIM: 1. Press in on a flat surface, with the battery bay toward you are not sure whether the computer is off or in Hibernation, turn the
computer on the computer.
Similar Questions


How To Remove Cmos Battery From Hp 2530p
(Posted by edymrwiz 10 years ago)

How To Remove Cmos Battery For Hp Probook 6450b
(Posted by JIJIJIJI 11 years ago)