Hayward EcoStar Support Question
Hayward EcoStar Support Question
Find answers below for this question about Hayward EcoStar.Need a Hayward EcoStar manual? We have 3 online manuals for this item!
Question posted by Anonymous-59323 on May 14th, 2012
Can You Reset The Timers Back To 'off'?
can you reset the timers back to 'OFF' on the SP3400VSPVR?
Current Answers
Related Hayward EcoStar Manual Pages
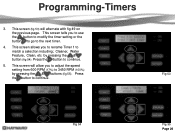
EcoStar Manual - Page 17
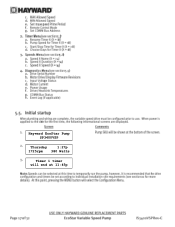
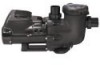
Hayward EcoStar Pump SP3400VSP
Thursday
1:27p
1725rpm 380 Watts
Timer 1 timer will end at 11:45p
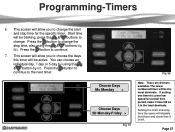
EcoStar Manual - Page 19

Press + to enter
Timer 1 1725rpm --- for yes; - Press > next timer
T1: Timer 1 +/- rename; Off --- adjust;
Reset all parameters + for yes; > to skip
Are you sure? + for no
Use Timers Menu to set timeclocks. times >
Timer 1 1725rpm --- Off --- Timer Menu Press > to change;
speed >
Timer 1 1725rpm +/-
Technical Guide - Page 4

... exceed the capacity of pipe (L) between pump suction port and first elbow or fitting should be at least 5 times pipe size. Existing Pools: When installing the EcoStar on a new pool, care should be taken to ensure proper pipe and equipment sizing to equipment manuals for flow rates.
3" 184gpm 8fps 138gpm 6fps
Figure 1
Page...
Technical Guide - Page 7

... Voltage
High Voltage Wiring terminals (L1 & L2)
1. Ground Wire Terminal. Installation -
Breaker, wire size would be connected first. Note: When connecting high voltage for an EcoStar that is data connected to a Hayward/Goldline control, voltage needs to come directly from a breaker in the control, or in the case of an OnCommand...
Technical Guide - Page 8

Remove the two screws as shown (fig 7, 9, 10 & 11) and re-secure with the two screws
(fig 7). Figure 7
Figure 8
Figure 9
Figure 10
Figure 11 Page 6 Installation-Interface removal/positioning
The interface assembly on the EcoStar can be configured in
four different positions.
1. Reposition interface assembly as shown (fig 7).
2. Remove the interface assembly as shown (fig 8).
3.
Technical Guide - Page 9

Installation-Interface /Wall mount
1. Plug is included with the EcoStar and includes blank cover, mounting bracket and new terminal block for wall mount or control connection.
2. Wall mount kit is permanently attached (fig 13), install ...
Technical Guide - Page 12

...to point. Note: When connecting high voltage for data cable The data cable needs to operate the EcoStar Aqua Logic/Pro Logic/Aqua Plus v2.65 or higher OnCommand 1.00 or higher
E-Command 4 (... as those shown as long as shown (fig 22 & 23).
panel and not from
4 on
7
EcoStar is data connected to a Hayward/Goldline control, voltage
needs to 1 on Remote
display to come directly from...
Technical Guide - Page 15

... can be controlled.
As shown by the charts, the number of speeds available depends on the number of 2 speeds
Filter Pump Relay
1st Aux (1)
Timer 1 Speed
On
Off
Timer 2 Speed
On
On
Fig 28
Page 13 Installation-Relay Connected Controls
(Non Hayward/Goldline compatible software & third party controls)
5. Filter pump relay plus...
Technical Guide - Page 17

...94%
Display Screen
Fig 30
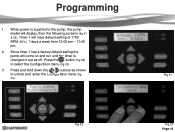
MENU/NAVIGATION BUTTONS
The button will illuminate once the timers have been programmed., even if the pump is not
running. The & buttons
are used to max set speed for ...cleaning. TIMERS ACTIVE LED
LED will scroll through the setup menus when pressed. Unprotected
mode requires manual ...
Technical Guide - Page 18
...to unlock and enter the Configuration menu (fig
33).
Fig 31
Fig 32
Fig 33 Page 16 Since timer 1 has a factory default setting the pump will have default setting of 1750 RPM (50%), 7 days ..., the pump model will display, then the following screens (fig 31 & 32). Timer 1 will come on and run until the timer is supplied to select the Configuration menu (fig 33).
3. Press and hold down the ...
Technical Guide - Page 24
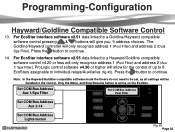
... the Hayward/Goldline compatible software mode the timers do not need to continue. ProLogic control software v4.30 or higher will allow for the control of up to 8 EcoStars assignable to a Goldline/Hayward compatible software control pressing & buttons will only recognize address 1 (Pool Filter) and address 2 (Dual Spa Filter). Only the Menu, and Stop...
Technical Guide - Page 25

... asked to enable or disable the Low Temp Operation (Default is 1000 rpm (29%). Press the button to continue.
16. Setting will turn on the EcoStar, if stopped, to set the Low Temp Speed ( fig 47). Enabling this screen you will be adjusted between 35.6 and 50º F. Press the button...
Technical Guide - Page 26

... the next to program. There will be a screen telling you have an HCP3400VSP or HCP3400VSPVR commercial EcoStar please refer to page 39 for directions on the next screen.
If no, press the button to... Control or the Stand alone feature is being used the timer menus would like to reset to the default parameters (factory settings ) (fig 49). Programming-Configuration
If you to use the...
Technical Guide - Page 27

...All speed settings in Configuration.
1. Press the button to continue.
2. Fig 51
Fig 52 Page 25
Timer 1 can be set to 1725 rpm (50%), 7 day operation from 12 am to 11:45 pm (fig 52).
...Compatible Software controller:
No timer or speed settings necessary.
Com bus address needs to be set. This is used to run the ...
Technical Guide - Page 28
... screen will alternate with fig 49 on the previous page. Fig 53
Fig 54
Fig 55 Page 26 This screen tells you to rename Timer 1 to 3450 RPM (100%) by pressing the & button (fig 54). Press the button to continue.
5. Cleaner, Water Feature, Clean, etc by pressing the & buttons (fig ...
Technical Guide - Page 29
... the least dominate.
Setting the start and stop time, also using the & button (fig 57).
This screen will allow you to choose the days this timer will allow you to change the start and stop time the same will be the most dominate. Press the button to the next...
Technical Guide - Page 32
...
Drive Error SVRS Trip
alternate during configuration, prior to operate as long as one of the timer settings matches the current time.
2. In Auto Prime, pump will show "Prime Failed" if...When the Low Temp Operation is not achieved within 15 minutes.
4. If the EcoStar you will not start unless one or more timers are using is an SVRS model and there is running.
5. Operation
1. ...
Technical Guide - Page 34

.... Goes back to meet spa jet or any water feature requirement. Page 32
Speed settings can be set over each other words, timer 1 will override timer 8 settings if they are set to
timer 8 speed at 3 pm.
In other .
9 am 12 noon
1 pm 3 pm
5:45 am
Timer 1: At 9 am
The lower the timer number the higher the...
Technical Guide - Page 48

EcoStar is tripping. Control reads "Pool bridge comm"
This indicates interference on , the
pump will ramp up and down in speed...not, replace motor. Troubleshooting/Fault Codes
Code/Fault
Indications
Warning NO Comm
Inspect the data wire between the control and EcoStar. Page 46 This is caused by frequency noise emitted from the display and re-connect. Disconnect the wires from the...
Technical Guide - Page 49

...The %/rpm reading does not match between GL/Hayward control and EcoStar.
The pump comes on control display. wires between the
pump interface and the control
... GL/Hayward control. Control reads "Pool bridge comm." EcoStar is connected and configured to variable speed . Page 47 Troubleshooting/Fault Codes
Code/Fault
Indications
EcoStar is connected and operating via GL/...
Similar Questions

I Recently Lost Power, Now My Ecommand 4 Panel Will Not Turn My Pump On.
I can only turn the pump on and off with the panel breaker. The panel is no longer controlling the p...
I can only turn the pump on and off with the panel breaker. The panel is no longer controlling the p...
(Posted by karenmonroelvnv 9 years ago)

How To Reset Default Settings On Hayward Ecostar Pool Pump
(Posted by ronaqw 10 years ago)


Dual Pool Spa System But The Settings Menu Doesn't Show Pool Heater Only Spa Hea
(Posted by Anonymous-39619 12 years ago)