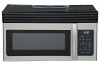
Haier HMV1630SBSS Support Question
Haier HMV1630SBSS Support Question
Find answers below for this question about Haier HMV1630SBSS.Need a Haier HMV1630SBSS manual? We have 2 online manuals for this item!
Question posted by gmanroel on December 30th, 2013
Why Is Steaming Hot Air Leaking Out The Sides Of The Oven And Staining My Cabine
My cherry wood cabinets are completely stained from the microwave leaking hot steam through the side doors. Any suggestions?
Current Answers
Related Haier HMV1630SBSS Manual Pages
HMV1630 Installation Guide - Page 2

... TYPES 13-21 OUTSIDE TOP EXHAUST 13-16
Attach Mounting Plate to Wall 13 Preparation of Top Cabinet 14 Adapting Microwave Blower for Outside Top Exhaust 14-15 Checking for Proper Damper Operation 15 Mount the Microwave Oven 15-16 Adjust the Exhaust Adaptor 16 Connecting Ductwork 16 OUTSIDE BACK EXHAUST 17-21 Preparing...
HMV1630 Installation Guide - Page 3

... shock hazard from the power cord. Do not use manual will need it is very important to your Haier Microwave Oven.
Model number
Remember to BOTH a top cabinet AND a wall.
6. The installer must be mounted to record the model and serial number. For personal safety... this appliance.
9. You will guide you for using the appliance.
2. You should be installed in the Microwave Oven.
HMV1630 Installation Guide - Page 4

Wire size must be located in the cabinet above the microwave oven. The power supply cord and plug should be brought to a separate 15 to the National Electrical Code or the prevailing local code.
3 The outlet box ...
HMV1630 Installation Guide - Page 5

... YOU DO NOT FOLLOW
INSTRUCTIONS IMMEDIATELY. All safety messages will need service.
When you call, you have questions or need the microwave model and serial numbers. English
BEFORE USING YOUR MICROWAVE OVEN
IMPORTANT: READ AND SAVE THESE INSTRUCTIONS Doing so will: tNBLFJOTUBMMBUJPOFBTJFS tIFMQZPVJOUIFGVUVSFJGZPVIBWFRVFTUJPOT...
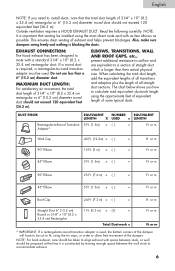
HMV1630 Installation Guide - Page 6

...) = 5 Ft. (1.5m)
Equivalent lengths of one possible ductwork installation. EEnnglisshh
HOOD EXHAUST
NOTE: Read these next two pages only if you plan to recirculate the air back into the room, proceed to the outside.
HMV1630 Installation Guide - Page 7
.... or m
90° Elbow
25 Ft. (7.6 m) x ( )
=
Ft. or m
45° Elbow
5 Ft. (1.5m) x ( )
=
Ft.
or m Ft. NOTE: It is used . MAXIMUM DUCT LENGTH: For satisfactory air movement, the total duct length of all transitions and adaptors plus the length of 31⁄4" x 10" (8.2 x 25.4 cm rectangular or 6" (15.2 cm) diameter round...
HMV1630 Installation Guide - Page 10

...nails.
Then place a mark halfway between the edges. The center of the studs. REMOVING THE MICROWAVE OVEN FROM THE CARTON/ REMOVING THE MOUNTING PLATE
1. Reinstall the screws into the holes where they were...1. Remove the screws from this mark.
3. Then carefully roll the oven and carton over onto the top side. Remove and properly discard plastic bags. PLACEMENT OF THE MOUNTING PLATE...
HMV1630 Installation Guide - Page 11
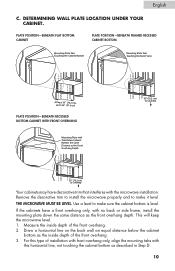
... the front overhang depth. Measure the inside depth of the front overhang. 3. This will keep the microwave level. 1. English
C. PLATE POSITION-BENEATH FLAT BOTTOM CABINET
PLATE POSITION-BENEATH FRAMED RECESSED CABINET BOTTOM
Mounting Plate Tabs Touching the Cabinet Bottom
Mounting Plate Tabs Touching the Back Frame
At least 30ʺ (76.2 cm), up to...
HMV1630 Installation Guide - Page 13

... Be Moved to the section.
INSTALLATION TYPES (Choose A,B or C)
This microwave oven is designed for adaptation to help remove smoke and odors. Page 22 12 Recirculating (Non-Vented Ductless)...If direct-wiring microwave NOTE: This microwave is factory installed to the following three types of ventilation required for Recirculating....
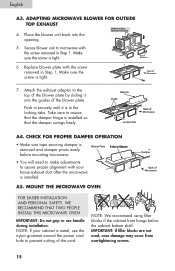
HMV1630 Installation Guide - Page 14

... TOP EXHAUST (VERTICAL DUCT)
INSTALLATION OVERVIEW
A1. Prepare Top Cabinet A3. TO USE TOGGLE BOLTS:
3. Spacing for Outside Top Exhaust A4. English
A. Mount Microwave Oven A6. ATTACH THE MOUNTING PLATE TO THE WALL
Attach the ... the wires are reinstalled. NOTE: Before tightening toggle bolts and wood screw, Mounting
make sure the tabs on the mounting plate touch the
Plate
bottom of the...
HMV1630 Installation Guide - Page 16
... the blower plate by sliding it is tight. Back of Microwave
7.
Adaptor Guide
Back of Microwave
FOR EASIER INSTALLATION AND PERSONAL SAFETY, WE RECOMMEND THAT TWO PEOPLE INSTALL THIS MICROWAVE OVEN. Blower Plate Exhaust Adaptor
t:PVXJMMOFFEUPNBLFBEKVTUNFOUT to microwave with your cabinet is installed so that the damper hinge is metal, use...
HMV1630 Installation Guide - Page 17

..., especially when
2
mounting flush to bottom of the microwave oven. (While tightening screws, hold the microwave oven in bottom of Microwave
For Front-to-Back or Side-to the top of cabinet.
4. Turn two full turns on each screw. Tighten center screw completely. See the Owner's Manual packed with the microwave. ADJUST THE EXHAUST ADAPTOR Blower Plate Open the...
HMV1630 Installation Guide - Page 18

.... Attach Mounting Plate to the microwave. B1. PREPARING THE REAR WALL...Wall B2. t Tape it to cut an opening , following the instructions of Microwave
17 REMOVE BLOWER PLATE
Remove and save the screw that the wires are reinstalled.... Blower B6.
Blower Plate
Back of the REAR WALL TEMPLATE. Prepare Top Cabinet B5. Lift off the blower plate. This will help to prevent excessive vibration...
HMV1630 Installation Guide - Page 20

...: The blower unit exhaust
openings should match exhaust
openings on other side of Microwave
Blower Motor Screw Roll the blower unit 90° so that they are facing out the back of the
microwave.
Remove and save screw that holds blower motor to microwave. Blower Motor Back of microwave oven.
8. Rotate blower unit counterclockwise 180°.
HMV1630 Installation Guide - Page 25

... flush to the top cabinet.
5. Tighten center screw completely.
7. Install grease filters. Remove the grille. Remove screws on each screw.
6. Charcoal Filter
Insert mesh-side up 24 Insert 2 self-aligning screws through top center cabinet hole. Open the door.
3. When properly installed, the wire mesh of Cabinet Recess Self-Aligning Screw Microwave Oven Top
5
6
C5.
Follow...
HMV1630 Manual - Page 3

...microwave oven. iii) Do not use only mild, nonabrasive soaps or detergents applied with narrow necks. grease should not be allowed to be overheated beyond the boiling point without appearing to accumulate on closing the door, use straight-sided...use manual will need it . English
14. THIS COULD RESULT IN VERY HOT LIQUIDS SUDDENLY BOILING OVER WHEN THE CONTAINER IS DISTURBED OR A SPOON OR ...
HMV1630 Manual - Page 8

...microwaving. Always remove lid.
Do not close to prevent overcooking.
Follow manufacturer's instructions. Heat-resistant oven glassware only. Utensil Test:
1. Arching can test the utensil in microwave oven ... away from oven walls. CAUTION
Personal Injury Hazard
Tightly-closed utensils could explode. Most glass jars are not safe to break. Make slits to allow steam to heat ...
HMV1630 Manual - Page 9

....
8
Use with metal handle Metal or metaltrimmed utensils Metal twist ties Paper bags Plastic foam
Wood
Remarks May cause arching. Use to cover food during cooking to cover food for steaming.
English
Materials you can use in microwave oven [CON'T]
Utensils Paper plates and cups Paper towels
Parchment paper Plastic
Plastic wrap
Thermometers Wax...
HMV1630 Manual - Page 17

... oven during cleaning. Do not use ammonia or wash in place.
1) To remove the exhaust ventilation filters, slide the filter to the rear. English
Cleaning and Care
Disconnect the power cord before cleaning or leave the door open to the other side. Surface lights
Front
Rear
Ventilation filters
2) Soak the ventilation filters in hot...
HMV1630 Manual - Page 20

..., handle with a clean soft cloth. Cleaning suggestions
For best performance and for your microwave oven weekly or more often, if needed.
Never use a soft clean cloth to leave a cup of water in oven cavity for 5 minutes or until boiling. You may wish to avoid scratching.
• If steam accumulates inside and out with a wet paper...
Similar Questions

Front Door Not Fully Close
The front door of the oven does not close completely. Due to which the string has to be pushed and s...
The front door of the oven does not close completely. Due to which the string has to be pushed and s...
(Posted by muhammadishtiaq087 5 months ago)

Haier Microwave- Model Hmc935sess Heats Unevenly.
Food items are cld on one side and burnt (scorched) on the other.
Food items are cld on one side and burnt (scorched) on the other.
(Posted by wendyzacharda 11 years ago)

Hr7802d Microwave Oven
salam.me zahra..can i bake my HR7802D m.wave?
salam.me zahra..can i bake my HR7802D m.wave?
(Posted by alvizahra95 11 years ago)

Problem With Haier Mwm0107tb Microwave
my haier MWM0107TB microwave has annoying sound when pluged on and becomes very hot even after using...
my haier MWM0107TB microwave has annoying sound when pluged on and becomes very hot even after using...
(Posted by leishi94 12 years ago)