Haier A642F Support Question
Haier A642F Support Question
Find answers below for this question about Haier A642F.Need a Haier A642F manual? We have 1 online manual for this item!
Question posted by wyliesteve on December 4th, 2013
How To Remove Tv Stand To Wall Mount Tv
how do I remove the tv stand so I can now wall mount the tv
Current Answers
Related Haier A642F Manual Pages
User Manual - Page 2

CONTENTS
IMPORTANT SAFETY INSTRUCTIONS p.01 REMOTE CONTROL p.03 KNOW YOUR MACHINE p.06 WALL MOUNTING p.08 ANTENNA CONNECTION p.10 TUNING MENU OPTIONS p.11 OTHER CONNECTIONS p.13 BASIC OPERATION p.18 MENU OPERATION p.22 TELETEXT...p.35 COMMON INTERFACE MODULE p.37 OAD OPERATION p.39 TROUBLESHOOTING p.40 SPECIFICATIONS p.41 APPENDIX...p.42 INFORMATION p.44 PRODUCT GUARANTEE p.46
User Manual - Page 3
... from the unit, switch it off, unplug it from the
wall socket and contact your dealer or service center. • Place the TV in such a position that the Voltage on the apparatus. •...
WARNING
• Misuse or modification of this appliance to have
soft indirect lighting whilst watching TV.
Avoid dark environments and screen reflection as vases, shall be placed on the rating plate ...
User Manual - Page 5
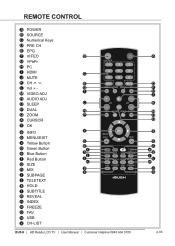
... D PRE CH E EPG F VI'EO G YPbPr H PC I
L
N P
Y
b d hf
j l
n p x
EPG YPbPr
Vol DUAL
MENU /EXIT
INFO
FAV CH-LIST USB FREEZE
D F H J
K
M O Q
X
a c eg i k m o q
BUSH | HD Ready LCD TV | User Manual | Customer Helpline 0845 604 0105
p.03 L Vol + M VIDEO ADJ N AUDIO ADJ O SLEEP P DUAL Q ZOOM X CURSOR Y OK
a INFO
b MENU/EXIT
c Yellow Button
d Green Button...
User Manual - Page 6

...Do not use . fig. 1
REMOTE CONTROL
1. Otherwise it may result in the device.
See fig. 2.
Remove the battery from the Remote Control. Please read the following instructions and handle the remote cont.
• Do .... See fig. 1.
2.
p.04
BUSH | HD Ready LCD TV | User Manual | Customer Helpline 0845 604 0105
BU marks correctly aligned. REMOTE CONTROL
NOTES:
-
User Manual - Page 7

... fig. 3. PRECAUTIONS:
To obtain the best performance from your remote control, please consider the following: • Ensure there is no obstruction between
remote control and TV set.
• Bright sunlight may affect the remote control performance.
• Always ensure that both batteries are replaced at the same time. Carefully close the...
User Manual - Page 8

... the on . p.06
BUSH | HD Ready LCD TV | User Manual | Customer Helpline 0845 604 0105
BU B Wall Mount Hole: For wall mount use only. KNOW YOUR MACHINE
1 x LCD TV
Front View
Control Panel
C D E F G H I
W X
A B
Rear Connections
V
Side Connections
J
Rear View
Q R S
U
T
K
L M N
O P
A Power LED: If the LED color is Blue, means the TV set is in standby mode. C Source: Use...
User Manual - Page 9
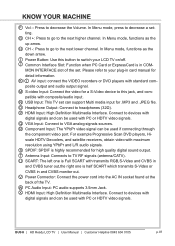
... monitor out. W PC Audio Input: PC audio supports 3.5mm Jack. BUSH | HD Ready LCD TV | User Manual | Customer Helpline 0845 604 0105
p.07 G CH +: Press to go to switch your plug-in...at the back of the set can be used with PC or HDTV video signals.
N USB Input: This TV set . In Menu mode, functions as the up arrow. J Common Interface Slot: Function when PC Card or...
User Manual - Page 10
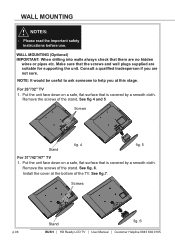
... cloth. Put the unit face down on a safe, flat surface that there are suitable for supporting the unit.
For 26"/32" TV 1. Remove the screws of the stand. WALL MOUNTING (Optional) IMPORTANT: When drilling into walls always check that is covered by a smooth cloth. Put the unit face down on a safe, flat surface that the screws...
User Manual - Page 11
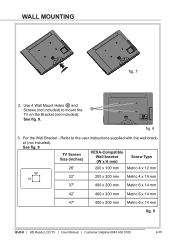
For the Wall Bracket - Refer to mount the B TV on the Bracket (not included). Use 4 Wall Mount Holes B and Screws (not included) to the user instructions supplied with the wall brack- fig. 8
3.
et (not included). WALL MOUNTING
fig. 7
2. See fig. 9
TV Screen Size (inches)
VESA-Compatible Wall bracket (W x H mm)
Screw Type
W H
26"
200 x 100 mm Metric 4 x 12 mm
32"
200 x ...
User Manual - Page 12
... a poor signal area, you may use a signal amplifier a (not included).
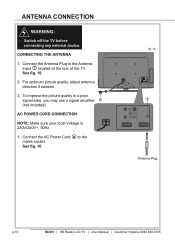
ANTENNA CONNECTION
WARNING:
- See fig. 10
fig. 10 T
Antenna Plug
p.10
BUSH | HD Ready LCD TV | User Manual | Customer Helpline 0845 604 0105
BU
CONNECTING THE ANTENNA
1. AC POWER CORD CONNECTION
NOTE: Make sure your local Voltage is 230V/240V~, 50Hz...
User Manual - Page 13
...fig. 11.
OK Next fig. 13
BUSH | HD Ready LCD TV | User Manual | Customer Helpline 0845 604 0105
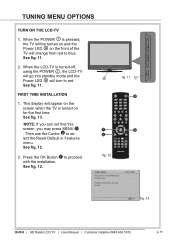
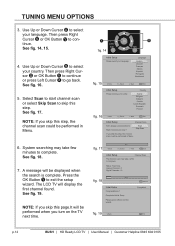
p.11 When the LCD-TV is pressed, the TV will turn to proceed with the installation.
Press the OK Button ...TIME INSTALLATION
1. Then use the Wizard for the first time. A
fig. 11 I , the LCD-TV will go into standby mode and the Power LED A will be turned on and the Power LED ...
User Manual - Page 14
... Congratulations !! EXIT Cancel Completed
fig. 19
Back
OK Exit
p.12
BUSH | HD Ready LCD TV | User Manual | Customer Helpline 0845 604 0105
BU
Scan Skip Scan
If you skip this step...Initial Setup Please select your country. See fig. 17. NOTE: If you turn on the TV next time. Status: Scanning..
TUNING MENU OPTIONS
3. System searching may take few minutes to...
User Manual - Page 15

...
SCART 2 fig. 20
F fig. 21
BUSH | HD Ready LCD TV | User Manual | Customer Helpline 0845 604 0105
p.13 SCART Lead
2.
Switch off the TV before connecting any external device. SCART INPUT
- See fig. 20. B...
3. Plug the scart lead from the external device into TV SCART Socket U . See fig. 21.
SCART 1 -
Half SCART, which transmits RGB, S-...
User Manual - Page 16
...cables to select the
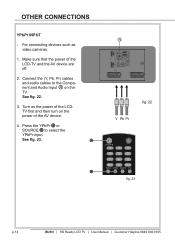
YPbPr input. Turn on the power of the LCDTV first and then turn on the TV.
For connecting devices such as video cameras.
1. See fig. 22.
3. Press the YPbPr G or
...SOURCE B to the Component and Audio Input R on the power of the LCD-TV and the AV device are off.
2. OTHER CONNECTIONS
YPbPr INPUT
- See fig. 23. B
R
fig. 22 Y Pb...
User Manual - Page 17
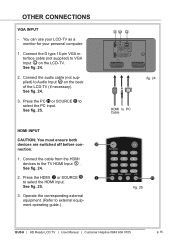
... 15-pin VGA interface cable (not supplied) to VGA Input Q on the back of the LCD-TV (if necessary). Connect the audio cable (not supplied) to PC Cable
HDMI INPUT
CAUTION: You must... or SOURCE B
I
to external equipment operating guide.)
EPG YPbPr
H fig. 25
BUSH | HD Ready LCD TV | User Manual | Customer Helpline 0845 604 0105
p.15 OTHER CONNECTIONS
VGA INPUT
- See fig. 24.
3. ...
User Manual - Page 18
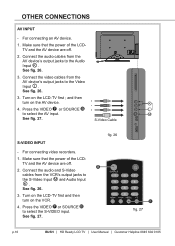
... and the AV device are off .
2.
OTHER CONNECTIONS
AV INPUT
- For connecting an AV device.
1. See fig. 26.
3.
See fig. 26.
3.
Turn on the LCD-TV first ; S-Video Cable
S-VIDEO INPUT
- See fig. 26.
3. Connect the audio cables from the AV device's output jacks to the S-Video Input M and Audio Input K.
User Manual - Page 19
... the speakers will be automatically mute.
BUSH | HD Ready LCD TV | User Manual | Customer Helpline 0845 604 0105
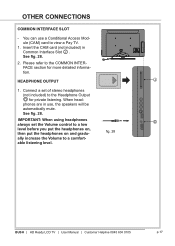
p.17 Please ...control to a comfort- IMPORTANT: When using headphones always set of stereo headphones (not included) to view a Pay TV.
1.
See fig. 28.
2. able listening level. When headphones are in Common Interface Slot J .
OTHER CONNECTIONS...
User Manual - Page 32
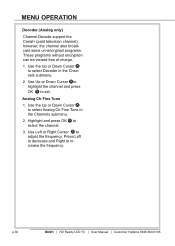
...submenu.
2. Analog Ch Fine Tune
1. Use the Up or Down Cursor X to increase the frequency.
p.30
BUSH | HD Ready LCD TV | User Manual | Customer Helpline 0845 604 0105
BU Use Up or Down Cursor X to highlight the channel and press OK Y to select...be viewed free of charge.
1. MENU OPERATION
Decoder (Analog only)
Channel Decode support the Canal+ (paid television channel);
User Manual - Page 40

... MENU /EXIT
INFO
fig. 65
Picture Sound TV Features Parental
CryptoWorks
OK Enter
EXIT Back
fig. 66
Picture Sound TV Features Parental
No CI card presented. COMMON INTERFACE... MODULE
3. Press OK Y to access the card menu, for more details refer to view the menu options and information on the inserted CI card. When module is removed...
User Manual - Page 43
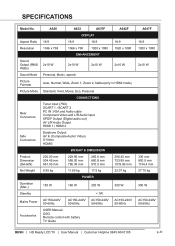
A626
A632
A637F
A642F
DISPLAY
Aspect Ratio 16:9
16:9
16:9
16:9
Resolution 1366 x 768
1366 x 768
1920 x 1080 1920 x 1080
ENHANCEMENT
Sound Output (RMS ...50-60Hz
AC150-240V 50-60Hz
AC150-240V 50-60Hz
AC150-240V 50-60Hz
Accessories
USER Manual QSG Remote control with battery TV Guide
A647F 16:9 1920 x 1080 2x10 W
330 mm 800.5 mm 1134.4 mm 27.75 kg 350 W AC150-240V 50...
Similar Questions

How To Install Tv On Wall....?
I had tv table mounted but I need to install now it on wall what to do..
I had tv table mounted but I need to install now it on wall what to do..
(Posted by dhsamc 5 years ago)

Stand Assembly Unit Required For Bush/haier Lt19m4 19' Tv
Hi, I have been searching for a stand assembly unit for the above tv and cannot find one, I have mis...
Hi, I have been searching for a stand assembly unit for the above tv and cannot find one, I have mis...
(Posted by jeansharpe 10 years ago)

What Screws To Use For Wall Mounting The Above Model Tv!!!!
Hi, I am wanting to wall mount my Bush LT19M4 LED 19inch tv but there is no screws provided to attac...
Hi, I am wanting to wall mount my Bush LT19M4 LED 19inch tv but there is no screws provided to attac...
(Posted by michaelwalsh9947 11 years ago)
Haier L32c300 Lcd Tv Screws For The Stand
Hi I bought this TV but the screws were missing to attach the stand to the TV, please could you advi...
Hi I bought this TV but the screws were missing to attach the stand to the TV, please could you advi...
(Posted by josimpson27187 12 years ago)
