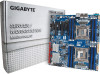
Gigabyte MW70-3S0 Support Question
Gigabyte MW70-3S0 Support Question
Find answers below for this question about Gigabyte MW70-3S0.Need a Gigabyte MW70-3S0 manual? We have 1 online manual for this item!
Question posted by Anonymous-155902 on November 18th, 2015
Can't Find Mw70-3s0 Anywhere.
I have queried every Gigabyte vendor I could find in North America and all were out of stock .Is this a pre-holiday thing, a manufacturing problem, a recall, or what?I have a big old server case with a 1200 watt power supply waiting. The customer is impatient and I need to make a go-nogo decision soon.Thanks for your help!Dan
Current Answers
Answer #1: Posted by TommyKervz on November 19th, 2015 3:48 AM
TommyKervz

Member since:
January 10th, 2013 Points: 17,776,813

Member since:
January 10th, 2013 Points: 17,776,813
Seems it has been discontinued by the manufacture' look for second hand from amazon or ebay: http://www.ebay.de/itm/Gifagabyte-Mainboard-MW70-3S0-Dual-Sockel-2011-3-Intel-C612-16-DIMM-/131636320496
Related Gigabyte MW70-3S0 Manual Pages
Manual - Page 1
MW70-3S0
Dual LGA2011 sockets R3 motherboard for Intel® E5-2600 V3 series processors
User's Manual
Rev. 1001
Manual - Page 2
... following types of this manual may be made by any form or by GIGABYTE without GIGABYTE's prior written permission. No part of GIGABYTE. Disclaimer Information in any means without prior notice. For more information, visit our website at :
http://reseller.b2b.gigabyte.com
https://www.facebook.com/gigabyteserver All rights reserved. The trademarks mentioned...
Manual - Page 3
Table of Contents
Box Contents...5 MW70-3S0 Motherboard Layout 6 Block Diagram...9 Chapter 1 Hardware Installation 10
1-1 Installation Precautions 10 1-2 Product Specifications 11 1-3 Installing the CPU and CPU Cooler 13
1-3-1 Installing the CPU...13 1-3-2 Installing ...
Manual - Page 5
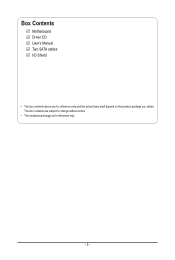
Box Contents
Motherboard Driver CD User's Manual Two SATA cables I/O Shield
• The box contents above are subject to change without notice.
• The motherboard image is for reference only and the actual items shall depend on the product package you obtain. The box contents are for reference only.
- 5 -
Manual - Page 6
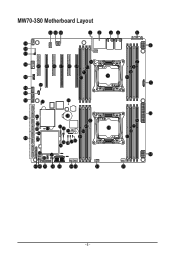
MW70-3S0 Motherboard Layout
63 64 65
12
34
5
59 58 57
70
56
60 62 66 67 68 69 71
72
55
73
11
61 54
53
52
51
74
6
7 8 9 10
12
50
48U
75 22
47
46
45
44
31 32 76
23 24
19
49
43
25 29 28 27 26 30
42
37
38
41 40 39 36 35
34 33
21
13 14 15 16 17
18
20
- 6 -
Manual - Page 7
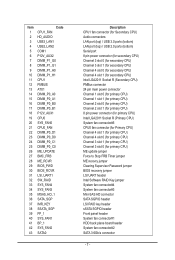
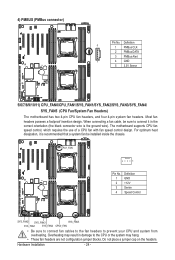
...) / USB 3.0 ports (bottom) LAN port (top) / USB 2.0 ports (bottom) Serial port 8 pin power connector (for secondary CPU) Channel 3 slot 0 (for secondary CPU) Channel 3 slot 1 (for secondary CPU)...slot 1 (for secondary CPU) Intel LGA2011 Socket R (Secondary CPU) PMBus connector 24 pin main power connector Channel 1 slot 0 (for primary CPU) Channel 1 slot 1 (for primary CPU) Channel 2 slot 0 (for...
Manual - Page 8
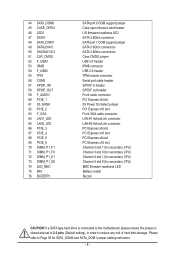
... connected to the motherboard, please ensure the jumper is closed and set to 2-3 pins (Default setting), in header S/PDIF out header Front audio connector PCI Express x8 slot S3 Power On Select jumper...DIMM_P1_F0 72 DIMM_P1_E1 73 DIMM_P1_E0 74 LED_BMC 75 BAT 76 BUZZER1
SATA port 0 DOM support jumper Case open intrusion alert header LSI firmware readiness LED SATA 3 6Gb/s connector SATA port 1 DOM ...
Manual - Page 10
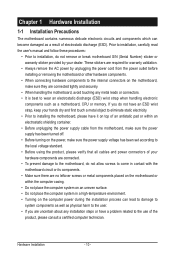
... the motherboard, please have it on top of an antistatic pad or within the computer casing. ...power supply cable from the motherboard, make sure the power supply has been turned off. • Before turning on the power, make sure the power supply voltage has been set according to the use of electrostatic discharge (ESD). These stickers are uncertain about any installation steps or have a problem...
Manual - Page 12
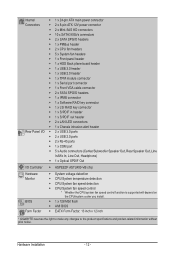
...Connectors
Rear Panel I/O
I/O Controller Hardware Monitor BIOS Form Factor
ŠŠ 1 x 24-pin ATX main power connector ŠŠ 2 x 8-pin ATX 12V power connector ŠŠ 2 x Mini-SAS HD connectors ŠŠ 10 x SATA3 6Gb/s connectors &#...EATX Form Factor; 13 inch x 12 inch
* GIGABYTE reserves the right to make any changes to the product specifications and product-related information without...
Manual - Page 13
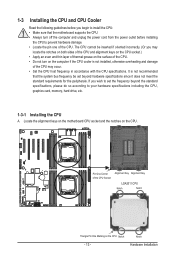
...the CPU host frequency in accordance with the CPU specifications.
Locate the alignment keys on the motherboard CPU socket and the notches on the CPU Notch
- 13 - Notch
Hardware Installation Pin... the CPU cooler is not recommended
that the motherboard supports the CPU. • Always turn off the computer and unplug the power cord from the power outlet before you begin to install the CPU...
Manual - Page 14
....)
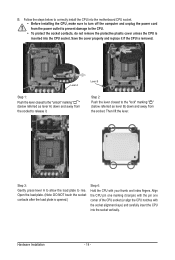
Step 4: Hold the CPU with the socket alignment keys) and carefully insert the CPU into the motherboard CPU socket. •• Before installing the CPU, make sure to turn off the computer and unplug the power cord from the socket. Align the CPU pin one marking (triangle) with the pin one corner...
Manual - Page 16
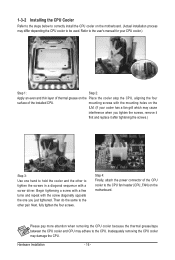
... grease/tape between the CPU cooler and CPU may damage the CPU.
Step 4: Finally, attach the power connector of the CPU cooler to the CPU fan header (CPU_FAN) on the
ILM. (If your ... same to the other to tighten the screws in a diagonal sequence with the mounting holes on the motherboard. Hardware Installation
- 16 - Begin tightening a screw with a few turns and repeat with the screw...
Manual - Page 17
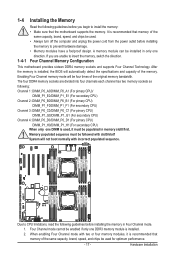
...used . • Always turn off the computer and unplug the power cord from the power outlet before installing the memory in Four Channel mode. 1.
Memory ...populated sequence must be enabled if only one DIMM is used, it is installed. 2. Hardware Installation Four Channel Memory Configuration
This motherboard...
Manual - Page 18

... Memory
Before installing a memory module, make sure to turn off the computer and unplug the power cord from the power outlet to prevent damage to remove the DIMM module.
1 2
2
1-4-3 DIMM Population Table
...module. Close the plastic clip at both edges of the DIMM slots to install DDR4 DIMMs on this motherboard. Slot Per Channel (SPC) and DIMM Per Channel (DPC)
1 Slot Per Channel
2 Slot Per...
Manual - Page 20
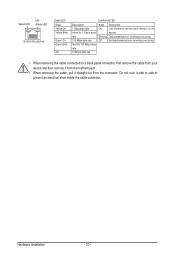
... a back panel connector, first remove the cable from your device and then remove it from the connector. Do not rock it straight out from the motherboard.
• When removing the cable, pull it side to side to prevent an electrical short inside the cable connector.
Manual - Page 22

Unplug the power
cord from the power outlet to prevent damage to the devices. • After installing the device and before connecting external devices: • First make sure the device cable has
... the devices, be sure to the connector on the computer, make sure your computer. Hardware Installation
- 22 - Read the following guidelines before turning on the motherboard.
Manual - Page 23
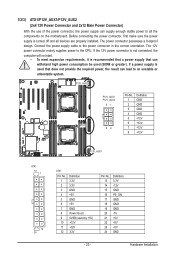
... turned off and all the components on the motherboard. The 12V power connector mainly supplies power to the power connector in the correct orientation.
1/2/3) ATX1/P12V_AUX1/P12V_AUX2 (2x4 12V Power Connector and 2x12 Main Power Connector)
With the use of the power connector, the power supply can supply enough stable power to an unstable or unbootable system. Before connecting...
Manual - Page 24
... the chassis. Hardware Installation
- 24 - Most fan headers possess a foolproof insertion design. Overheating may hang.
• These fan headers are not configuration jumper blocks. The motherboard supports CPU fan speed control, which requires the use of a CPU fan with fan speed control design.
Definition
5
1 PMBus CLK
2 PMBus DATA
3 PMBus Alert
1
4 GND...
Manual - Page 33

... and AC'97 audio.
Hardware Installation Incorrect connection between the module connector and the motherboard header will make the device unable to this header. You may connect your chassis ...No Pin LINE2-L LINE2-JD
Pin No. 1 2 3 4 5 6 7 8 9 10
Definition MIC GND MIC Power NC Line Out (R) NC NC No Pin Line Out (L) NC
• The front panel audio header supports HD audio by default.
Manual - Page 39
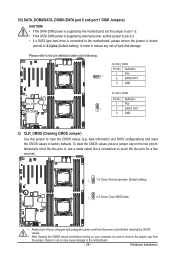
... No. Hardware Installation 1/2) SATA_DOM0/SATA_DOM0 (SATA port 0 and port 1 DOM Jumpers)
CAUTION! • If the SATA DOM power is supplied by the motherboard, set the jumper to pin 1-2. • If the SATA DOM power is supplied by external power, set the jumper to pin 2-3. • If a SATA type hard drive is connected to the...
Similar Questions

Is It Possible To Overclock The 3770k With This Motherboard? 4.2 Ghz Or Higher
Is it possible to overclock the 3770k with this motherboard? 4.2 ghz or higher
Is it possible to overclock the 3770k with this motherboard? 4.2 ghz or higher
(Posted by serkangurdall 1 year ago)

Motherboard Will Not Boot To Bios.
After power cut off motherboard will not boot to bios anymore but the cpu fan still works.
After power cut off motherboard will not boot to bios anymore but the cpu fan still works.
(Posted by jwf335 7 years ago)

Power Sw Place.
hi dear, i can not power sw place on the motherboaed. help please.
hi dear, i can not power sw place on the motherboaed. help please.
(Posted by 4gooshshadel 10 years ago)

Time
The problem I am having is with the system clock. Everything works fine except that the system conti...
The problem I am having is with the system clock. Everything works fine except that the system conti...
(Posted by mrzilla 12 years ago)

Where Can I Download The Whole Driver Disk That Comes With The Ex58-ds4 ?
I have lost my disk that comes with the motherboard and I would really like to download it, so I can...
I have lost my disk that comes with the motherboard and I would really like to download it, so I can...
(Posted by johansendanny 12 years ago)