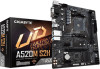
Gigabyte A520M S2H Support Question
Gigabyte A520M S2H Support Question
Find answers below for this question about Gigabyte A520M S2H.Need a Gigabyte A520M S2H manual? We have 1 online manual for this item!
Question posted by e2wentzel on March 16th, 2022
Com Header Port Not Working
New MB using com header with cable and 9 pin cponnector. Bios set up for com1 active.Device set to use com1 but does not respond. Ohmed cable to make sure 1 to 1 pinout correct.device works with usb to rs232 adapter but rather use com header port for cleaner cables.
Current Answers
Answer #1: Posted by SonuKumar on March 16th, 2022 7:48 AM
SonuKumar

Member since:
May 9th, 2021 Points: 16,622,280

Member since:
May 9th, 2021 Points: 16,622,280
https://www.youtube.com/watch?v=nCuow9J_-rA&t=209
https://www.youtube.com/watch?v=nCuow9J_-rA&t=310
https://www.youtube.com/watch?v=nCuow9J_-rA&t=544
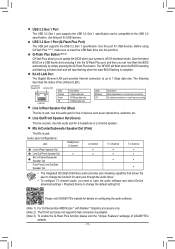
How do I enable USB ports on my Gigabyte motherboard?
Image result for Gigabyte A520M S2H Com Header Port Not Working
BIOS settings to enable USB Boot in Gigabyte Motherboard:
During boot sequence, press DEL key in keyboard and go to BIOS settings .
Enable Integrated Peripherals > USB Legacy .
Enable Integrated Peripherals > USB Storage .
Set Boot Order to HDD , CD-ROM , Network .
Now plug in Live USB Boot stick and reboot .
https://download.gigabyte.com/FileList/Manual/mb_manual_a520m-s2h_e_v1.pdf
Please respond to my effort to provide you with the best possible solution by using the "Acceptable Solution" and/or the "Helpful" buttons when the answer has proven to be helpful.
Regards,
Sonu
Your search handyman for all e-support needs!!
Related Gigabyte A520M S2H Manual Pages
User Manual - Page 4
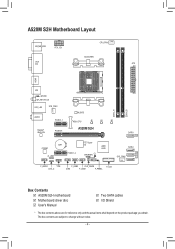
... CODEC
D_LED1
PCIEX1_2
iTE® Super
I/O
AMD
A520
SPEAKER CI
SATA3 SYS_FAN2
F_AUDIO
TPM
LED_C
F_USB2
CLR_CMOS
F_U32
COM
F_USB1
F_PANEL
3
012
Box Contents 55 A520M S2H motherboard 55 Motherboard driver disc 55 User's Manual
55 Two SATA cables 55 I/O Shield
* The box contents above are subject to change without notice.
- 4 - The box contents are for...
User Manual - Page 5
...and securely. •• When handling the motherboard, avoid touching any installation steps or have a problem related to the use an adapter, extension power cable, or power strip, ensure to consult with...on the motherboard, make sure the power supply voltage has been set according to the local voltage standard. •• Before using the product, please verify that all cables and power...
User Manual - Page 9
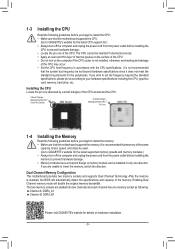
... •• Make sure that the motherboard supports the memory. Installing the CPU Locate the pin one (denoted by a small triangle) of the CPU.
It is installed, the BIOS will double the original... detect the specifications and capacity of the same
capacity, brand, speed, and chips be used. (Go to GIGABYTE's website for the latest supported memory speeds and memory modules.) &#...
User Manual - Page 10

... the cable, pull it straight out from the power outlet before you install motherboard drivers in the operating system first.
•• After installing the HDMI device, make sure to set up to 192KHz/24bit 7.1-channel LPCM audio output. It also supports up a triple-display configuration, you must install motherboard drivers in OS. Use this port. You can use this port...
User Manual - Page 11
... and select Device advanced settings > Playback Device to change the default setting first. Please visit GIGABYTE's website for a headphone or 2-channel speaker. Use this port for USB devices.
Mic In/Center/Subwoofer Speaker Out (Pink)
The Mic in jack. The following describes the states of GIGABYTE's
website. - 11 - Before using Q-Flash Plus (Note 3), make sure to insert...
User Manual - Page 12
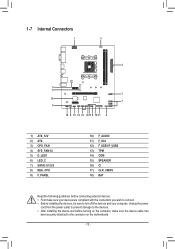
... 9) F_PANEL
10) F_AUDIO 11) F_U32 12) F_USB1/F_USB2 13) TPM 14) COM 15) SPEAKER 16) CI 17) CLR_CMOS 18) BAT
Read the following guidelines before turning on the computer, make sure your devices are compliant with the connectors you wish to connect. •• Before installing the devices, be sure to the connector on the motherboard.
- 12 -
User Manual - Page 13
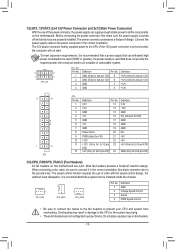
... supply enough stable power to all devices are 4-pin. Do not place a jumper cap on this motherboard are properly installed.
If the 12V power connector is turned off and all the components on the motherboard. Most fan headers possess a foolproof insertion design. Connect the power supply cable to connect it is used (500W or greater). If a power...
User Manual - Page 14
...USB 0_ B
_
S _S
B_
_
DEBUG PORT
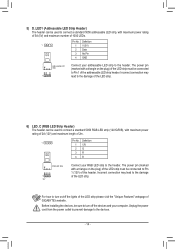
6) LED_C (RGB LED Strip Header) The header can be sure to turn on/off the devices and your computer.
Unplug the power cord from the power outlet to prevent damage to the damage of 1000 LEDs. Pin...No Pin
4 GND
G.QBOFM
F_USB30 3
Addressable LED Strip
B_
Connect your RGB LED strip to the header. Before installing the devices, be used ...
User Manual - Page 16
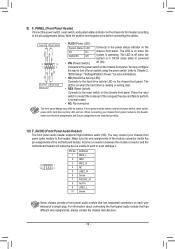
... LED is off your chassis front panel audio module to this header, make the device unable to this header. Incorrect connection between the module connector and the motherboard header will make sure the wire assignments and the pin assignments are matched correctly.
10) F_AUDIO (Front Panel Audio Header) The front panel audio header supports High Definition audio (HD). For information about...
User Manual - Page 18

... at system startup. The system reports system startup status by issuing a beep code.
Definition
1
1 VCC
2 NC
3 NC
4 SPK-
16) CI (Chassis Intrusion Header) This motherboard provides a chassis detection feature that detects if the chassis cover has been removed.
Pin No. 14) COM (Serial Port Header) The COM header can provide one serial port via an optional COM port cable.
User Manual - Page 19
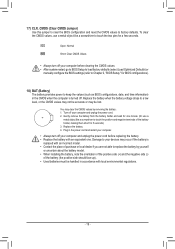
...of the battery holder, making them short for 5 seconds...BIOS settings (refer to Chapter 2, "BIOS Setup," for BIOS configurations).
18) BAT (Battery) The battery provides power to replace the battery by removing the battery: 1. Replace the battery when the battery voltage drops to a low level, or the CMOS values may not be lost. 17) CLR_CMOS (Clear CMOS Jumper) Use this jumper to clear the BIOS...
User Manual - Page 20
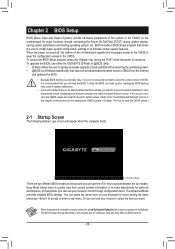
... on the motherboard supplies the necessary power to the CMOS to boot. Its major functions include conducting the Power-On Self-Test (POST) during the POST when the power is not stable as follows and you can use your keyboard to move through configuration items. The Advanced Mode provides detailed BIOS settings. Or you...
User Manual - Page 21
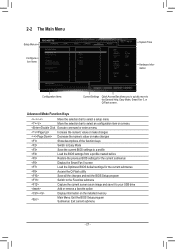
...make changes
/ Decrease the numeric value or make changes
Show descriptions of the function keys
Switch to Easy Mode
Save the current BIOS settings to a profile
Load the BIOS settings from a profile created before
Restore the previous BIOS settings... Information
Configuration Items
Current Settings Quick Access Bar allows you to quickly move to your USB drive
Add or remove ...
User Manual - Page 32
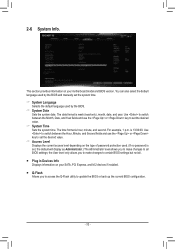
...;ƒ Plug in Devices Info Displays information on your SATA, PCI Express, and M.2 devices if installed. ƒƒ Q-Flash Allows you to make changes to certain BIOS settings but not all BIOS settings; This section provides information on your motherboard model and BIOS version. You can also select the default language used by the BIOS. && System Date
Sets the system date. 2-6 System...
User Manual - Page 34
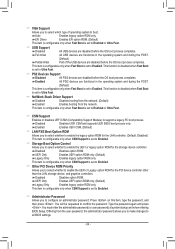
... CSM Support is set to Enabled.
&& Administrator Password Allows you to make changes to all BIOS settings.
- 34 - This item is configurable only when Fast Boot is set to confirm the password... when Fast Boot is set to Enabled or Ultra Fast.
&& USB Support Disabled All USB devices are disabled before the OS boot process completes. Full Initial All USB devices are functional in the...
User Manual - Page 35
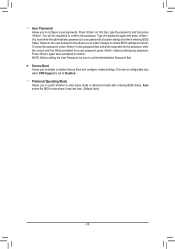
... after entering BIOS Setup. Press on the password item and when requested for a new password, press without entering any password. To cancel the password, press on this item, type the password, and then press . NOTE: Before setting the User Password, be requested to confirm. When prompted for the password, enter the correct one first...
User Manual - Page 36
... worked properly (last known good record).
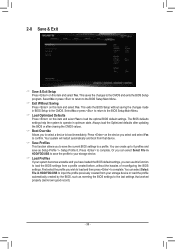
- 36 - Or you can use this item and select Yes to complete. Select No or press to return to the CMOS and exits the BIOS Setup program. 2-8 Save & Exit
&& Save & Exit Setup Press on the device you to select a device to save as reverting the BIOS settings to the last settings that device...
User Manual - Page 37
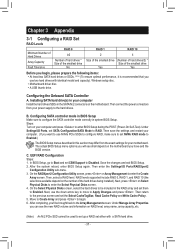
... and capacity). C. Then, select a RAID level. Next, use NVMe PCIe SSDs to configure RAID, make sure to Apply Changes and press . Installing SATA hard drive(s) in your computer and press to Enabled. Under Settings\IO Ports, set them to enter BIOS Setup during the POST (Power-On Self-Test). In BIOS Setup, go to Disabled. Next, press on...
User Manual - Page 38
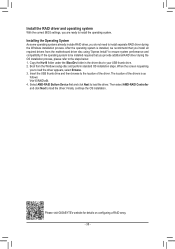
...motherboard driver disc using "Xpress Install" to ensure system performance and compatibility. Insert the USB thumb drive and then browse to your USB..., select Browse. 3. Select AMD-RAID Bottom Device first and click Next to install separate RAID driver...driver. Install the RAID driver and operating system
With the correct BIOS settings, you are ready to the steps below: 1. After...
User Manual - Page 40
...www.gigabyte.com
FCC Compliance Statement: This device complies ...set out in a particular installation. Canadian Department of Communications Statement This digital apparatus does not exceed the Class B limits for activation of the treatment, collection, recycling and disposal procedure. Under the Directive, used...Motherboard Trade Name: GIGABYTE Model Number: A520M S2H
Responsible Party -
Similar Questions


Gigabyte Motherboard Board Legacy Bios Settings
(Posted by jaydeepjedhe2002 2 years ago)

Try To Install Win7x64 From Usb Key. Sata Hd Not Found Once Ahci Driver Loaded
using latest available driver from server_driver_sata_v3.0.0.3020 package more precisely the stuff f...
using latest available driver from server_driver_sata_v3.0.0.3020 package more precisely the stuff f...
(Posted by xragusin 10 years ago)
Bios Set Up For Use As A Professional Audio Work Station.
Bios set up for use as a professional audio work station.
Bios set up for use as a professional audio work station.
(Posted by bsgilmour 12 years ago)

Memory Ram
Why mother board dont recognize 4GB for memory ?? only 3,25Gb
Why mother board dont recognize 4GB for memory ?? only 3,25Gb
(Posted by brauyabico 12 years ago)