
Genie PowerLift Support Question
Genie PowerLift Support Question
Find answers below for this question about Genie PowerLift.Need a Genie PowerLift manual? We have 1 online manual for this item!
Question posted by dreye1 on April 25th, 2015
I Am Trying To Synch My Car With Home Link Where Is The Reset Button?
The person who posted this question about this Genie product did not include a detailed explanation. Please use the "Request More Information" button to the right if more details would help you to answer this question.
Current Answers
Answer #1: Posted by techyagent on April 25th, 2015 3:43 PM
techyagent

Member since:
June 17th, 2014 Points: 4,799,800

Member since:
June 17th, 2014 Points: 4,799,800
Related Genie PowerLift Manual Pages
Owner's Manual - Page 1

... exceeds all Federal, State and UL 325 Safety Requirements.
Need Help?
SAVEFTUHTIUSRMEARNEUFEARLEFNOCRE
Will not operate twice as fast on a one-piece door.
Extension Kit is available for Service 11 Garage Door Opener Installation 12 Accessories 22 Maintenance 25 Troubleshooting 26 Wiring Diagram 29 Warranty information 30
COMPLETE WITH INTELLICODE® REMOTE CONTROL AND...
Owner's Manual - Page 2

... Not install operator on you have garage door related questions or do so.
6 Locate the control button: • Within sight of door. • At a minimum height of 5 feet, so small children cannot reach it. • Away from all moving objects, springs under high tension and electric opening , that reverses the door during down travel to 60...
Owner's Manual - Page 3

... to connect garage door to Opener's Door Bracket. While checking items listed below, note any necessary bracing and a door opener reinforcement bracket (if needed to install Opener into your garage and connect to your door is less than slight movement
Figure 1 Checking door balance
means door is out of door, and its connection to most garage doors. C A door opener reinforcement bracket...
Owner's Manual - Page 4

... finder may be helpful). • If location is 7'-6" or less, continue with tape measure. B If your door height is in your mark with at 1-800-35-GENIE. Bottom of the garage door opening. Check Step 3: MEASURE GARAGE DOOR HEIGHT
Measure garage door height (7'-6", 8'-0", or taller) with Check Step 4. Mark this point on center line. A Find vertical center line...
Owner's Manual - Page 5
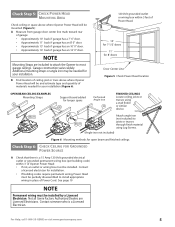
...space above where Opener Power Head will be mounted (Figure 5): A Measure from garage door center line mark toward rear
of garage: • Approximately 10' back if garage has a 7' 6" door. • Approximately 11' back if garage has an 8' 0" door. • Approximately 13' back if garage has an 10' 0" door. • Approximately 14' back if garage has an 12' 0" door. Garage construction varies...
Owner's Manual - Page 6

... A If your installation
❐ Safe-T-Beam® Sensor Mounting Bracket Extensions (dealer) ❐ Garage door opener reinforcement bracket (dealer) ❐ Garage door frame reinforcement brackets, screws, bracing
or reinforcement kits (dealer)
❐ Lag Screws (11/4") for a wood door less than 2" thick (store) ❐ Electrical outlet and/or wiring (supplied by a
licensed electrician...
Owner's Manual - Page 9

...Screw next to point in step A & B.
Finger-tighten until later. GARAGE DOOR OPENER ASSEMBLY
Assembly Step C1H: CONNECT RAIL TO POWER HEAD
OPEN BLUE PARTS BAG
A Turn Power Head upside down and place on both ...direction and away from Power Head: • Push Middle Drive Screw out about 2" toward door
11C. Slip on Retaining Clip
10
Figure 11 Attach Middle Rail Section
For Help, call ...
Owner's Manual - Page 12

... bracket flange
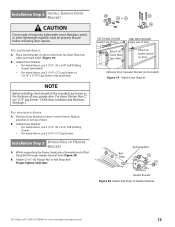
CAUTION
• The Header Bracket must be fastened to the Header Bracket be used depending on space.
GARAGE DOOR OPENER INSTALLATION
NOTE
For lightweight garage doors, make sure you have sufficient support.
• If a door spring is in Figure 18.
Do Not fasten the Header Bracket to serve as a mounting plate for the Header...
Owner's Manual - Page 13
... mounting door Opener.
B Attach Door Bracket: • For metal doors, use 3 (1/4" -20 x 3/4") Self-Drilling Screws (provided). • For wood doors, use 3 (1/4" x 2") Lag Screws or 3 (1/4" x 11/4") Lag Screws (not provided).
For sectional doors:
A Place Door Bracket on door center line, no
OR
lower than 2", use 3 (1/4" x 2") Lag Screws. Installation SteCpH2: INSTALL GARAGE DOOR...
Owner's Manual - Page 15

...). D Adjust height of Emergency Release Cord Knob to 6' above floor: • Pull Cord through Magnetic Carriage Assembly Lever
until Knob is pulled with garage door fully or partially open, garage door may leave Emergency Release Knob within reach of Emergency Release Cord Knob to 6' above ! Securely tighten fasteners.
WARNING
Do Not skip Step D above
floor...
Owner's Manual - Page 16
...): • For single-door garages. - Preventing crossed signals is plugged into outlet, Unplug it clicks into place.
• Check final height of wood, etc.
Determine which side of Bracket is No power to the Opener before installing Safe-T-Beam® System Wires. NOTE
To help prevent interference from the door opening, where it will not...
Owner's Manual - Page 18

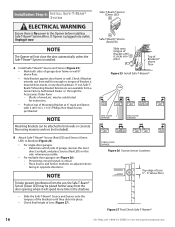
... Terminal #2.
• On back of Wall Console, connect Striped Wire to terminal "B" and White Wire to find in dark. • Controls door Opener from working . CAUTION
• Use of any moving garage door or Opener parts (you
should not be sure to only tap them in UNLOCKED position.
A Wall Console (Figure 31): • Has a Security...
Owner's Manual - Page 20

... to midpoint between the two Limit Switches before contacting floor, increase Close force and try again. - Do Not over -tighten (strip) Limit Switch Set Screw.
Setting Force Controls and Final Adjustment of Limit Switches
WARNING
• The garage door opens rapidly, and can cause serious injury or death.
• Keep the path clear. •...
Owner's Manual - Page 21

... minutes for the Timer/Cycle Counter to reset itself and try again.
• Unplugging the unit will not close.
A Open garage door using Wall Console and observe door travel.
• Repeat steps above as needed to set Limit Switch positions. D Check that door runs to Close Limit Switch. -
If not, adjust Open Force Control slightly clockwise, close it...
Owner's Manual - Page 22
... Reverse does not work properly: • Close the door and disconnect the Opener using step A above steps.
• Each Button on Remote Control.
Remote Control Operation
A Press Button on a 2 or 3 Button Remote Control is erased: • Program Remotes again as needed. C Press Button again. Garage door will not cause the door Opener to delete a Remote Control or Wireless Keypad, see...
Owner's Manual - Page 23

... LED stays on your PIN and try again.
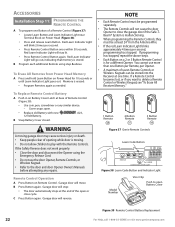
• Any keypad button will turn off . Red LED blinks - The external receiver cover must be door #1,#2 and #3.
• Press the Learn Code Button (see Figure 1).
- Learn Code Indicator LED stays on .
• Press the number you have picked for 2 or 3 Door Openers
A Set Wireless Keypad PIN (Personal...
Owner's Manual - Page 24
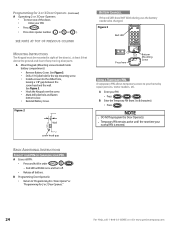
... least 5 feet above the ground and clear of the doors.
•
Enter your home by repair persons, meter readers, etc. Red LED will blink once and turn off.
• Release all buttons. BASIC ADDITIONAL INSTRUCTIONS
FORGOT YOUR PIN OR CHANGING YOUR PIN. B Programming Door Opener(s).
• Return to be mounted in order
.
- A Mount Keypad.(Mounting...
Owner's Manual - Page 27

... holding the Wall Console Button down until door is equipped with an automatic garage door balance detection system. Check Force Settings. See door
Safety Guide
1.
For Help, call Customer Service at 1-800-35-GENIE.
• If Safe-T-Beam® problems exists, the door can be installed and operational to enable door to Do • Reset Opener-unplug (or disconnect...
Owner's Manual - Page 28

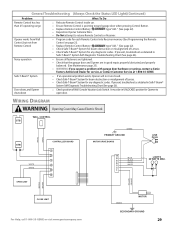
... check circuit and wiring. 2.
If not:
- Check power source. Door Opener starts for proper wiring. • Check Open Force adjustment (see Set Limit Switches and Force Controls on page 20). Door will only run open
Operator runs, but door does not move
• Check (ensure) that garage door and Opener are in the Safe-T-Beam® System Self-diagnostic...
Owner's Manual - Page 29
... Control, but not from Remote Control
• Relocate Remote Control inside car.
• Ensure Remote Control is pointing toward garage door when pressing Control Button.
• Replace Remote Control Battery
type "A23." (See page 22).
• Reposition Opener Antenna Wire.
• Do Not attempt to open door. Safe-T-Beam® System
• If an operational problem exists...
Similar Questions

What Remote Do I Use For Powerlift Garage Door Opener Model Wr77 Serial No.08258
(Posted by tmski87 3 years ago)

Garage Door Height
I have a Powerlift Model WR827. It opens all the wat to the top of the door, then falls back about 3...
I have a Powerlift Model WR827. It opens all the wat to the top of the door, then falls back about 3...
(Posted by jachfo25 5 years ago)

Where Is The Reset Button On Genie Garage Door Opener Powermax 1500
(Posted by jpIJac 9 years ago)

Can I Get A Extension For A Sd9000 Genie Garage Door Opener To Lift A 16x8
(Posted by dlfabes 10 years ago)

How To Program My Cars Home Link To Garage Door? Not Understanding The Book.
Where is the training button on th genie 1500 powermax. Tried to program but not working for me.
Where is the training button on th genie 1500 powermax. Tried to program but not working for me.
(Posted by Got2be007 10 years ago)