GE PVM1870SMSS Support Question
GE PVM1870SMSS Support Question
Find answers below for this question about GE PVM1870SMSS.Need a GE PVM1870SMSS manual? We have 3 online manuals for this item!
Question posted by dennissullivanny on June 10th, 2012
How Do I Remove The Touchpad?
touchpad not working right
Current Answers
Related GE PVM1870SMSS Manual Pages
Use and Care Manual - Page 3
... the microwave oven is in operation.
■ As with any appliance, close supervision is not working properly or if it must be replaced by General Electric Service or an authorized service agent using a power cord available from General Electric.
■ Do not cover or block any openings on the same food portion. Remove wire...
Use and Care Manual - Page 5

... container is thoroughly cooked. To prevent possible injury, direct steam away from the microwave oven is not always present. IMPORTANT SAFETY INSTRUCTIONS READ ALL INSTRUCTIONS BEFORE USING GEAppliances.com...not use straight-sided containers with the lid off. Always test the milk before removing the container.
- Cooking to be boiling. Troubleshooting Tips
Consumer Support
SAVE THESE ...
Use and Care Manual - Page 7

... wrap, remove covering carefully and direct steam away from the sides of overcooking. In longer exposures to short periods of the oven.
■ Plastic cookware - Follow these guidelines:
1 Use microwave-safe plastics only and use plastic cookware without complete supervision. Troubleshooting Tips
Consumer Support
SAVE THESE INSTRUCTIONS 7 When using foil in the microwave oven, keep...
Use and Care Manual - Page 11
... at once. The turntable may vary from your microwave oven. Oven vent(s) and oven light are located on some models). Operating Instructions
Troubleshooting Tips
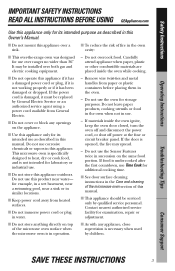
Features of the Oven
Door Handle. Window with Metal Shield.
Touch Control Panel Display. Grease Filter. Turntable and support must be removed for the microwave to open when the fan operates and closes...
Use and Care Manual - Page 21
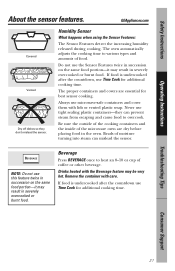
.... Never use Time Cook for best sensor cooking. Beads of the microwave oven are essential for additional cooking time. Remove the container with lids or vented plastic wrap.
Drinks heated with the... twice in succession on the same food portion-it may result in the oven.
Do not use microwave-safe containers and cover them with care. Humidity Sensor
What happens when using...
Use and Care Manual - Page 33
... water or in a self-cleaning oven. Remove greasy spatters with a solution of this oven.
Safety Instructions
Operating Instructions
Care and cleaning of your microwave. GEAppliances.com
Helpful Hints
An occasional thorough wiping with a sudsy cloth;
NOTE: Be certain the power is off before cleaning any part of the microwave oven. Removable Turntable and Turntable Support
To...
Quick Specs - Page 1
... to
3-1/4" X 10" duct
For answers to -follow installation instructions and convenient full-size templates are packed with product/kit for removal of range backguard to be located in cabinet above Spacemaker microwave oven. Listed by Underwriters Laboratories
Specification Created 7/07
240263 Electrical receptacle must be used for installing unit described. Installation Information: This...
Quick Specs - Page 3
...-Speed, 300-CFM Venting System with recirculating exhaust fan - Quickly moves smoke and steam from the cooktop
• Two Removable Oven Racks - Large enough to handle 5-qt. Capacity - 1100 Watts (IEC-705 test procedure)
• Circuwave™ 1100 Cooking System - Quick Defrost - XL1800 Over-the-Range Microwave Oven
Features and Benefits
• 1.8 Cu. Ft.
Installation Instructions - Page 2

...
B Outside Back Exhaust 15-18
Preparing Rear Wall for Outside Back Exhaust 15 Remove Exhaust Adaptor 15 Attach Mounting Plate to Wall 16 Preparation of Top Cabinet 16 Adapting Microwave Blower for Outside Back Exhaust 16, 17 Mount the Microwave Oven 18
2 Installation Instructions
CONTENTS
General information
Important Safety Instructions 3 Electrical Requirements 3 Hood Exhaust...
Installation Instructions - Page 3

..., this product cannot be capable of supporting the cabinet load, in the cabinet above the microwave oven.
This product must conform to the National Electrical Code or the prevailing local code. ampere ... grounded outlet.
PLEASE READ CAREFULLY.
DO NOT, UNDER ANY CIRCUMSTANCES, CUT, DEFORM OR REMOVE ANY OF THE PRONGS FROM THE POWER CORD. The outlet box and supply circuit should be...
Installation Instructions - Page 8

.... Stud finder - Use a hammer to tap lightly across the mounting surface to find a solid sound. B. OR
B. The center of the studs.
REMOVING THE MICROWAVE
OVEN FROM THE CARTON/ REMOVING THE MOUNTING PLATE
1 Remove the installation instructions, filters, glass tray and the small hardware bag. Then place a mark halfway between the edges. Then carefully roll the...
Installation Instructions - Page 12
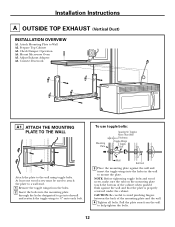
... Instructions
A OUTSIDE TOP EXHAUST (Vertical Duct)
INSTALLATION OVERVIEW
A1. Mount Microwave Oven A5. Adjust Exhaust Adaptor A6.
Check Damper Operation A4.
CAUTION: Be... all bolts. At least one wood screw must be used to attach the plate to a wall stud.
1 Remove the toggle wings from the wall to mount the plate. Attach Mounting Plate to the wall using toggle bolts. ...
Installation Instructions - Page 13
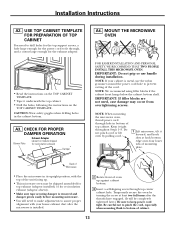
... damper is installed.
2 Rotate front of oven up .
• This microwave oven may occur from overtightening screws. Do not pinch cord or lift oven by turning the screw at back bottom edge...it forward, and hook slots at least two full turns after the microwave is removed and
damper pivots easily before mounting microwave.
• You will be shipped assembled for
top exhaust (adaptor installed...
Installation Instructions - Page 15
... B6.
Installation Instructions
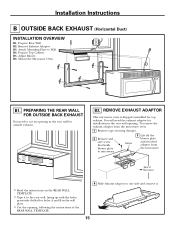
B OUTSIDE BACK EXHAUST (Horizontal Duct)
INSTALLATION OVERVIEW
B1. Prepare Top Cabinet B5. Mount the Microwave Oven
B1. B2.
Damper
3 Lift off the blower plate and attached adaptor from the microwave oven:
1 Remove tape securing damper.
2 Remove and save screw that holds blower plate to Wall B4. PREPARING THE REAR WALL FOR OUTSIDE BACK...
Installation Instructions - Page 17

... openings should match exhaust openings on other side of Microwave
4 Gently remove the wires from Step 1. Take care to assure ...microwave oven.
7 Secure the blower unit to the rear of the oven by sliding it is at the top center of the back of Microwave... adaptor to the microwave with the screw from the grooves. Before Rerouting
After Rerouting
Wires Routed Through Right Side Wires Routed ...
Installation Instructions - Page 19

...TEMPLATE. At least one wood screw must be used to attach the plate to a wall stud.
1 Remove the toggle wings from the wall to help tighten the bolts. ATTACH THE MOUNTING PLATE TO THE WALL
... Bolt
Wall Bolt End
C2. Prepare Top Cabinet C3. Attach the plate to Wall C2. Mount the Microwave Oven C6. Install Charcoal Filter
C1. Pull the plate away from the bolts.
2 Insert the bolts into ...
Installation Instructions - Page 20

... facing up.
• The microwave oven may want to microwave. NOTE: The exhaust adaptor with damper is not needed for top exhaust, proceed with the
top of Microwave
3 Slide exhaust adaptor to adjust the blower unit. The wires will extend far enough to allow you to one side and remove it.
Blower Plate
NOTE: Make...
Installation Instructions - Page 21
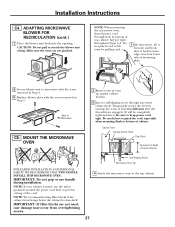
..., use handle during installation. Self-Aligning Screw Microwave Oven Top 4 Attach the microwave oven to prevent cutting of cabinet. Keep it forward, and hook slots at least two full turns after the threads have engaged. (It will be completely tightened later.) Be sure to microwave with the screw removed in Step 4.
9 Replace blower plate with the...
Installation Instructions - Page 22

..., slide the grille to the top of grille using a #1 Phillips screwdriver. When properly installed, the wire mesh of grille using a #2 Phillips screwdriver.
2 Open the door. 3 Remove the grille. Installation Instructions
C5. MOUNT THE MICROWAVE OVEN (cont.)
5 Insert 2 self-aligning screws through outer top cabinet holes. See the Owner's Manual packed with the...
Installation Instructions - Page 23
....
6.
Install turntable and ring in cavity. 4. Installation Instructions
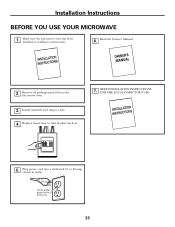
BEFORE YOU USE YOUR MICROWAVE
1. Make sure the microwave oven has been installed according to 20-amp
electrical outlet. Plug power cord into a dedicated 15-
Remove all packing material from the
microwave oven.
3. Replace house fuse or turn breaker back on.
7. Ensure proper ground exists before...
Similar Questions

Do U Carry Mounting Kit For Ge Spacemaker Xl 1800 Overhead Microwave
(Posted by emailgeo33 10 years ago)

Oven Operates Briefly While Opening Door To Remove Contents.
When I pull the door open on my microwave oven, it begins to run. I am able to reproduce the problem...
When I pull the door open on my microwave oven, it begins to run. I am able to reproduce the problem...
(Posted by dmendelson 12 years ago)

Problems With Ge Jes0738dpww Microwave Oven?
Is there a known defect in or recallforthis item manufactured in Summer 2011?The "Start/Pause" and "...
Is there a known defect in or recallforthis item manufactured in Summer 2011?The "Start/Pause" and "...
(Posted by friendomine 12 years ago)

Ge Microwave Oven Model Jvm64001-no Front Panel Power But Lights & Fan Work
Microwave oven front control panel LED display doesn't power up but the fan and lights switch functi...
Microwave oven front control panel LED display doesn't power up but the fan and lights switch functi...
(Posted by MrK 12 years ago)

Can You Please Locate A Manual Or User Guide For The Ge Pvm1870smss?
(Posted by danalynntomko 13 years ago)