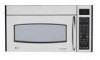
GE JVM1870SK Support Question
GE JVM1870SK Support Question
Find answers below for this question about GE JVM1870SK - Spacemaker Microwave Oven.Need a GE JVM1870SK manual? We have 3 online manuals for this item!
Question posted by sunny1bg on August 26th, 2013
How Do I Replace Inside Microwave Bulb?
The person who posted this question about this GE product did not include a detailed explanation. Please use the "Request More Information" button to the right if more details would help you to answer this question.
Current Answers
Related GE JVM1870SK Manual Pages
Use and Care Manual - Page 1
... ge.com.
Microwave Spacemaker Oven
ge.com
Safety Instructions . . . .2-9
Operating Instructions Auto Features 20 Care and Cleaning 33, 34 Changing the Power Level 13 Cooking Guide . . . . .15, 16 Defrosting Guide . . . . . .18 Exhaust Feature . . . .37, 38 Features of Your Microwave Oven . . . .11, 12 Microwave Terms . . . . . .32 Other Features . . . . 25-31 Replacing Bulbs . . . .35, 36...
Use and Care Manual - Page 3
... not overcook food.
This microwave oven is specifically designed to heat, dry or cook food, and is opened, the fire may be serviced only by children. If materials inside the oven while cooking. If the ....
Do not use the oven for storage purposes.
s Do not operate this appliance if it has a damaged power cord or plug, if it must be replaced by General Electric Service or...
Use and Care Manual - Page 4
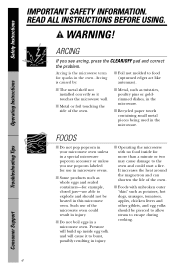
... for example, closed jars-are able to burst, possibly resulting in microwave ovens. s Foods with no food inside egg yolk and will cause it touches the microwave wall. Arcing is the microwave term for use of the microwave oven could start a fire. Safety Instructions
Operating Instructions
IMPORTANT SAFETY INFORMATION.
READ ALL INSTRUCTIONS BEFORE USING.
s The metal shelf...
Use and Care Manual - Page 10
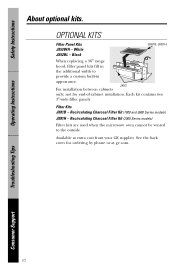
... Filter Kits JX81B -
See the back cover for end-of-cabinet installation.
Black
JX81B, JX81H
When replacing a 36″ range hood, filler panel kits fill in the additional width to the outside.
Each... Filter Kit (2000 Series models)
Filter kits are used when the microwave oven cannot be vented to provide a custom built-in appearance. Safety Instructions
About optional kits.
Available ...
Use and Care Manual - Page 11
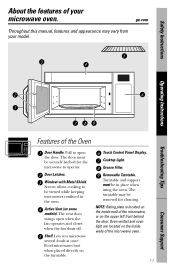
... when the fan shuts off. Shelf. Cooktop Light. The turntable may vary from your
microwave oven.
Active Vent (on the turntable.
NOTE: Rating plate is located on the inside walls of the microwave, or on the inside wall of the microwave oven.
11
Consumer Support ge.com
Throughout this manual, features and appearance may be viewed while...
Use and Care Manual - Page 13
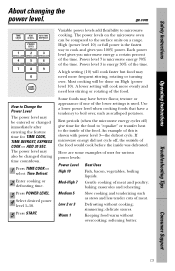
... and tenderizing such as scalloped potatoes. Defrosting without overcooking; The power levels on the microwave oven can be done on a range.
simmering;
softening butter.
A lower setting will cook...level 1-10.
5 Press START. Rest periods (when the microwave energy cycles off , the outside of the food would cook before the inside of the food. Here are some examples of meat and ...
Use and Care Manual - Page 21

... Tips
Consumer Support
21 Be sure the outside of the cooking containers and the inside of food. Do not use tight sealing plastic containers-they don't mislead the sensor. Beverage
Press BEVERAGE once to various types and amounts of the microwave oven are essential for best sensor cooking.
BEVERAGE
NOTE: Do not use...
Use and Care Manual - Page 30
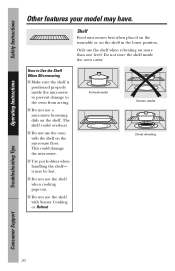
... pot holders when handling the shelf- it may have.
Do not store the shelf inside the microwave to prevent damage to the oven from arcing. s Do not use a microwave browning dish on the shelf in the lower position. s Do not use the shelf with the shelf on more than one level. This could overheat...
Use and Care Manual - Page 33
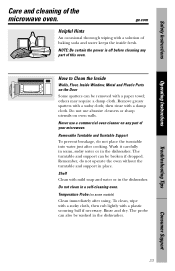
....
Shelf
Clean with a paper towel; Rinse and dry. How to Clean the Inside
Walls, Floor, Inside Window, Metal and Plastic Parts on some models)
Clean immediately after cooking. Never use abrasive cleaners or sharp utensils on any part of the
microwave oven. Temperature Probe (on the Door
Some spatters can be removed with mild...
Use and Care Manual - Page 35
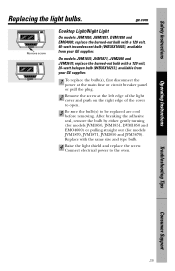
... the right edge of the cover to open.
3 Be sure the bulb(s) to the oven. Connect electrical power to be replaced are cool before removing. Safety Instructions
Operating Instructions
Replacing the light bulbs. Troubleshooting Tips
Consumer Support
35 After breaking the adhesive seal, remove the bulb by either gently turning (for models JVM1850, JNM1851, DVM1850 and...
Use and Care Manual - Page 36
... breaker panel or pull the plug.
2 Remove the top grille by pulling straight out.
On some models
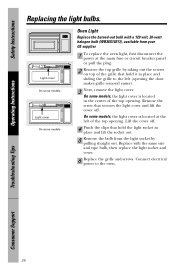
Oven Light
Replace the burned-out bulb with the same size and type bulb, then replace the light socket and cover.
6 Replace the grille and screws.
Light cover On some models
Light cover On some models, the light cover...
Use and Care Manual - Page 37
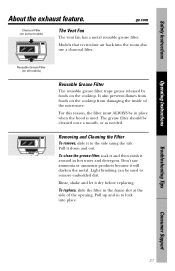
Pull it dry before replacing.
Troubleshooting Tips
Consumer Support
37 It also prevents flames from foods on the cooktop from damaging the inside of the opening. Light brushing can be in place when ...around in the frame slot at the side of the microwave.
The grease filter should be cleaned once a month, or as needed. To replace, slide the filter in hot water and detergent.
Use and Care Manual - Page 39
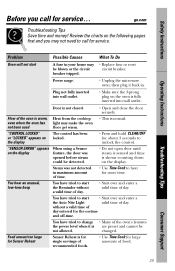
...service... You have tried to unlock the control. breaker tripped. Power surge.
• Unplug the microwave oven;
"SENSOR ERROR" appears on the display
When using a Sensor feature, the door was not detected...not fully inserted into wall outlet. Floor of the oven is warm, Heat from the cooktop
even when the oven has light may • Replace fuse or reset
be blown or the circuit
circuit ...
Use and Care Manual - Page 43

... ge.com, or call 800.GE.CARES (800.432.2737). For The Period Of: GE Will Replace:
For GE and GE Profile Models:
One Year From the date of the original purchase
Any part of the microwave oven which vary from wire rack or metal/foil), or used commercially.
s Damage caused after delivery...
Installation Instructions - Page 3

...Wire size must be located in cabinet arrangements such as an island or a peninsula. ELECTRICAL REQUIREMENTS
Product rating is encountered, it replaced with a standard three-prong (grounding) wall receptacle to 50 pounds or a total weight of the proper voltage and frequency.... a three-prong grounded outlet.
The installer must be installed in the cabinet above the microwave oven.
Installation Instructions - Page 17

... are facing out the back of the oven.
Blower Plate Back of Microwave
Guide
Guide
Locking Tabs
Push in securely until it is in the same position as before with the screw from the grooves.
Back of Microwave
Back of Microwave
Adaptor
Back of Microwave
Blower Motor Screw
8 Replace the blower plate in the lower locking...
Installation Instructions - Page 21
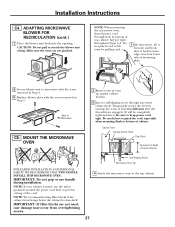
...9 Replace blower plate with the screw removed in bottom of cabinet.
ADAPTING MICROWAVE BLOWER FOR RECIRCULATION (cont.)
7 Place the blower unit back into the opening.
IMPORTANT: If filler blocks are not pinched. Temporarily secure the oven by pulling cord.
1 Lift microwave, tilt it tight throughout Steps 1-3. Self-Aligning Screw Microwave Oven Top 4 Attach the microwave oven...
Installation Instructions - Page 22

...on top front of the microwave oven. (While tightening screws, hold the microwave oven in place against the ...wall and the top cabinet.)
8 Install grease filter. On 1400 and 1600 Series models, pull the grille straight off .
Insert mesh-side up
22 On 1800 Series models, remove screws on front of the filter should be visible from the front.
5 Replace...
Installation Instructions - Page 23
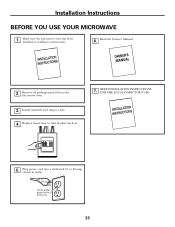
Installation Instructions
BEFORE YOU USE YOUR MICROWAVE
1. Plug power cord into a dedicated 15- Replace house fuse or turn breaker back on.
7. KEEP INSTALLATION INSTRUCTIONS FOR THE LOCAL INSPECTOR'S USE.
5. Remove all packing material from the
microwave oven.
3.
Make sure the microwave oven has been installed according to 20-amp
electrical outlet. Read the Owner's Manual.
2. to ...
Dimensions - Page 2

...-of-cabinet installation.
Two kits are equivalent to a section of some typical ducts.
JVM1870SK
GE Profile™ Spacemaker® 1.8 Cu. Read the following carefully. Maximum Duct Length: For satisfactory air ...-Stainless Steel Decorative Panel Kit
When replacing a Hi/Low range with
a microwave/convection oven or
Spacemaker over a range model, this kit fills in appearance.
Similar Questions

Can I Replace The Microwave And Not The Hood?
I want to replace the microwave with a newer version but I think I need to keep the hood. Also, does...
I want to replace the microwave with a newer version but I think I need to keep the hood. Also, does...
(Posted by dawnnair 9 years ago)

Cooktop Microwave Replacement Of Bulb
the cooktop light/night light bulb does not go in on the GE Microwave JVM1871?
the cooktop light/night light bulb does not go in on the GE Microwave JVM1871?
(Posted by fgreenman 9 years ago)

How Do You Change The Interior Bulb On A Ge Microwave Jvm1870sk04
(Posted by donantbs 9 years ago)

How To Change Light Bulb In Ge Profile Microwave Active Vent
(Posted by corbjohn 10 years ago)
How Do I Replace The Microwave Light Bulb
Ge Pvm1790srss
(Posted by trinhquan 10 years ago)