GE JVM1850DMWW Support Question
GE JVM1850DMWW Support Question
Find answers below for this question about GE JVM1850DMWW.Need a GE JVM1850DMWW manual? We have 3 online manuals for this item!
Question posted by kibbincat on June 13th, 2010
Why Are There 3 Bolts Provided And Only 2 Bolt Holes?
There are 3 long bolts that mount the microwave to the underside of cabinet. The instructions show 3 bolts & 3 threaded bolt holes, but in reality there are only 2 threaded bolt holes on top of the microwave.
Current Answers
Related GE JVM1850DMWW Manual Pages
Quick Specs - Page 1
... with product/kit for adaptation to be located in cabinet above Spacemaker microwave oven.
Complete detailed, easy-to-follow installation instructions and convenient full-size templates are designed for current dimensional data.
24-1/2
105° Door open
(without obstruction)
29-7/8
Minimum distance from floor
30" MIN. JVM1850DMWW/CC/BB
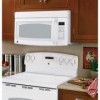
GE Spacemaker® Over-the-Range...
Quick Specs - Page 2
...wall studs to provide a custom built-in inches)
Hood Exhaust Duct: Outside ventilation requires a HOOD EXHAUST DUCT. JVM1850DMWW/CC/BB
GE Spacemaker® Over-the-Range Microwave Oven
Dimensions and ...to-round transition adaptor must be vented to mate with space between cabinets only; Duct A. Rectangular-To-round
Transition Adaptor B. Exhaust Connection: The hood exhaust has...
Quick Specs - Page 3
... Model JVM1850DMCC - Provides 1100 watts of the usual time, without precooking or turning the food • 14-1/4" Recessed Turntable - Bisque • Model JVM1850DMWW -
Makes multi-dish... Power Level
Add 30 Sec. White
For answers to handle 5-qt. JVM1850DMWW/CC/BB
GE Spacemaker® Over-the-Range Microwave Oven
Features and Benefits
• 1.8 Cu. Ft. Large enough to your ...
Use and Care Manual - Page 2
... precautions in
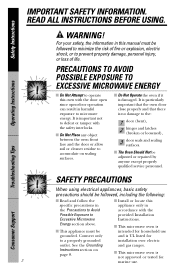
appliance only in this oven with the safety interlocks. Consumer Support For your safety, the information in
the Precautions to Avoid
accordance with the
Possible Exposure to prevent property damage, personal injury, or loss of fire or explosion, electric shock, or to
provided Installation
Excessive Microwave
Instructions.
Connect only
and is
s This...
Use and Care Manual - Page 10
... the back cover for end-of-cabinet installation. Operating Instructions
Troubleshooting Tips
Consumer Support
10 Black
JX81B, JX81H
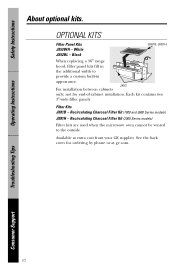
When replacing a 36″ range hood, filler panel kits fill in appearance.
Recirculating Charcoal Filter Kit (2000 Series models)
Filter kits are used when the microwave oven cannot be vented to provide a custom built-in the additional...
Use and Care Manual - Page 22

... in succession on the same food portion-it may result in the center of the microwave.
2 Press POPCORN for additional cooking time.
Place the package of popcorn in severely ... oven starts immediately.
How to Adjust the Popcorn Program to Use the Popcorn Feature
1 Follow package instructions, using the Popcorn feature.
Troubleshooting Tips
Consumer Support
22 Popcorn
How to Provide...
Use and Care Manual - Page 43

...Instructions
Operating Instructions
GE Microwave Oven Warranty. Please have other
than the intended purpose or used for a particular purpose, are , consult your local or state consumer affairs office or your home to teach you will also provide....
s Damage to obtain service under the
warranty. Proof of the microwave oven which vary from wire rack or metal/foil), or used commercially....
Installation Instructions - Page 6
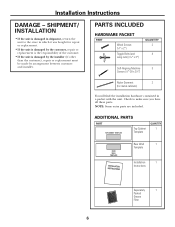
...; x 2″)
Toggle Bolts (and wing nuts) (3⁄16″ x 3″)
QUANTITY 2
4
Self-Aligning Machine
3
Screws (1⁄4″-28 x 31⁄4″)
Nylon Grommet
2
(for metal cabinets)
You will find the ... ADDITIONAL PARTS
PART
Top Cabinet Template
QUANTITY 1
Rear Wall
1
Template
Installation
1
Instructions
Separately
1
Packed
Grease
Filter
6 Installation...
Installation Instructions - Page 7

... duct preparation.
• When installing the microwave oven beneath
smooth, flat cabinets, be careful to follow the instructions on the top cabinet template for top cabinet spacing (used on recessed bottom cabinet installations only)
Saw (saber, hole or keyhole)
Stud finder or Hammer (optional)
Safety goggles
Level
Duct and masking tape
MOUNTING SPACE
161⁄2″
30″ 2″...
Installation Instructions - Page 8

REMOVING THE MICROWAVE
OVEN FROM THE CARTON/ REMOVING THE MOUNTING PLATE
1 Remove the installation instructions, filters, glass tray and the small hardware bag. This will be resting in the Styrofoam. THE MICROWAVE MUST BE CONNECTED TO AT LEAST ONE WALL STUD.
5 Remove the 2 screws from this mark.
3 Draw a line down the center of any adjacent studs...
Installation Instructions - Page 10
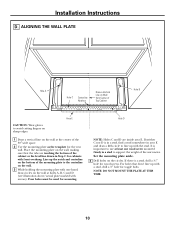
... of Top Cabinet
Hole B
CAUTION: Wear gloves to line up the notch and centerline on the circles. ALIGNING THE WALL PLATE
Hole A
Hole C Centerline Notches
Draw a Vertical Line on the wall at holes A, B, C and D (see illustration above/actual plate marked with the stud. NOTE: DO NOT MOUNT THE PLATE AT THIS TIME.
10
Installation Instructions
D. Area E
1 Draw...
Installation Instructions - Page 12
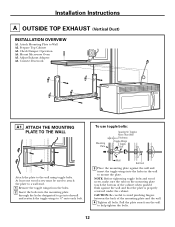
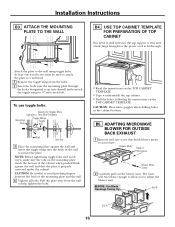
Prepare Top Cabinet A3. Mount Microwave Oven A5. ATTACH THE MOUNTING PLATE TO THE WALL
To use toggle bolts:
Mounting Plate
Spacing for Toggles More Than Wall Thickness
Toggle Wings Toggle Bolt
Attach the plate to Wall A2. NOTE: Before tightening toggle bolts and wood screw, make sure the tabs on the mounting plate touch the bottom of the cabinet when pushed...
Installation Instructions - Page 13
...-aligning screw through hole in the cabinet bottom.
A3.
Installation Instructions
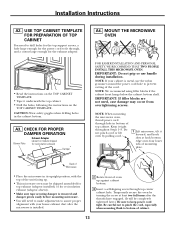
A2. USE TOP CABINET TEMPLATE FOR PREPARATION OF TOP CABINET
You need to make adjustments to keep power cord tight.
Temporarily secure the oven by pulling cord.
1 Lift microwave, tilt it tight throughout Steps 1-3.
Back of mounting plate. NOTE: When mounting the microwave oven, thread power cord...
Installation Instructions - Page 14
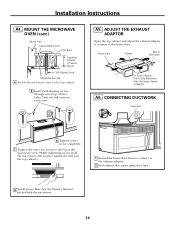
... Recess
Self-Aligning Screw
Microwave Oven Top 4 Attach the microwave oven to -Side Adjustment, Slide the Exhaust Adaptor as Needed
A6. Installation Instructions
A4. MOUNT THE MICROWAVE OVEN (cont.)
Cabinet Front Cabinet Bottom Shelf Filler Block
Equivalent to Depth of Microwave
For Front-to-Back or Side-to the top cabinet.
5 Insert 2 self-aligning screws through outer top cabinet holes.
Installation Instructions - Page 15
... one side and remove it to cut an opening in the rear wall opening , following the instructions of Microwave
• Read the instructions on the REAR WALL
TEMPLATE.
• Tape it .
15 Attach Mounting Plate to microwave. Mount the Microwave Oven
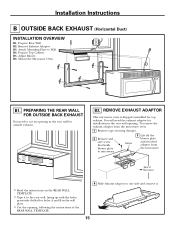
B1. PREPARING THE REAR WALL FOR OUTSIDE BACK EXHAUST
You need the exhaust adaptor for installation in...
Installation Instructions - Page 16
... Instructions
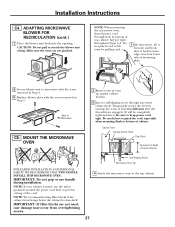
B3. USE TOP CABINET TEMPLATE FOR PREPARATION OF TOP CABINET
You need to drill holes for the top support screws and a hole large enough for Toggles More Than Wall Thickness
Toggle Wings Toggle Bolt
Wall Bolt End
3 Place the mounting plate against the wall and that holds blower motor to avoid pinching fingers between the back of Microwave...
Installation Instructions - Page 18
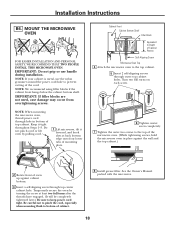
...to pinch the cord, especially when mounting flush to bottom of Cabinet Recess Self-Aligning Screw Microwave Oven Top 4 Attach the microwave oven to Depth of cabinet.
8 Install grease filter. Installation Instructions
B6. Cabinet Front Cabinet Bottom Shelf Filler Block
Equivalent to the top cabinet. 5 Insert 2 self-aligning screws through outer top cabinet holes. Turn two full turns on each...
Installation Instructions - Page 19

...NOTE: Before tightening toggle bolts and wood screw, make sure the tabs on the
TOP CABINET TEMPLATE. CAUTION: Be careful to the wall using toggle bolts. Install Charcoal Filter
C1. Prepare Top Cabinet C3. To use toggle bolts:
Mounting Plate
Spacing for the power cord to Wall C2.
Mount the Microwave Oven C6. Installation Instructions
C RECIRCULATING (Non-Vented Ductless...
Installation Instructions - Page 21
... when mounting flush to Depth of mounting plate.
8 Secure blower unit to keep power cord tight.
Installation Instructions
C4....cabinet front hangs below the cabinet bottom shelf.
NOTE: If your cabinet is metal, use handle during installation.
NOTE: When mounting the microwave oven, thread power cord through top center cabinet hole. Back of the cord. Cabinet Front Cabinet...
Installation Instructions - Page 22

... Series models, remove screws on top front of the filter should be visible from the front.
5 Replace the grille and the screws. 6 Close the door. MOUNT THE MICROWAVE OVEN (cont.)
5 Insert 2 self-aligning screws through outer top cabinet holes. Installation Instructions
C5.
Similar Questions

Disposal Of Ge Jes738wh - Countertop Microwave Oven
Hi,I live in Los Angeles and would like to know the correct way to dispose a GE JES738WH - Counterto...
Hi,I live in Los Angeles and would like to know the correct way to dispose a GE JES738WH - Counterto...
(Posted by tkaiz 7 years ago)

How Do I Install The Jx81j Charcoal Filter In My Ge Jvm1752spss Microwave Oven?
I have a GE JVM1752SPSS microwave oven and can't seem to find a simplified explanation on how to ins...
I have a GE JVM1752SPSS microwave oven and can't seem to find a simplified explanation on how to ins...
(Posted by regonzalez007 10 years ago)

Ge Spacemaker Microwave Oven
I have General Electric Spacemaker Microwave Oven model replace general electric Model JVM 1730, ...
I have General Electric Spacemaker Microwave Oven model replace general electric Model JVM 1730, ...
(Posted by snissim1 11 years ago)

Problems With Ge Jes0738dpww Microwave Oven?
Is there a known defect in or recallforthis item manufactured in Summer 2011?The "Start/Pause" and "...
Is there a known defect in or recallforthis item manufactured in Summer 2011?The "Start/Pause" and "...
(Posted by friendomine 12 years ago)

Ge Microwave Oven Model Jvm64001-no Front Panel Power But Lights & Fan Work
Microwave oven front control panel LED display doesn't power up but the fan and lights switch functi...
Microwave oven front control panel LED display doesn't power up but the fan and lights switch functi...
(Posted by MrK 12 years ago)