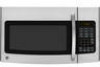
GE JVM1740SPSS Support Question
GE JVM1740SPSS Support Question
Find answers below for this question about GE JVM1740SPSS.Need a GE JVM1740SPSS manual? We have 3 online manuals for this item!
Question posted by geraldwbradshaw on September 13th, 2013
Handle
How do you tighen the screws that hold the handle?
Current Answers
Related GE JVM1740SPSS Manual Pages
Installation Instructions - Page 8

... the edges of the studs. REMOVING THE MICROWAVE
OVEN FROM THE CARTON/ REMOVING THE MOUNTING PLATE
1 Remove the installation instructions, filters, glass tray and the small hardware bag. a magnetic device which locates nails. THE MICROWAVE MUST BE CONNECTED TO AT LEAST ONE WALL STUD.
5 Remove the 2 screws from this mark.
3 Draw a line down the...
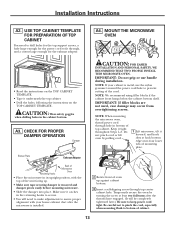
Installation Instructions - Page 12

... wood screw, make sure the tabs on the mounting plate touch the bottom of the mounting plate and the wall.
4 Tighten all bolts. CAUTION: Be careful to the wall using toggle bolts. Mount Microwave Oven A5.... A4. Prepare Top Cabinet A3.
Attach Mounting Plate to help tighten the bolts. At least one wood screw must be used to attach the plate to a wall stud. 1 Remove the toggle wings from the ...
Installation Instructions - Page 13
...It will need to drill holes for the top support screws, a hole large enough for the exhaust adaptor.
NOTE: When mounting the microwave oven, thread power cord through hole in its upright position... screws. Do not pinch cord or lift oven by turning the screw at back bottom edge onto four lower tabs of oven up .
• Make sure tape securing damper is metal, use handle during...
Installation Instructions - Page 14

... holes. Damper
Back of Cabinet Recess
Self-Aligning Screw
Microwave Oven Top 4 Attach the microwave oven to -Side Adjustment, Slide the Exhaust Adaptor as Needed
A6. CONNECTING DUCTWORK
House Duct
6 Tighten center screw completely.
7 Tighten the outer two screws to the top of the microwave oven. (While tightening screws, hold the microwave oven in place against the wall and the top cabinet...
Installation Instructions - Page 15
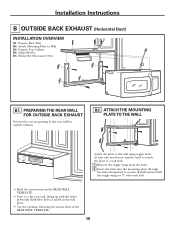
Prepare Rear Wall B2. Mount the Microwave Oven
B1. At least one wood screw must be used to attach the plate to a wall stud. 1 Remove the toggle wings from the bolts. 2 Insert the bolts into the mounting plate through
...
Installation Instructions - Page 16
... against the wall and that holds the blower motor door closed on the back and the blower retaining screw on the top of the door. Remove and save the screw that the plate is properly ...the plate away from the wall
to avoid
pinching fingers between the back of the microwave oven.
B4. Blower Retaining Screw
Blower
Back of the cabinet when pushed flush against the wall and insert the ...
Installation Instructions - Page 17

... unit back into the lower locking tabs.
Take care to the microwave oven using the screw from Step 1.
Close the blower door and secure it into the...Before Rolling
After Rolling
Back of Microwave Oven
Back of Microwave Oven
Back of Microwave Oven
Blower Retaining Screw
9 Slide the exhaust adaptor onto the back of the microwave oven. Before Rerouting
After Rerouting
CAUTION...
Installation Instructions - Page 18

... threads have engaged. (It will be completely tightened later.) Be sure to the top of the microwave oven. (While tightening screws, hold the microwave oven in bottom of oven up against cabinet bottom.
3 Insert a self-aligning screw through outer top cabinet holes. MOUNT THE MICROWAVE OVEN
CAUTION: FOR EASIER
INSTALLATION AND PERSONAL SAFETY, WE RECOMMEND THAT TWO PEOPLE INSTALL THIS...
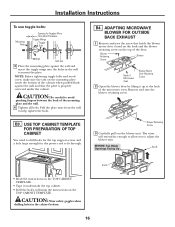
Installation Instructions - Page 19

... the plate to Wall C2.
C2.
CAUTION: Be careful to mount the plate. Mount the Microwave Oven C5. To use toggle bolts:
Mounting Plate
Spacing for the power cord to fit through the holes...TOP CABINET TEMPLATE FOR PREPARATION OF TOP CABINET
You need to drill holes for the top support screws and a hole large enough for Toggles More Than Wall Thickness
Toggle Wings Toggle Bolt
Wall Bolt ...
Installation Instructions - Page 20

... FOR RECIRCULATION
1 Remove and save the blower retaining screw.
4 Roll the blower unit 90° so that holds the blower motor door closed on the back and the blower retaining screw on the top of the microwave.
Blower Retaining Screw
Blower
Back of Microwave Oven
Blower Motor Door Retaining Screw
2 Open the blower door by lifting it up...
Installation Instructions - Page 21

....
2 Rotate front of top cabinet. Secure the blower and blower door to prevent cutting of Microwave Oven
Blower Motor Door Retaining Screw
Blower Retaining Screw
C4.
NOTE: When mounting the microwave oven, thread power cord through hole in bottom of oven up against cabinet bottom.
21
Make sure the wires are not used, case damage may occur...
Installation Instructions - Page 22

... filter at least two full turns after the threads have engaged. (It will be completely tightened later.) Be sure to the top of the microwave oven. (While tightening screws, hold the microwave oven in place against the wall and the top cabinet.)
Insert mesh-side up 6 Close the door.
8 Install grease filter. Turn two full turns...
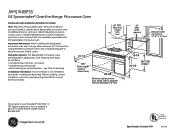
Quick Specs - Page 1
..." MAX. 12" MIN. Listed by Underwriters Laboratories
Specification Created 4/09
340148 Electrical receptacle must be used for removal of ventilation: • Outside exhaust (vertical - JVM1740SPSS
Over-the-Range Microwave Oven
GE Spacemaker® Over-the-Range MicrowavDeimOevnesnions (in inches)
Dimensions and Installation Information (in many cases. Mounting
height from floor
30" MIN...
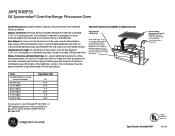
Quick Specs - Page 2
... should be taken to accommodate exhaust. Read the following carefully. If a round duct is constructed by Underwriters Laboratories
Specification Created 4/09
340148
JVM1740SPSS
GE Spacemaker® Over-the-Range Microwave Oven
Hood Exhaust Duct: Outside ventilation requires a HOOD EXHAUST DUCT. Maximum Duct Length: For satisfactory air movement, the total duct length of all...
Quick Specs - Page 3

...
Listed by Underwriters Laboratories
Specification Created 4/09
340148 Simply enter the weight of your family's favorites • F ull-View Cooktop Lighting - JVM1740SPSS
GE Spacemaker® Over-the-Range Microwave Oven
Features and Benefits • 1 .7 Cu. CONVENIENCE COOKING Popcorn Beverage Reheat
Potato Vegetable
Cook
Time Cook
Defrost Reminder Timer
Clock
Beeper Auto Nite...
Use and Care Manual - Page 4
...oven ignite, keep the oven door closed, turn the oven off and disconnect the power cord, or shut off power at the fuse or circuit breaker panel. Remove wire twist-ties and metal handles...See door surface cleaning instructions in the Care and Cleaning section(s) of the microwave oven surface when the microwave oven is in succession on the same food portion. IMPORTANT SAFETY INSTRUCTIONS
READ ALL...
Use and Care Manual - Page 7

... or next to dry newspapers.
• Not all cookware used in your microwave oven is microwave-safe, use this test: Place in the oven both the dish you are not sure if a dish is suitable for use in injury. Be sure to handle the cookware.
• "Boilable" cooking pouches and tightly closed plastic bags should...
Use and Care Manual - Page 10

... manual, features and appearance may be viewed while keeping microwaves confined in place when using the microwave.
6 Cooktop Lights.
7 Grease Filters.
8 Removable Turntable. The turntable may vary from your model.)
Features
3
4
2
1
7
896
5 7
1 Door Handle. NOTE: Rating plate, oven vent(s) and oven light are located on the oven floor or turntable.
5 Touch Control Panel You must...
Use and Care Manual - Page 29
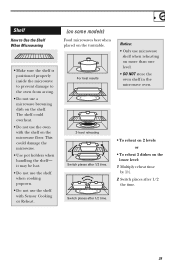
Switch places after 1/2 time.
29
The shelf could damage the microwave.
• Use pot holders when handling the shelf- This could overheat.
• Do not use the oven with Sensor Cooking or Reheat.
(on some models)
Food microwaves best when placed on the microwave floor. it may be hot.
• Do not use the shelf when...
Use and Care Manual - Page 36

oven is fully inserted into wall outlet. When the light is on display
locked.
• Press and hold CLEAR/OFF for about 3 seconds to unlock the control. Vent fan will not turn it off by pressing the Vent Fan pad after the microwave... vent fan cannot be turned off while the microwave is operating.
Power surge.
• Unplug the microwave oven, then plug it produces may be detected. ...
Similar Questions

Disposal Of Ge Jes738wh - Countertop Microwave Oven
Hi,I live in Los Angeles and would like to know the correct way to dispose a GE JES738WH - Counterto...
Hi,I live in Los Angeles and would like to know the correct way to dispose a GE JES738WH - Counterto...
(Posted by tkaiz 7 years ago)

Ge Microwave Oven With Browner Model#jes1384sf06
GE microwave oven with Browner model#Jes1384Sf06 stop working. When the timer is selected and press ...
GE microwave oven with Browner model#Jes1384Sf06 stop working. When the timer is selected and press ...
(Posted by Erdaize 8 years ago)


Ge Spacemaker Microwave Oven
I have General Electric Spacemaker Microwave Oven model replace general electric Model JVM 1730, ...
I have General Electric Spacemaker Microwave Oven model replace general electric Model JVM 1730, ...
(Posted by snissim1 11 years ago)

Ge Microwave Oven Model Jvm64001-no Front Panel Power But Lights & Fan Work
Microwave oven front control panel LED display doesn't power up but the fan and lights switch functi...
Microwave oven front control panel LED display doesn't power up but the fan and lights switch functi...
(Posted by MrK 12 years ago)