GE JSP39SNSS Support Question
GE JSP39SNSS Support Question
Find answers below for this question about GE JSP39SNSS.Need a GE JSP39SNSS manual? We have 3 online manuals for this item!
Question posted by Anonymous-39463 on October 4th, 2011
Solve F3 Error Code?
The person who posted this question about this GE product did not include a detailed explanation. Please use the "Request More Information" button to the right if more details would help you to answer this question.
Current Answers
Related GE JSP39SNSS Manual Pages
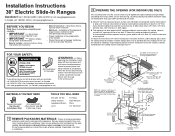
Installation Instructions - Page 1
....
2 PREPARE THE OPENING (FOR INDOOR USE ONLY)
If the countertop area is protected by the range.
Power cords 4-1/2' to 6' long may be locked, securely fasten a prominent warning device, such ...(.015" thick), .015" thick stainless steel, .025" aluminum or .020" copper. erning codes and ordinances.
• Note to allow a 24" minimum when bottom of the cabinets. Remove ...
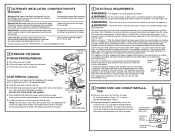
Installation Instructions - Page 2
...-
This kit can only be used when the opening in new construction, mobile home, recreational vehicle, or an area where local codes prohibit grounding through neutral require a 4-conductor, UL-listed range cord. Designed to the removal position. (Approximately 1"-2" from damaging the cable.
We recommend you connect to aluminum wiring, properly installed connectors...
Installation Instructions - Page 3

...Squeeze connector
Terminal block
Bracket
D. Ground strap must be installed before reinstalling the rear range wiring cover. Terminal block Power Cord
(appearance
FOR POWER CORD INSTALLATION
may be connected...: The neutral wire of the power cord must be installed before reinstalling the rear range wiring cover. Ground strap
or
Neutral terminal
FOR POWER CORD INSTALLATION A. Cut and ...
Installation Instructions - Page 4
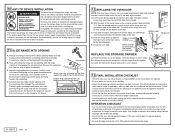
... the stops clear the guides. If the glow is within the time limit, recheck the range wiring connections. If no interference with the bracket for proper connections and voltage.
• ... is securely installed. Push the hinge locks up against the end of Front Control Panel Position range cord so that the oven control operates properly. Place the drawer rail on metal panel under ...
Quick Specs - Page 1

... electrical outlet box. Acceptable
13"
Max.
Electrical Outlet Area
15" Min.
13" Max. 15" Min.
35-7/8"-38" from floor to be allowed for location of range as a backguard when unit is protected by installing a rangreechoomomd tehnadt epdrotjeocrtesdautcleeaesxt p5"obseuyreontod tshteeafrmon, tgoref athseecsapbliantetetsr. aCnadbihneeatst. Make sure withstand the heat (up to 200...
Quick Specs - Page 2
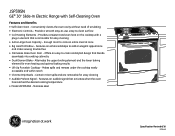
... when the oven
has reached the desired cooking temperature • Model JSP39SNSS - Offers an easy-to cook an entire meal at once •...7 56
3 4
HI 9
8
7
56
REAR
JSP39SN
Specification Revised 6/10 320643 JSP39SN
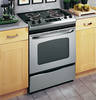
GE® 30" Slide-In Electric Range with a
plug-in element that is removable for easy cleaning • Extra-Large Oven Capacity - Conveniently cleans the oven cavity ...
Use and Care Manual - Page 1
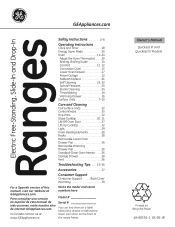
... . . . . 26 Storage Drawer 28 Vent 26
Troubleshooting Tips . . . . 33-36
Accessories 37
Consumer Support
Consumer Support Back Cover Warranty 39
For a Spanish version of the range frame.
Use and Care Manual - Page 2
...installed and engaged properly, remove the storage drawer or kick panel and look underneath the range to such substances. If it does not, the bracket must be secured by a...without a storage drawer or kick panel, carefully tip the range forward.
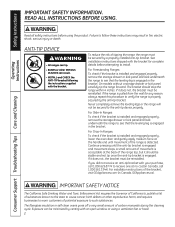
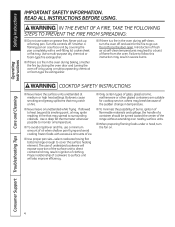
A small amount of the range top, but it should stop the range within 4 inches. Safety Instructions
Operating Instructions
IMPORTANT SAFETY ...
Use and Care Manual - Page 3
... materials contact the surface units, areas nearby the surface units or any service, unplug the range or disconnect the power supply at least an internal temperature of the oven;
These garments may... ignite.
■ Clean ventilating hoods frequently. During and after use your range unless it is properly installed and grounded by removing the fuse or switching off the ...
Use and Care Manual - Page 4
... use water on a surface unit by using a multi-purpose dry chemical or foam-type fire extinguisher.
■ If there is a fire in ignition of the range without extending over nearby surface units.
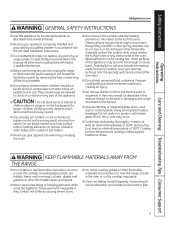
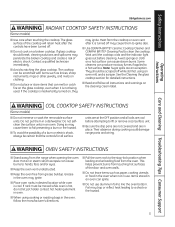
■ When preparing flaming foods under a hood, turn the oven off . Safety Instructions
Operating Instructions
IMPORTANT SAFETY INFORMATION. Smother...
Use and Care Manual - Page 5
... off.
■ Do not cook on a broken cooktop. Their absence during cooking could damage range parts and wiring. Wait until the cooktop cools and the indicator light goes out before attempting to...cleaners can melt or catch fire on the cleaning cream label.
This helps prevent burns from the range when opening the oven door. Do not put them to ignite also.
■ Use CERAMA...
Use and Care Manual - Page 7
... Safety Instructions OperaIntOisnptgreurIacnttsiitonrngusctions Care and Cleaning Troubleshooting Tips Consumer Support
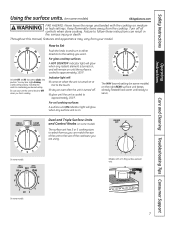
Using the surface units. (on some models)
GEAppliances.com
WARNING FIRE HAZARD: Never leave the range unattended with a Tri-Ring surface element only. Turn off .
■ glow until the unit is maintaining your model.
BURNER SIZE
9"
6"
12"
OFF
On some models...
Use and Care Manual - Page 11
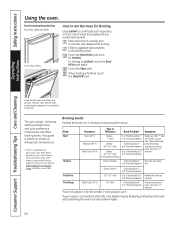
...the time or temperature by small amounts.
Bake Light Flashes while in use.
If the function error code appears during the selfcleaning cycle, check the oven door latch. NOTE: The display will increase the... the time of day clock and the display when the range is moved to turn off . The display will go. If the function error code repeats, disconnect the power to select the bake function....
Use and Care Manual - Page 14
... Broil.
When broiling is finished, touch the Clear/Off pad.
USDA Rev.
Safety Instructions
Using the oven. The size, weight, thickness, starting temperature and your range is popular, but you should be 6″ To prevent curling of meat thoroughly without overbrowning them. They cook through before browning. To change to cook...
Use and Care Manual - Page 18
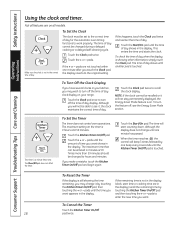
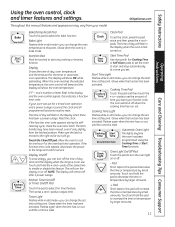
... several clocks in the display. Times more than 59 minutes should be changed to recall the clock display. The time of day shows in your range.
The time will not stay permanently displayed, the Energy Saver Mode feature is 59. Touch the + or -
Consumer Support Troubleshooting Tips Care and Cleaning
To...
Use and Care Manual - Page 20

... have made the adjustment, touch the Start/On pad to go back to turn off the time of day clock and the display when the range is too hot or too cold, you forget and leave the oven on or off after 3 hours during baking functions or after a power outage. The...
Use and Care Manual - Page 22
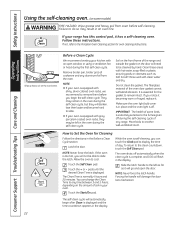
...directions in the oven during the self-cleaning cycle of soil in the display. Self Clean
If your range has this control pad, it .
Make sure the oven light bulb cover is off.
Allow the ...the Self Clean pad.
The Clean Time is too hot, you can change the Clean Time to any range. You can touch the Clock pad to the left in the Before a Clean Cycle section.
While the ...
Use and Care Manual - Page 24
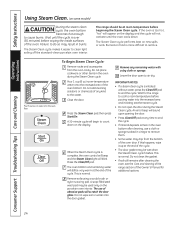
.... Do not wipe soil or water onto the door gasket.
Wait for additional options.
24 The range should be used only on new spills or soils.
Do not place cookware or other items in ... Do not add cleaning solutions or chemicals of any remaining water with a dry cloth or sponge. An error beep will still be wet when the Steam Clean cycle finishes. A 30-minute cycle will blink. This...
Use and Care Manual - Page 35
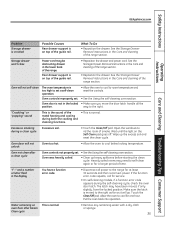
...during the self-cleaning cycle, check the oven door latch.
The latch may have a function error code.
• Disconnect all the
position. Put the oven back into operation. Water remaining on ...may be obstructing drawer in the Care and cleaning of the range section.
• Reposition the drawer. If the function error code repeats, call for one hour. Oven controls improperly set. ...
Use and Care Manual - Page 37

...(standard) broil pan does not fit in 20"/24" ranges. ** The XL pan does not fit in 24" wall ovens, 27" drop-ins or 20"/24" ranges. When you order your broiler pan within 30 days of... Purchase __________
First Name Last Name
Address _____
City State Zip Code
Phone E-Mail
Credit Card __ Check ____...
Similar Questions


Ge Jsp39snss Range
The Eyes & pans do not set firmly. They pivot ("wobble"). The eyes plug in and oposite side with...
The Eyes & pans do not set firmly. They pivot ("wobble"). The eyes plug in and oposite side with...
(Posted by rodneyatkins 9 years ago)

Is It Ok To...
Is it ok the install this range- Jsp39snss if my plug location is higher than the spec outlet locati...
Is it ok the install this range- Jsp39snss if my plug location is higher than the spec outlet locati...
(Posted by acumenbuildershawaii 10 years ago)

How Do I Get The Loc Error Code Cleared So I Can Use The Oven?
(Posted by Lizwarmbier 12 years ago)

Can You Comment About This Complaint? I'm Returning My Range With This Model Nu
I'm returning my range with this model number because I cannot tolerate the number of audible clicks...
I'm returning my range with this model number because I cannot tolerate the number of audible clicks...
(Posted by gramls 12 years ago)