GE GLDT696TSS Support Question
GE GLDT696TSS Support Question
Find answers below for this question about GE GLDT696TSS.Need a GE GLDT696TSS manual? We have 4 online manuals for this item!
Question posted by iguanatshirt on April 7th, 2020
Selection Lights Are Flashing In A Series Powers On And Will Run
The control panel powers on and off but the wash selection lights are flashing in a series from left to right. The display shows an H and maybe a 2. If you hit the selection button the machine will start and run, but its pot luck on the type of wash you get. Any sugestions?
Current Answers
Answer #1: Posted by Odin on April 7th, 2020 3:33 PM
Odin

Member since:
April 10th, 2010 Points: 41,236,660

Member since:
April 10th, 2010 Points: 41,236,660
Disconnecting power to the dishwasher for 30 seconds may clear the fault; otherwise, further service may be required. For service, you can schedule an appointment with GE Appliances Factory Service.
Hope this is useful. Please don't forget to click the Accept This Answer button if you do accept it. My aim is to provide reliable helpful answers, not just a lot of them. See https://www.helpowl.com/profile/Odin.
Related GE GLDT696TSS Manual Pages
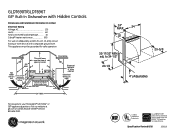
Quick Specs - Page 1
... line on
right
24" MIN.
to your Monogram,® GE Profile™ or GE® appliance questions, visit our website at ge.com or call GE Answer Center® service, 800.626.2000.
24" MAX.
24
22
32-11/32" MIN. GLDT690T/GLDT696T GE® Built-In Dishwasher with Hidden Controls
Dimensions and...
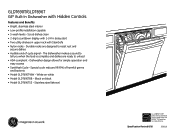
Quick Specs - Page 2
... for simple operation and
easy access • S aniWash Cycle - Specification Revised 8/10
350210 delay start • Two utility shelves in upper rack with Hidden Controls
Features and Benefits • Bright, stainless steel interior • Low-profile installation capable • 5 wash levels - Black on white • Model GLDT690TBB - Special cycle reduces 99.99% of...
Use and Care Manual - Page 1

...
GEAppliances.com
Safety Instructions 2-5
Operating Instructions
Control Panels and Settings . . . . 6,7 Loading the Dishwasher Racks 10 Using the Dishwasher 8, 9
Care Instructions
Care and Cleaning 11, 12
Troubleshooting Tips . . . 13-15
Consumer Support
Consumer Support 18 Warranty 17
Owner's Manual
GLDT690 Series GLDT696 Series
Write the model and serial numbers here:
Model
Serial...
Use and Care Manual - Page 2

... or service representative if you are in a risk of electric shock.
contact with your dishwasher unless it is necessary if this appliance from the power supply. controls, if you can result in doubt whether the appliance is
of dishwasher may result. IMPORTANT SAFETY INFORMATION.
Since the gas is specifically recommended in your appliance. If...
Use and Care Manual - Page 4

... Throw Away Your Old Dishwasher:
n Take off the door of the washing compartment or remove the door latch keeper (as described in the vicinity of children. n Load sharp knives with the handles up to damage the door seal. n Do not operate your dishwasher, follow the instructions below to play with controls. n Do not abuse...
Use and Care Manual - Page 6

... faster cycle completion. This cycle features reduced wash times to choose wash cycle. For rinsing partial loads that have been pre-rinsed. About the dishwasher control panel.
43
2
1
6
6
Control Settings
1 ON/OFF
With door open, press ON/OFF button to turn on . This cycle is meant for lightly soiled glassware. If you select sanitize cycle, at the end of...
Use and Care Manual - Page 7

... to delay the start of a wash cycle for sanitization are not reached, the light will not turn the dishwasher ON by a 60 second pump out before the start the cycle or begin the DELAY START countdown. The hours will show in the cycle (up to 24 hours. When a cycle is selected, this display is selected, the sanitized indicator light will be...
Use and Care Manual - Page 8

... temperature stops rising. If you observe foam in a glass and let the water run continuously into the final wash can discolor stainless steel.
8
Dish Preparation Prior to reduce the amount of rinse ...to the left and lift it full, but do not overfill.
1 Make sure the dishwasher door is fully open. 2 Turn the dispenser cap to prevent dish damage. using Heavy, Normal or Speed wash cycles....
Use and Care Manual - Page 11

..., bleach or products containing chlorine on the left-hand tub wall just inside the door. ...panel, make the dishwasher tub and inner door provides the highest reliability available in BB-black or WW-white)
Use a clean, soft, lightly dampened cloth, then dry thoroughly. If your model number on Stainless Steel doors. Do
not use sharp objects, scouring pads or harsh cleaners on the control panel...
Use and Care Manual - Page 12
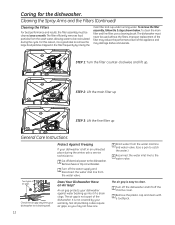
...filter efficiently removes food particles from the wash water, allowing water to be cleaned ...running water. Not all plumbing codes require air gaps, so you may not have one.
12
3
Drain water from
the water valve.
The dishwasher must be recirculated during the winter, ask a service technician to the dishwasher.
It is left in the filter frequently by your dishwasher...
Use and Care Manual - Page 13
....
Close and latch the dishwasher. If cup is draining well. review the charts on a regular basis.
Advance the control to the start of the tub immediately after...left in dispenser cups Water standing in the bottom of the tub
Suds in the tub
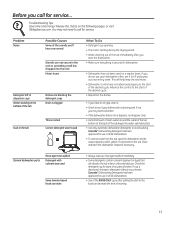
Possible Causes Some of the sounds you'll hear are normal
Utensils are not secure in the rack or something small has dropped into a disposer, run...
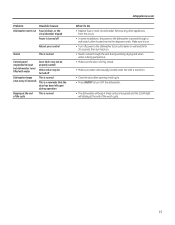
Use and Care Manual - Page 15
... is normal
Control panel responded to input
but dishwasher never filled with water
Door latch may not be properly seated
Water valve may be turned off power to the dishwasher (at circuit breaker or wall switch) for
30 seconds, then turn OFF the dishwasher.
• The dishwasher will beep 4 times (unless interupted) and the CLEAN light will display at...
Installation Instructions - Page 1

... Owner's Manual for future reference.
• Skill Level -
Product failure due to Installer - GE Appliances and Lighting Appliances
Installation Instructions
Built-In Dishwasher
If you should be installed to persons, the installer must
ensure that the dishwasher is the responsibility of electrical shock, fire,
or injury to allow for the consumer's and local...
Installation Instructions - Page 2
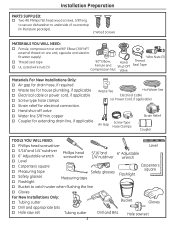
...SUPPLIED:
Two #8 Phillips flat head wood screws, 5/8"long
to secure dishwasher to underside of countertop
(in literature package).
2 Wood Screws
MATERIALS YOU WILL NEED...for drain hose, if required Waste tee for house plumbing, if applicable Electrical cable or power cord, if applicable Screw type hose clamps Strain relief for extending drain line, if ...
Installation Instructions - Page 4
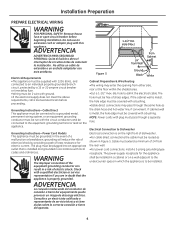
...installed in a cabinet or on the right front of sharp edges. The power-supply receptacle for electric current. ADVERTENCIA
ADVERTENCIA...hot water line, if convenient. The plug must be run with local codes and ordinances.
Electrical Connection to admit the...utilice un cable de
1-1/2" Dia. hole to Dishwasher
Grounding Instructions-Power Cord Models This appliance must be plugged into ...
Installation Instructions - Page 5

... area shown in Figure F. •The line may pass through power cord hole. Install the hot water inlet line, using no less than 3/8" O.D. Do not open the door, hold the top of the dishwasher. If it is on the left side of the dishwasher securely with plug is balance.
Shut-off the water supply...
Installation Instructions - Page 6

...
D Use UL Listed Wire Nuts
Figure 10
C
Insert Power Cord Wires Thru
Strain Relief and Tighten
Connect incoming power cord white (or ribbed) to dishwasher green wire. ADJUST LEVELING LEGS
•Move the dishwasher close to face the rear of the dishwasher .
6 INSTALL POWER CORD
Skip this step if dishwasher will be direct wired.
STEP 3 - Lift off...
Installation Instructions - Page 9

.... •Slide compression nut, then ferrule over end of the cabinet frame. SECURE DISHWASHER TO CABINET
The dishwasher must be sure
that the tub flange aligns with the 2 Phillips screws provided.
Align Tub Flange to Front Face of the control panel and can interfere with door closing the door. Re-route the lines if...
Installation Instructions - Page 11

... - If door hits cabinet, reposition or relevel dishwasher . If the rack moves, adjust leveling legs. Check for a service call that is not covered by the installer . Tighten connections if needed.
Remove protective film if present from the control panel and door..
11
Insert dishwasher wires through the small hole in contact with power cord. check...
Installation Instructions - Page 12

... Step 13. STEP 17 - There will drain about 12 minutes after corrections are turned on Dishwasher Select "Normal wash" program. Close the door. Restore power after the first fill. See Step 12. Open dishwasher door and make modifications without giving prior notice.
12 Allow the toe kick to leave complete literature package...
Similar Questions

Power Light Stays On, Select Switch Does Not Work, Motor Will Not Power On.
(Posted by lavere70 9 years ago)


Portable Dishwasher Glc4400; Control Panel Does Not Light.
Control panel does not light up; not able to operate at all. Ihave checked power at house receptacle...
Control panel does not light up; not able to operate at all. Ihave checked power at house receptacle...
(Posted by rhartmann126 11 years ago)
