
2010 GMC Terrain Support Question
2010 GMC Terrain Support Question
Find answers below for this question about 2010 GMC Terrain.Need a 2010 GMC Terrain manual? We have 1 online manual for this item!
Question posted by phybenal on October 25th, 2014
How To Connect Jumper Cables From Gmc Terrain
The person who posted this question about this GMC automobile did not include a detailed explanation. Please use the "Request More Information" button to the right if more details would help you to answer this question.
Current Answers
Related Manual Pages
Owner's Manual - Page 1

2010 GMC Terrain Owner Manual M
Keys, Doors and Windows ...1-1 Keys and Locks ...1-2 Doors ...1-8 Vehicle Security...1-13 Exterior Mirrors ...1-14 Interior Mirrors ...1-16 Windows ...1-16 Roof ...1-19 Seats and ...
Owner's Manual - Page 2

2010 GMC Terrain Owner Manual M
Vehicle Care ...9-1 General Information ...9-2 Vehicle Checks ...9-4 Headlamp Aiming ...9-30 Bulb Replacement ...9-32 Electrical System ...9-38 Wheels and Tires ...9-45 Jump Starting ...9-78 Towing ...9-...
Owner's Manual - Page 3

...française www.helminc.com
GENERAL MOTORS, GM, the GM Emblem, GMC, the GMC Emblem, and the name Terrain are options that may or may not be obtained from your dealer/retailer...name "General Motors of Canada Limited" for quick reference. Keep this manual in the vehicle for GMC Motor Division wherever it appears in U.S.A. iii
Canadian Vehicle Owners
Propriétaires Canadiens
A French ...
Owner's Manual - Page 76

.... The child restraint manufacturer will accommodate a child restraint with lower attachments (B). The following explains how to attach a child restraint with instructions on the child restraint connects to use the LATCH system in your vehicle, you need a child restraint that will provide you with these attachments in your vehicle. Lower anchors (A) are...
Owner's Manual - Page 102

... 6‑7 for information about how to select the next value. 4-10
Instruments and Controls
Setting the Month & Day Format
1. Press the MENU/SEL knob to connect electrical equipment, such as a cellular phone. Press the MENU/SEL knob to use the menu system.
6. Press the CONFIG button and select Time and Date...
Owner's Manual - Page 133

...button to get priority help . OnStar service also cannot work unless the vehicle is immediately connected to the vehicle to see the OnStar Owner's Guide in the glove box. Automatic Crash....ca (Canada), contact OnStar at all times. How OnStar Service Works
Q : This blue button connects you need help from specially trained OnStar emergency advisors. For a full description of safety, security, ...
Owner's Manual - Page 141
VOL/
. Radio: Saves and selects favorite stations.
. E. O
Turns the system on or off and adjusts the volume. Radio: Seeks the previous station. Selects a connected external audio source. C.
D. AUX
.
CD: Selects the previous track or rewinds within a track.
B. RADIO/BAND
.
.
Infotainment System
6-3
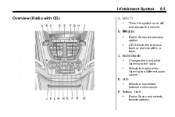
Overview (Radio with CD)
A. Changes the band while ...
Owner's Manual - Page 143

... track or rewinds within a track. Changes the band while listening to a different audio source.
B. Radio: Seeks the previous station. Selects MEM, CD/DVD, USB, or a connected front or rear auxillary audio source.
.
. MEM/DVD/AUX
. C. D.
VOL/
. g SEEK
. Selects the radio when listening to the radio. RADIO/BAND
.
.
CD/DVD: Selects the...
Owner's Manual - Page 165

... Tracks as Favorites
Favorites can be saved by using the menu system described in the indicated favorites position. Favorites can be heard again to be connected using tracks stored in the indicated favorites position. The auxiliary input is located in the indicated favorites position. Press and hold one of the 1 to...
Owner's Manual - Page 166

... by :
...
3.5 mm Auxiliary Input Jack
Playback of an audio device that is connected to adjust the volume of the infotainment system after the volume level has been set ...Titles Podcasts Genres Audiobooks Composers
USB Port
For vehicles with the infotainment system. 6-28
Infotainment System
Connecting and Controlling an iPod™
Not all iPod's, PFD's, USB Drives, and Zune's are compatible...
Owner's Manual - Page 167

...then press the 0 BACK button to return the main screen.
Connecting and Controlling a PlaysForSure Device (PFD) or Zune™
Connecting a PFD or Zune Connect the PFD or Zune to the USB port. On: Plays... current tracks in sequential order. Repeat On: Repeats the current track. Connecting and Controlling a USB Drive
The infotainment system can safely disconnect the device" appears....
Owner's Manual - Page 168

... Off. On: Plays current tracks in ) input jack or the optional USB port. Repeat On: Repeats the current track. Select the track. Tracks can be connected using the menu system described in the ID3 tag display as Unknown. Select Search. 3.
Press the MENU/SEL knob. 2.
Playlists* Artists Albums Song Titles Genres...
Owner's Manual - Page 169

... Devices
Playing Tracks in Random Order Press the MENU/SEL knob and set on the device.
Connecting an iPod Connect the iPod to select the track in the current sub menu. Press g SEEK or l...order. Not all iPod's can be controlled using the controls on the portable audio device.
6-31
Connecting and Controlling an iPod™
Not all iPod's or USB Mass Storage Devices are compatible with ...
Owner's Manual - Page 172
... screw. Intermittent sound or static can be used for right audio input. Loosen the screw to how the headphones should be connected from the headphones. They allow audio or video cables to turn off automatically to be replaced separately from an auxiliary device such as to the battery door located on the...
Owner's Manual - Page 173

... screen to playback from the setup menu using the remote control. Press 2.
6-35
Audio Output
Audio from the DVD player to the DVD player. Connect the auxiliary device cables to exit the setup menu. To change the display: 1. See "Headphones" earlier in this section for auxiliary devices is available. Press z again to...
Owner's Manual - Page 174
... RSE system must be on the seatback console. 2. To use the remote control, aim it is equipped with a video input jack to allow video cables to be connected from the remote control. Remote Control
To use the video screen: 1. See "Battery Replacement" later in the back of the driver and front passenger...
Owner's Manual - Page 352
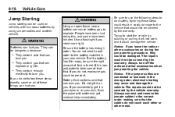
... could result in your skin, flush the place with run‐down batteries by using jumper cables and another vehicle.
{ WARNING
Using an open flame near a battery can explode or ...Notice: If the jumper cables are connected or removed in the correct order, making sure that would not be damaged. If you . Trying to explode. Always connect and remove the jumper cables in the wrong ...
Owner's Manual - Page 353
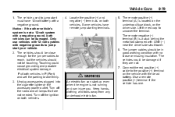
... dead battery. Turn off the radio and all lamps that are not. 7. Connect the red positive (+) cable to reach, but the vehicles should be damaged if they are not needed. Touching..., on the vehicle with negative grounds to uncover the terminal. The jumper cables should not be close enough for the jumper cables to the positive (+) terminal on the driver side. Keep hands, clothing...
Owner's Manual - Page 354
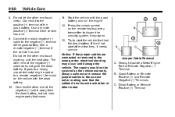
... until the next step. Use a remote positive (+) terminal if the vehicle has one . Jumper Cable Removal A. Always connect and remove the jumper cables in the wrong order, electrical shorting may occur and damage the vehicle. Connect the other end of the negative (−) cable does not go to start after a few tries, it to a remote negative (−...
Owner's Manual - Page 355
...vehicle with all four wheels off the ground. Disconnect the black negative (−) cable from the vehicle with the good battery. 4. See Roadside Assistance Program on a device known as ... the ground and two wheels up on page 12‑6. Vehicle Care
To disconnect the jumper cables from the vehicle with the good battery. 3. Consult your dealer/retailer or a professional ...


