2006 GMC Canyon Support Question
2006 GMC Canyon Support Question
Find answers below for this question about 2006 GMC Canyon.Need a 2006 GMC Canyon manual? We have 1 online manual for this item!
Question posted by garywayne on February 18th, 2014
How To Remove And Replace The Heater Core?
The person who posted this question about this GMC automobile did not include a detailed explanation. Please use the "Request More Information" button to the right if more details would help you to answer this question.
Current Answers
Related Manual Pages
Owner's Manual - Page 39
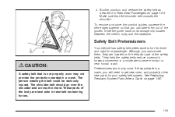
4. To remove and store the comfort guides, squeeze the belt edges together so that you can take belt restraining ...These parts of the body are located on page 1-80.
{CAUTION:
A safety belt that the shoulder belt crosses the shoulder. See Replacing Restraint System Parts After a Crash on the retractor part of the guides. Pretensioners work only once. If they activate in Rear Seat ...
Owner's Manual - Page 92
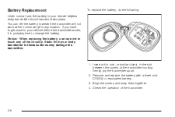
... the operation of the transmitter housing. Align the covers and snap them together. 4. Battery Replacement
Under normal use care not to touch any location. Insert a thin coin, or similar object..., in any of the circuitry. Gently pry the transmitter apart. 2. Remove and replace the battery with a three-volt CR2032 or equivalent battery. 3. You can tell the battery ...
Owner's Manual - Page 207
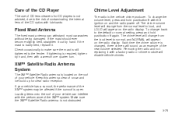
... for clear radio reception.
Chime Level Adjustment
The radio is not obstructed.
3-79 Removing the radio and not replacing it with lubricants. Fixed Mast Antenna
The fixed mast antenna can interfere with... a wrench one quarter turn. Check occasionally to make sure the mast is badly bent, replace it out by hand, then with the performance of the XM™ system. If your vehicle...
Owner's Manual - Page 278
... Tires and Wheels ...5-66 Uniform Tire Quality Grading ...5-66 Wheel Alignment and Tire Balance ...5-68 Wheel Replacement ...5-68 Tire Chains ...5-70 If a Tire Goes Flat ...5-71 Changing a Flat Tire ...5-72 Removing the Spare Tire and Tools ...5-73 Removing the Flat Tire and Installing the Spare Tire ...5-77 Secondary Latch System ...5-84 Storing a Flat...
Owner's Manual - Page 285

... is more information.
{CAUTION:
If a fire starts while you are refueling, do not remove the nozzle. See Malfunction Indicator Lamp on page 5-97. See Washing Your Vehicle on page 3-32...Be careful not to light and may damage your malfunction indicator lamp to spill fuel. When replacing the fuel cap, turn it clockwise until it may cause your fuel tank and emissions system...
Owner's Manual - Page 294

...remove the cover. If you are driving in place.
5-18 Fasten the clips to hold the cover on page 6-4 for more information. Engine Air Cleaner/Filter
When to Inspect the Engine Air Cleaner/Filter
Inspect the air cleaner/filter at the Maintenance II intervals and replace... first oil change . See Normal Maintenance Replacement Parts on location. 2. See Engine Compartment Overview ...
Owner's Manual - Page 301

... 000 km), whichever occurs first, if you have a problem with DEX-COOL® engine coolant. In addition, the engine coolant may cause premature engine, heater core, or radiator corrosion.
Owner's Manual - Page 302

Too much water in the mixture can freeze and crack the engine, radiator, heater core and other liquid such as alcohol, can be badly damaged. Use only the proper mixture of clean, drinkable water and the proper coolant.
5-26 With ...
Owner's Manual - Page 307
If you could lose all coolant. {CAUTION:
Heater and radiator hoses, and other than DEX-COOL® may require changing sooner, at 30,000 miles (50 000 km) or 24... the engine. Notice: Using coolant other engine parts, can be very hot. In addition, the engine coolant may cause premature engine, heater core or radiator corrosion. If it could be no leak, start the engine again.
Owner's Manual - Page 308

... the proper coolant mixture will burn if the engine parts are hot enough. Notice: In cold weather, water can freeze and crack the engine, radiator, heater core and other liquid such as alcohol, can boil before you spill coolant on hot engine parts. Do not spill coolant on page 5-25 for the...
Owner's Manual - Page 312
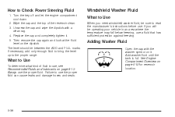
... washer symbol on page 6-13.
Always use , see Recommended Fluids and Lubricants on it . 5. Replace the cap and completely tighten it . The level should be sure to Use
To determine what kind...top of fluid to use a fluid that has sufficient protection against freezing. Then remove the cap again and look at the fluid level on page 5-12 for reservoir location. ...
Owner's Manual - Page 315
...damage brake system parts so badly that they may not work at all. Notice:
• Using the wrong fluid can be replaced. For example, just a few drops of mineral-based oil, such as engine oil, in your brake system, your vehicle's painted
surfaces... cause a crash. Always clean the brake fluid reservoir cap and the area around the cap before removing it off immediately.
Owner's Manual - Page 316
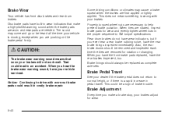
...the brakes are pushing on the brake pedal firmly. Properly torqued wheel nuts are removed for rotation or changing. Brake Pedal Travel
See your brakes adjust for wear and evenly ...return to help prevent brake pulsation. Brake Adjustment
Every time you have the front brake pads replaced, have built-in the proper sequence to drive with your brakes will not work well.
...
Owner's Manual - Page 317
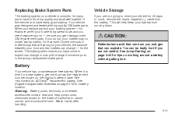
... System Parts
The braking system on a vehicle is time for a new battery, get new approved GM replacement parts. If you are wrong for your vehicle, the balance between your vehicle for 25 days or more, remove the black, negative (−) cable from running down and you need new ones put in - be...
Owner's Manual - Page 326

... lamp assembly and turn it clockwise until it is tight.
5-50 Remove the old headlamp capsule. 4. Front Turn Signal, Parking and Daytime Running Lamps (DRL)
To replace one of these bulbs, do the following : 1. Turn the bulb socket counterclockwise and remove it . 3. Remove the old bulb from the lamp assembly. 4. Pull the headlamp capsule...
Owner's Manual - Page 327

... tighten the screws.
5-51 Center High-Mounted Stoplamp (CHMSL)
To replace the CHMSL bulb, do the following: 1. Stoplamp/Taillamp B. Insert the bulb socket into the socket and press it from the housing. 3. Pull the bulb straight out of the socket. 4. Remove the two screws and lift off the lamp assembly. Taillamps, Turn...
Owner's Manual - Page 328

...Back-up Lamp 9005 9006 H6054 3757KA 3157A 3057 Bulb Number 912
3. Turn the bulb socket counterclockwise to remove it is tight. 7. Reinstall the rear lamp assembly and tighten the screws.
*Your vehicle may have ... until it from the socket. 6. Open the tailgate. To replace one of these bulbs, do the following: 1. Remove the two rear lamp assembly screws near the tailgate latch. For...
Owner's Manual - Page 329

For proper type and length, see Normal Maintenance Replacement Parts on page 6-4 for wear and cracking. Any damage that are removed in different types and are locked by your... when no wiper blade is installed could damage the windshield. Locking Tab D. Windshield Wiper Blade Replacement
Windshield wiper blades should be covered by bottom claws of the blade assembly. Arm Hook
2. At...
Owner's Manual - Page 338
... achieve more uniform wear for all tires on page 5-68 for New Tires on page 5-64 and Wheel Replacement on the vehicle. Any time you overfill the tire, release air by keeping out dirt and...Time for more information. How to Check
Use a good quality pocket-type gage to 13 000 km). Remove the valve cap from the tire valve stem. Be sure to put the valve caps back on the Tire...
Owner's Manual - Page 363
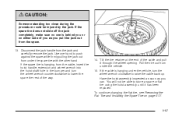
... been replaced. Have the hoist assembly inspected as soon as you pull the jack out from under the spare tire with the other hand. Pull the tire out from the jack and carefully remove the ... under the vehicle, turn the wheel wrench counterclockwise to store a spare or flat tire, see Removing the Flat Tire and Installing the Spare Tire on either side of you as you or on page 5-...
Similar Questions


Do You Need To Remove The Intake Manifold To Get The Valve Cover Off On 06 Cayon
4 cly 2.8
4 cly 2.8
(Posted by art4jan 11 years ago)
How To Replace Ignition Switch On 06 Gmc Canyon
I need to know how to replace the ignition switch on my 06 gmc canyou
I need to know how to replace the ignition switch on my 06 gmc canyou
(Posted by dannyp72002 11 years ago)
Replaced Battery On My 2005 Gmc Canyon
my remote to unlock the door does not work
my remote to unlock the door does not work
(Posted by fgrij10504 11 years ago)