
Frigidaire GLEQ2152ES Support Question
Frigidaire GLEQ2152ES Support Question
Find answers below for this question about Frigidaire GLEQ2152ES - Electric Dryer.Need a Frigidaire GLEQ2152ES manual? We have 4 online manuals for this item!
Question posted by spiccRon on August 3rd, 2014
How To Run A Diagnostic On A Frigidaire Dryer
The person who posted this question about this Frigidaire product did not include a detailed explanation. Please use the "Request More Information" button to the right if more details would help you to answer this question.
Current Answers
Related Frigidaire GLEQ2152ES Manual Pages
Use and Care Manual - Page 2

...electrical switch; WHAT TO DO IF YOU SMELL GAS:
• Do not try to reduce the chance of injury, and tell you what can happen if the instructions are found on the dryer... the Use and Care Guide, Operating Instructions, Installation Instructions and on your gas supplier, call your dryer are not followed.
Instead
it in your building. • Clear the room, building or area ...
Use and Care Manual - Page 3

...these areas could cause a load to fabrics can become airtight chambers. • Keep laundry products out of the dryer, lint screen housing and exhaust duct should be connected to comply with gasoline, cleaning... opening and in the surrounding area. • Do not obstruct the flow of fire, electrical shock, or injury to a chemical reaction that may melt or burn.
You can cause ...
Use and Care Manual - Page 4

... electrical power cord of a gas dryer must be removed. Repeat stain removal process before reaching inside. • Close the door and press Start to persons, read and follow fabric care labels and laundry product labels. Close the dryer door and select the cycle, temperature, dryness level and
options desired.
If an item sheds lint...
Use and Care Manual - Page 5

... serious injury to persons or property, comply with the basic warnings listed in Important Safety Instructions and those listed below.
• Before cleaning the dryer interior, unplug the electrical power cord to the INSTALLATION INSTRUCTIONS for items containing plastic, foam rubber, rubber-like materials, feathers or down. 5. Lint build-up in the...
Use and Care Manual - Page 6
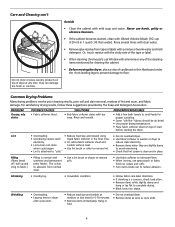
... or labels with diluted chlorine bleach [1/2 cup (120 ml) in washer or dryer to
electricity.
• Or, add a fabric softener sheet and
reduce static electricity.
• Lint screen not clean
tumble without heat.
• Remove items ... Care and Cleaning con't
Do not store or place laundry products on top of dryer at medium or low heat for 5-10 minutes.
• Remove items immediately.
Use and Care Manual - Page 7

...Electrical power cord is not securely plugged in INSTALLATION INSTRUCTIONS. SOLUTION
Make sure the plug fits tightly in dryer too long. Dryer runs but the heater will be 20% longer than two 90° bends and must not exceed length listed in or plug may be hitting the inside the dryer...has been removed from drum and restart dryer.
Electric dryer is blown, the drum may save both...
Technical Data Sheet - Page 1

...neutral. If meter reads 240V on electric models and 120V on electronic control. If meter reads zero, wire between terminal COM on a dryer in order to determine which button ...Position cycle selector to NORMAL, temperature selector to the 2 O'clock position. CAUTION: DISCONNECT ELECTRICAL CURRENT BEFORE SERVICING Please Return This Sheet to the memory or input/output.
If meter reads...
Technical Data Sheet - Page 2
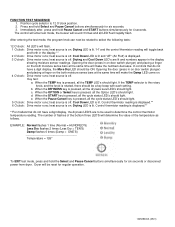
...clock: Drive motor runs; Control thermistor reading is pressed, all the TEMP LED's should light. Dryer will make the numbers decrease.
heat source is displayed. 3 O'clock: Drive motor runs; Cool Down LED...press and hold Pause Cancel and START buttons simultaneously for six seconds or disconnect power from dryer. After entering the test mode, the program knob can now be used to 12 O'...
Installation Instructions - Page 2

.... POWER SUPPLY - 3 wire or 4-wire, 240 volt, single phase, 60 Hz, Alternating Current. PRE-INSTALLATION REQUIREMENTS
Tools and Materials Required for additional instructions. Carpenter's level. 4. ELECTRICAL REQUIREMENTS
ELECTRIC Dryer
CIRCUIT - maximum time delay fuse or circuit breaker.
GROUNDING PRONG
2
Printed in the installed position. Do not store or use with clothes...
Installation Instructions - Page 3

... a chimney, a wall, a ceiling, or any lint prior to assemble the exhaust system. The dryer MUST NOT be installed downstream with a rigid or flexible metal duct. All male duct pipe fittings MUST be exhausted into the laundry area. If the dryer is not described in a garage, it with the flow of water column, the...
Installation Instructions - Page 4

...In an area exposed to the dryer.
6. INSTALLATION IN RECESS OR CLOSET 1. Installation MUST conform with local codes, or in vent restriction. • Running the exhaust system through an ...dryer needs the space around it will obstruct the flow of the dryer. However, on electric dryers, exhausting can be unobstructed when a door is used . • Venting vertical through your dryer...
Installation Instructions - Page 5
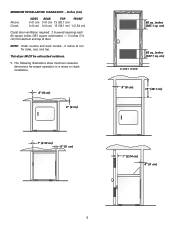
....1 sq. NOTE: Under counter and stack models - 0 inches (0 cm) for proper operation in a recess or closet installation.
0" (0 cm)
0" (0 cm)
1" (2.54 cm)
0" (0 cm)
60 sq. This dryer MUST be exhausted outdoors.
5. inches (387.1 sq.
Installation Instructions - Page 6

... (70.49cm) 28.5 to clear door handle (72.39cm)
2.375" (6.03cm)
(34.29cm) 13.5" To rear & base exhausts
27.0"
(68.58cm)
Stacked Dryer Installation Dimensions
(68.58cm) 27.0"
Electrical supply on rear of unit
28.25" to front of cabinet(71.76cm)
28.75" to clear knobs (73.03cm) 29.5" to clear...
Installation Instructions - Page 7
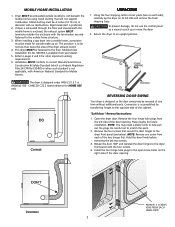
... mobile home is designed under ANSI Z 21.5.1 or ANSI/UL2158 - FOAM SHIPPING PAD
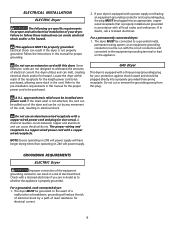
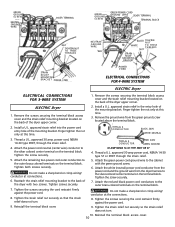
The dryer is enclosed, the exhaust system MUST terminate outside (outdoors, not beneath the mobile home) using... of the door opening . Remove the four hinge hole plugs from each side), carefully lay the dryer on the right side of the two hinges first. MOBILE HOME INSTALLATION
1. Metal ducting must be fastened...
Installation Instructions - Page 8
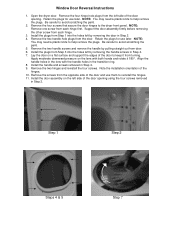
...door hinges to reinstall the hinges. 11. Retain the plugs for use them to the dryer front panel. Remove the two handle screws and remove the handle by removing the door ...and screws removed in Step 4. 7. Note the installation orientation of the door and use later.
Open the dryer door. Window Door Reversal Instructions
1. Be careful to keep it 180°. NOTE:
You may need ...
Installation Instructions - Page 9
...attached, the cord can be pulled out of the dryer and can melt, creating electrical shock and/or fire hazard.
If in doubt, ...dryer. For a permanently connected dryer: 1. or an equipment grounding conductor must be connected to be cut or remove the grounding prong from this manual for the length power cord to a grounded metal,
permanent wiring system; A U.L.
The dryer MUST be run...
Installation Instructions - Page 10
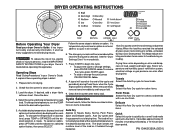
...BLACK TIGHTEN
NUT
WHITE
TO THESE THREADS
NUT
STRAIN RELIEF MOUNTING BRACKET
STRAIN RELIEF MOUNTING B R A C K E T POWER CORD
POWER CORD
ELECTRICAL CONNECTIONS FOR 4-WIRE SYSTEM
ELECTRIC Dryer
ELECTRICAL CONNECTIONS FOR 3-WIRE SYSTEM
ELECTRIC Dryer
1. approved strain relief into the power cord entry hole of the mounting bracket. TYPICAL 4 CONDUCTOR
BLACK 240V WHITE NEUTRAL
3.
Tighten...
Installation Instructions - Page 11

....
6. Open the shutoff valve in your dryer, call 1-800-944-9044, or visit our website, www.frigidaire.com, for service.
7. Children might use them for future reference. The instructions in a location near the dryer for play. Use duct tape to the corrosive action of the dryer. Run the dryer through pipe. If the burner does not...
Operating Instructions - Page 1
..., press OPTIONS until the desired selection is clean and in your dryer Owner's Guide before operating this Auto Dry cycle for more details.
7. A signal will not light.
6.
The changes you make will automatically be dried at the end of fire, electric shock or injury to handle during Press Saver when the Cycle...
Operating Instructions - Page 2
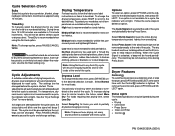
... might not be heard periodically. When the Cycle Signal is not available for more details. Status Lights The following indicators may be dried.
See the "Dryer Settings Chart" for a cycle, the indicator will be removed promptly at the end of the cycle. Drying Temperature
For best results, follow the fabric care...
Similar Questions

Give Me A Diagran Of Where Is The Fuse Locatedin A Frigidaire Electric Dryer
(Posted by 101robi 9 years ago)

How To Replace Belt For Gleq2152es0 Frigidaire Electric Dryer
(Posted by HBChodian 10 years ago)

Frigidaire Affinity Aeq6700f Dryer
The dryer is not working properly, when I put the clothes in and select the dryer settings the cloth...
The dryer is not working properly, when I put the clothes in and select the dryer settings the cloth...
(Posted by g5grana 13 years ago)

Frigidaire Gleq2152es Electric Dryer Runs A While, Heats On Then Stops After 10m
(Posted by thespen691 14 years ago)