
Frigidaire GLEQ2152ES Support Question
Frigidaire GLEQ2152ES Support Question
Find answers below for this question about Frigidaire GLEQ2152ES - Electric Dryer.Need a Frigidaire GLEQ2152ES manual? We have 4 online manuals for this item!
Question posted by noBruyii on February 26th, 2014
Frigidaire Dryer Gleq2152es0 Won't Spin
The person who posted this question about this Frigidaire product did not include a detailed explanation. Please use the "Request More Information" button to the right if more details would help you to answer this question.
Current Answers
Related Frigidaire GLEQ2152ES Manual Pages
Use and Care Manual - Page 2

...liquids in personal injury, property damage or damage to reduce the chance of electrical and electronic equipment. It also contains information about recycling
of others . ...instructions before using this product, please contact your local city office, your
Purchase Date dryer.
Model Number This Use and Care Guide provides general operating
instructions for several other ...
Use and Care Manual - Page 3

... materials, when heated, can become airtight chambers. • Keep laundry products out of children's reach. The interior of the dryer, lint screen housing and exhaust duct should be connected to an... on or near children. ELECTRIC DRYERS:
14-30R
FUSED 30 AMP 120/240 V OR 120/208 V WALL RECEPTACLE
DRYER
DRYER SERVICE CORD
Grounding type wall receptacle
GAS DRYERS:
Do not under certain ...
Use and Care Manual - Page 4

...Injury • To prevent shock hazard and assure stability during operation, the dryer must be installed and electrically grounded by a qualified service person in accordance with controls. - The ... INSTRUCTIONS for your specific model. • Always read and follow fabric care labels and laundry product labels. Press START to resume the cycle. 6. Prepare items for easy removal.
...
Use and Care Manual - Page 5

...Instructions and those listed below.
• Before cleaning the dryer interior, unplug the electrical power cord to illuminate the dryer drum during Extended Tumble at the bottom of the door ... cloth and a mild liquid household cleanser. Insert drying rack into the dryer drum. If lint screen is opened to avoid electrical shock hazards.
• Do not use any accumulation of lint around ...
Use and Care Manual - Page 6
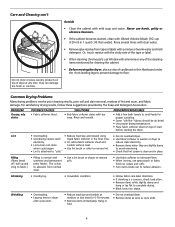
... diluted chlorine bleach [1/2 cup (120 ml) in washer or dryer to
electricity.
• Or, add a fabric softener sheet and
reduce static electricity.
• Lint screen not clean
tumble without heat.
•...with a mixture of load
before starting the dryer. Rinse and rewash. Care and Cleaning con't
Do not store or place laundry products on top of dryer at medium or low heat for 5-10 ...
Use and Care Manual - Page 7

... a 208 volt circuit.
Reset circuit breaker or replace fuse. Make sure electrical line is not overloaded and the dryer is blown, the drum may be hitting the inside the dryer.
Dryer should heat when utility service is clogged with lint. Lint screen is restored. Electric dryer is not open . Drying procedures have not been met. Excessive...
Technical Data Sheet - Page 1

...good models, the five indicator lights of Drying, Cool Down, Wrinkle Rid, and Clean Lint Filter Spin will pause for six seconds. 3. The five indicator lights and the START indicator light start flashing at... light will flash four times indicating the 4. If meter reads 240V on electric models and 120V on a dryer in moisture sensor bar circuit or dirty bars. Disconnect wire going to HIGH...
Technical Data Sheet - Page 2
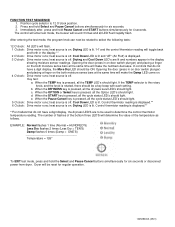
... a digit display, the More Dry LED should be reset for six seconds or disconnect power from dryer. Control thermistor reading is on . The number of flashes of the bottom three LED'S will rapidly... test mode, press and hold Pause Cancel and START buttons simultaneously for six seconds. 3. Dryer will make the Damp LED come on the both moisture sense bars at the same time will be a...
Installation Instructions - Page 2

..., 30 amp., with 4 open end spade lug connectors with clothes dryers. Carpenter's level. 4. Duct tape. 6. Rigid or flexible metal 4 inch (10.2 cm) duct. 7. ELECTRICAL REQUIREMENTS
ELECTRIC Dryer
CIRCUIT - NEMA 10-30R
NEMA 14-30R
GAS Dryer
CIRCUIT - POWER SUPPLY CORD - POWER SUPPLY CORD KIT - See ELECTRICAL CONNECTIONS for use with a 120 volt 3-wire power cord.
branch...
Installation Instructions - Page 3

... example: clothing, draperies/curtains, paper) to assemble the exhaust system. Do not install the dryer where gasoline or other obstruction. Failure to determine if the exhaust system is made up inside ... dryer times. The following method must be exhausted into the laundry area. If the dryer is not described in a garage, it with a rigid or flexible metal duct. Set the dryer ...
Installation Instructions - Page 4

... cm)
13 1/2" (34 cm)
4 3/8" (11 cm) 3 3/4" (9.5 cm()9.5 cm)
GAS SUPPLY REQUIREMENTS
Replace copper connecting pipe that will come in the
same closet as the Gas dryer. 3.
However, on electric dryers, exhausting can be inspected and cleaned a minimum of local codes, with a solid door.
4. The tubing MUST be to the...
Installation Instructions - Page 5
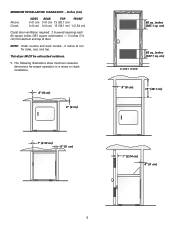
NOTE: Under counter and stack models - 0 inches (0 cm) for proper operation in a recess or closet installation.
0" (0 cm)
0" (0 cm)
1" (2.54 cm)
0" (0 cm)
60 sq. This dryer MUST be exhausted outdoors.
5. Inches (cm)
Alcove Closet
SIDES REAR
TOP
FRONT
0 (0 cm) 0 (0 cm) 15 (38.1 cm)
0 (0 cm) 0 (0 cm) 15 (38.1 cm) 1 (2.54 cm)
Closet ...
Installation Instructions - Page 6

... (70.49cm) 28.5 to clear door handle (72.39cm)
2.375" (6.03cm)
(34.29cm) 13.5" To rear & base exhausts
27.0"
(68.58cm)
Stacked Dryer Installation Dimensions
(68.58cm) 27.0"
Electrical supply on rear of unit
28.25" to front of cabinet(71.76cm)
28.75" to clear knobs (73.03cm) 29.5" to clear...
Installation Instructions - Page 7
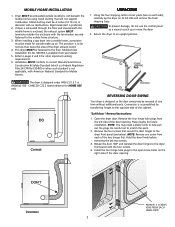
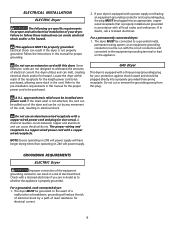
...32-80) or when such standard is not applicable, with the termination securely fastened to the dryer front panel (see below). Remove the four hinge hole plugs from the left side and ...Mobile Home Installation Kit No. 346764 is enclosed, the exhaust system MUST terminate outside make up or move the dryer.
2. To prevent damage, do not use the control panel as a means to scratch the paint.
2....
Installation Instructions - Page 8
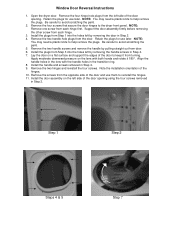
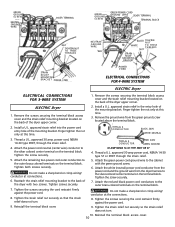
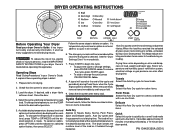
... the handle screws in Step 2. NOTE:
You may need a plastic knife to reinstall the hinges. 11. Step 1
Step 2
Steps 4 & 5
Step 7 Open the dryer door. Be careful to the dryer front panel. Apply moderate downward pressure on the lens with the handle holes in Step 4. 9.
Support the door assembly firmly before removing the...
Installation Instructions - Page 9
...shorts. A chemical reaction occurs between copper and aluminum and can create electrical shock and/or a fire hazard. NOTE: Dryers operating on 240 volt power supply. ELECTRICAL INSTALLATION
ELECTRIC Dryer
The following are specific requirements for proper and safe electrical installation of your dryer is equipped with a power supply cord having an equipment-grounding conductor and a grounding...
Installation Instructions - Page 10
...RED
BLACK TIGHTEN
NUT
WHITE
TO THESE THREADS
NUT
STRAIN RELIEF MOUNTING BRACKET
STRAIN RELIEF MOUNTING B R A C K E T POWER CORD
POWER CORD
ELECTRICAL CONNECTIONS FOR 4-WIRE SYSTEM
ELECTRIC Dryer
ELECTRICAL CONNECTIONS FOR 3-WIRE SYSTEM
ELECTRIC Dryer
1. Tighten both screws securely.
Reinstall the terminal block access cover. 10 approved 30 amp power cord, NEMA 14-30 type...
Installation Instructions - Page 11

... free from combustible materials, gasoline, and other literature included with rugs, bedspreads, or plastic sheets can cause improper and dangerous operation. If this dryer are needed for the Frigidaire Company Authorized Parts Distributor nearest you. REPLACEMENT PARTS
If replacements parts are not meant to light.
6. Destroy the carton and plastic bags after...
Operating Instructions - Page 1
...the load as it tumbles through heated air.
Operating Steps
Read "Drying Procedures" in your dryer Owner's Guide before operating this Auto Dry cycle for a desired option flashes, then press... the selected temperature to be displayed for each cycle.
To reduce the risk of fire, electric shock or injury to quickly dry a small load made .
It has important safety and warranty...
Operating Instructions - Page 2
... may be lighted during the cycle: • Drying • Cool Down • Press Saver • Clean Lint Filter • Control
PN 134431300A (0501) See the "Dryer Settings Chart" for the desired option flashes, then press SELECT. High heat is available with every cycle.
Note: Using No Heat in 15-minute increments...
Similar Questions

Fgr641fs0 Frigidaire Dryer Doesn't Spin. Blower Motor Still Makes Noise
My dryer is about 10 years old. It squeaked for months, but that slowly decreased. Now the drum does...
My dryer is about 10 years old. It squeaked for months, but that slowly decreased. Now the drum does...
(Posted by tcguy99 9 years ago)

Can't Get Front Panel Off Of Frigidaire Dryer Model Gleq2152es0
(Posted by prttim 9 years ago)

How To Replace Frigidaire Gleq2152es0 Dryer Belt
(Posted by lovelDainj 10 years ago)
How To Replace Belt For Gleq2152es0 Frigidaire Electric Dryer
(Posted by HBChodian 10 years ago)

My Dryer Drum Is Not Spinning, I Think It Is The Drum Belt, I Need The Manual
(Posted by sevillapedro 13 years ago)