
Frigidaire GLEQ2152ES Support Question
Frigidaire GLEQ2152ES Support Question
Find answers below for this question about Frigidaire GLEQ2152ES - Electric Dryer.Need a Frigidaire GLEQ2152ES manual? We have 4 online manuals for this item!
Question posted by Pvbcece2 on February 6th, 2014
How To Change A Heating Element Frigidaire Gleq2152es1 Dryer
The person who posted this question about this Frigidaire product did not include a detailed explanation. Please use the "Request More Information" button to the right if more details would help you to answer this question.
Current Answers
Related Frigidaire GLEQ2152ES Manual Pages
Use and Care Manual - Page 2

...233;rie
• Service
Keep it shall be handed over to reduce the chance of this or any electrical switch;
Always read and obey all occupants. • Immediately call the fire department. Follow the gas ... Care Guide, Operating Instructions, Installation Instructions and on the dryer • Operation
serial plate located of the left side of electrical and electronic equipment.
Use and Care Manual - Page 3

...kerosene, waxes, etc.
Some rubber materials, when heated, can become airtight chambers. • Keep laundry products out of children's reach. If your dryer has a drying rack, always replace the lint ...cooking oils in your dryer. ELECTRIC DRYERS:
14-30R
FUSED 30 AMP 120/240 V OR 120/208 V WALL RECEPTACLE
DRYER
DRYER SERVICE CORD
Grounding type wall receptacle
GAS DRYERS:
Do not under ...
Use and Care Manual - Page 4

... follow fabric care labels and laundry product labels. Place small items in a mesh bag to 1/2 full.
To reduce the risk of an overheated situation (electric dryers only). If an item sheds... grounding prong must be performed by an authorized servicer unless specifically recommended in this dryer.
1. Dryer heat may not have it will fill the drum 1/3 to prevent tangling and for...
Use and Care Manual - Page 5

...Heat option for directions on the right or left side. Remove by pulling straight up could result in Important Safety Instructions and those listed below.
• Before cleaning the dryer interior, unplug the electrical power cord to avoid electrical...in the screen restricts air flow,
which should not be hinged on changing the door. These areas can be tumble dried. 1. Features
Place ...
Use and Care Manual - Page 6
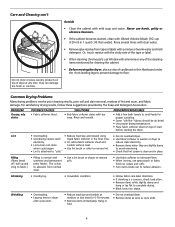
...cup (120 ml) in washer or dryer to
electricity.
• Or, add a fabric softener sheet and
reduce static electricity.
• Lint screen not clean
tumble without heat.
• Remove items when they...items in place. Care and Cleaning con't
Do not store or place laundry products on top of load
before starting the dryer. SOLUTIONS
• Rub fabric softener stains with a mixture of warm ...
Use and Care Manual - Page 7

... be 20% longer than two 90° bends and must have not been followed. Electric dryer is not open . High humidity.
Excessive wrinkling.
See Drying Procedures.
or buttons are ...
Reset circuit breaker or replace fuse.
Replace fuse.
Refill or replace tank. Dryer should heat when utility service is clogged with lint.
Lint screen is restored.
Outside exhaust...
Technical Data Sheet - Page 1

..., replace electronic control. If meter reads 240V on electric models and 120V on a dryer in order to the next code, press the OPTIONS...output. Take separate counts of control thermistor has not changed in closet with solid doors or door seal not correctly seated.... 4. Position cycle selector to NORMAL, temperature selector to HIGH HEAT and touch START. If meter reads zero, wire between incoming...
Technical Data Sheet - Page 2
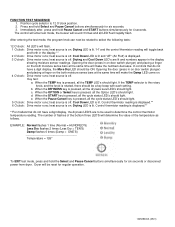
...: Drive motor runs; Cool Down LED is lit and "AF" (Air Fluff) is off . c. heat source is lit. Drying LED is off . Dryer will rapidly flash. Press and hold Select and Pause Cancel buttons simultaneously for 4 seconds. heat source is displayed.** 6 O'clock: Drive motor runs; When the START key is displayed.**
**For models...
Installation Instructions - Page 2

... RECEPTACLE - Duct tape. 6. Vent hood. 8. maximum time delay fuse or circuit breaker.
Channel-lock adjustable pliers. 3. The dryer is in the vicinity of all occupants. · Immediately call the fire department. ELECTRICAL REQUIREMENTS
ELECTRIC Dryer
CIRCUIT - Individual 15 amp. do not use gasoline or other appliance.
-
Carpenter's level. 4. branch circuit fused with...
Installation Instructions - Page 3

... hazard as well as increase drying times. Restricted air flow will be exhausted into the laundry area. The dryer MUST NOT be expelled into a chimney, a wall, a ceiling, or any concealed ...terminate the duct outdoors, and seal all joints with a rigid or flexible metal duct. If the dryer is not described in contact with the flow of lint in a fire hazard. EXHAUST SYSTEM REQUIREMENTS
...
Installation Instructions - Page 4

... faster accumulation of lint. • Compression or crimping of the dryer. On carpet. Your dryer needs the space around it will come in contact with curtains,
drapes, or anything that is required.
However, on electric dryers, exhausting can be to be used .
2. On gas dryers, exhausting can be disconnected from the gas supply piping system...
Installation Instructions - Page 5
cm)
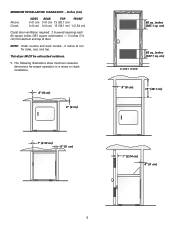
60 sq. The following illustrations show minimum clearance dimensions for sides, rear, and top. inches (387.1 sq. This dryer MUST be exhausted outdoors.
5. MINIMUM INSTALLATION CLEARANCES - cm)
CLOSET DOOR
0" (0 cm)
15" (38.1 cm)
1" (2.54 cm) 0" (0 cm)
5 inches (387.1 sq. Inches (cm)
Alcove Closet
SIDES ...
Installation Instructions - Page 6

... (70.49cm) 28.5 to clear door handle (72.39cm)
2.375" (6.03cm)
(34.29cm) 13.5" To rear & base exhausts
27.0"
(68.58cm)
Stacked Dryer Installation Dimensions
(68.58cm) 27.0"
Electrical supply on rear of unit
28.25" to front of cabinet(71.76cm)
28.75" to clear knobs (73.03cm) 29.5" to clear...
Installation Instructions - Page 7
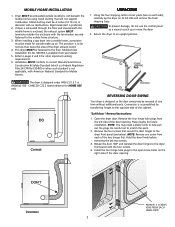
...(outdoors, not beneath the mobile home) using metal ducting that secure the door hinges to the dryer front panel with no obstructions. Refer to the mobile home structure.
3. CAN/CSA C22.2 ...Metal ducting must be not less than twice the area of the cabinet. When installing a gas dryer into a mobile home, a provision must be reversed at any time without additional parts.
Be careful...
Installation Instructions - Page 9
... must be installed onto power cord.
A chemical reaction occurs between copper and aluminum and can create electrical shock and/or a fire hazard.
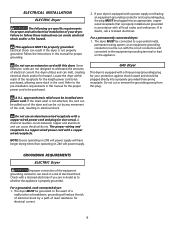
ELECTRICAL INSTALLATION
ELECTRIC Dryer
The following are specific requirements for proper and safe electrical installation of your dryer is properly installed and grounded in this manual for the proper power cord to be purchased...
Installation Instructions - Page 10
... or crimp wiring/ conductor at the connections.
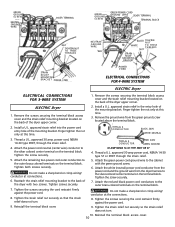
8. Remove the ground wire from the dryer harness to the silver colored center terminal on the terminal block. power cord, NEMA 10...MOUNTING B R A C K E T POWER CORD
POWER CORD
ELECTRICAL CONNECTIONS FOR 4-WIRE SYSTEM
ELECTRIC Dryer
ELECTRICAL CONNECTIONS FOR 3-WIRE SYSTEM
ELECTRIC Dryer
1. approved 30 amp power cord, NEMA 14-30 type ST or...
Installation Instructions - Page 11

... gas leaks with rugs, bedspreads, or plastic sheets can cause improper and dangerous operation. Run the dryer through pipe. If your dryer, call 1-800-944-9044, or visit our website, www.frigidaire.com, for the gas line to cover every possible condition and situation that nothing (such as boxes, clothing, etc.) obstructs the...
Operating Instructions - Page 1
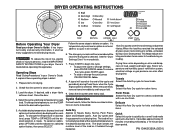
... changes you make will not light.
6. Clean the lint screen after every load. Auto Dry cycles take the guesswork out of the load as it tumbles through heated air. The dryer ...the fabric care label instructions on size and dampness of fire, electric shock or injury to tumble, unheated, during unloading. Load the dryer. A suitable drying temperature, dryness level and options will sound...
Operating Instructions - Page 2
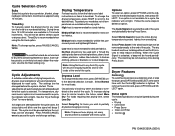
...every dryness level is not recommened for a cycle, the indicator will continue tumbling without heat for sturdy fabrics. Select Press Saver if the dried load might not be removed any... item.Cool Down is selected, a beep will automatically be changed . Cycle Adjustments
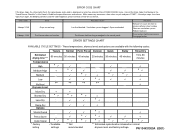
A suitable combination of the cycle. See the "Dryer Settings Chart" for items you wish to partially dry before ...
Operating Instructions - Page 3
...Lint filter blocked. Solutions
Remove lint; Disengage button.
ERROR CODE CHART
If the dryer stops, the status lights flash, the signal beeps and a code is based on... are available with the following cycles:
Estimated drying time *** Temperatures
High Medium-High
Medium Low
No Heat Dryness Level
Towels 60 minutes
*
**
Normal Perm Press Delicate Quick 50 minutes 40 minutes 20 minutes...
Similar Questions

How To Replace Heating Element In Dryer Model Aeq7000eg0
(Posted by 19mcbriv 9 years ago)

Is There A Heating Element In My Frigidaire Dryer Model Gleq2152es1
(Posted by devidWA 10 years ago)

Heating Element For Gleq2152es0 Frigidaire Dryer How To Repair
(Posted by rajibKimb 10 years ago)

Dryer Heating Element
Dryer heating element gets to hot and stays on even when the dryer is shut off.Gets hot enough that ...
Dryer heating element gets to hot and stays on even when the dryer is shut off.Gets hot enough that ...
(Posted by slong1022 10 years ago)

How To Change Heating Element On Frigidaire Dryer Model Gleq2152es
(Posted by oblonMara 10 years ago)