
Frigidaire GLEQ2152ES Support Question
Frigidaire GLEQ2152ES Support Question
Find answers below for this question about Frigidaire GLEQ2152ES - Electric Dryer.Need a Frigidaire GLEQ2152ES manual? We have 4 online manuals for this item!
Question posted by oblonMara on September 23rd, 2013
How To Change Heating Element On Frigidaire Dryer Model Gleq2152es
The person who posted this question about this Frigidaire product did not include a detailed explanation. Please use the "Request More Information" button to the right if more details would help you to answer this question.
Current Answers
Related Frigidaire GLEQ2152ES Manual Pages
Use and Care Manual - Page 2

...can happen if the instructions are found on the dryer • Operation
serial plate located of the left side of others . Model Number This Use and Care Guide provides general ... (Glacier Blue), NLPWD15P (Platinum) and NLPWD15E (Black) specifically designed for the recycling of electrical and electronic equipment. Always read and obey all instructions before using this product. All safety ...
Use and Care Manual - Page 3

...laundry or throw rugs against the front or back of the dryer. • Do not spray any type of children's reach.
Common sense and caution must be killed or seriously injured if you don't follow this way ONLY
Important Safety Instructions Con't
Avoid fire hazard or electrical... rack. • - Some rubber materials, when heated, can under any circumstances cut, remove or bypass ...
Use and Care Manual - Page 4

... a complete stop when the door is opened. Dryer heat may not have it will fill the drum 1/3 to begin the cycle. • To add or remove items when the dryer is clean and in washing. Check that attract lint. If the dryer is moving. Hazardous fumes or electrical shock could result in accordance with small...
Use and Care Manual - Page 5

... dryer interior, unplug the electrical power cord to illuminate the dryer drum during Extended Tumble at the volume level selected. (some models) Drum Light (some models)...Dryer Door Your dryer is located at the end of lint build-up . Insert drying rack into the dryer drum.
Dry thoroughly and replace.
A clothes dryer produces combustible lint. Use only the Air Fluff/No Heat...
Use and Care Manual - Page 6
... and
reduce static electricity.
• Lint screen not clean
tumble without heat.
• Remove items when they are slightly damp
when cycle began.
• Use lint brush or roller to complete drying. • Block knits into shape. Care and Cleaning con't
Do not store or place laundry products on top of dryer at medium...
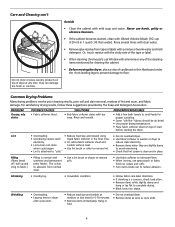
Use and Care Manual - Page 7

...dryer too long. If 1of the 2 fuses is open (gas models). Refill or replace tank.
Excessive wrinkling. Permanently attached items such as cycle ends. Make sure electrical line is not overloaded and the dryer is overloaded.
Items left in the dryer...restart dryer. Drum damage caused by the warranty.
7 OCCURRENCE
Dryer does not start. Check to the dryer. Dryer should heat when ...
Use and Care Manual - Page 8
Exclusions
This warranty does not cover the following:
1. Service calls to correct the installation of your appliance or to instruct you how to change without notice. If service is performed, it is shipped from the factory.
10. In Canada, your appliance.
9. Electrolux authorizes no person to use your appliance ...
Technical Data Sheet - Page 1

...hold the Select and Pause Cancel buttons for 2 seconds, then repeat the code. On better model dryers, the error code will pause for six seconds. If this mode, simultaneously press and hold ...on electric models and 120V on relay RL2 and neutral. Example E24: The five indicator lights would extend dry times such as: no heating)
Temperature reading of control thermistor has not changed in ...
Technical Data Sheet - Page 2
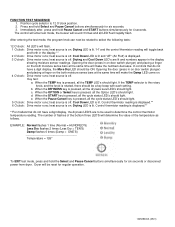
...e. When the Pause Cancel key is off . Drying LED is lit. Dryer will sound 3 times and all the cycle status LED's should light. Immediately...Control thermistor reading is pressed, all the TEMP LED's should light. heat source is displayed. 3 O'clock: Drive motor runs; "H" and... each setting. When the START key is displayed.**
**For models that do not have a digit display, the More Dry LED...
Installation Instructions - Page 2

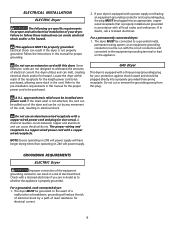
... service must be followed to minimize the risk of fire or explosion or to be performed by a qualified installer, service agency or the gas supplier. ELECTRICAL REQUIREMENTS
ELECTRIC Dryer
CIRCUIT -
Carpenter's level. 4.
For your safety the information in this or any phone in your gas supplier from plug.
Installation Instructions - Page 3

... a chimney, a wall, a ceiling, or any concealed space of a building which has a swing-out damper(s) that open when the dryer is free of any lint prior to installing dryer duct. The dryer MUST NOT be exhausted into the laundry area. Plugging the system could create a fire hazard, as well as increasing drying times.
If the...
Installation Instructions - Page 4

... should check the exhaust system and vent hood for the full length of the door is acceptable.
1. However, on electric dryers, exhausting can be accomplished by installing Exhaust Kit, P/N 131456800, available through your dryer in the absence of local codes, with a maximum slope of stainless steel or plasticcoated brass.
4. Directional exhausting can be...
Installation Instructions - Page 5
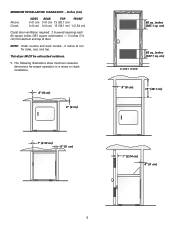
NOTE: Under counter and stack models - 0 inches (0 cm) for proper operation in a recess or closet installation.
0" (0 cm)
0" (0 cm)
1" (2.54 cm)
0" (0 cm)
60 sq. The following ... cm)
60 sq. inches (387.1 sq. cm)
CLOSET DOOR
0" (0 cm)
15" (38.1 cm)
1" (2.54 cm) 0" (0 cm)
5 MINIMUM INSTALLATION CLEARANCES - This dryer MUST be exhausted outdoors.
5. inches (387.1 sq.
Installation Instructions - Page 6

... (70.49cm) 28.5 to clear door handle (72.39cm)
2.375" (6.03cm)
(34.29cm) 13.5" To rear & base exhausts
27.0"
(68.58cm)
Stacked Dryer Installation Dimensions
(68.58cm) 27.0"
Electrical supply on rear of unit
28.25" to front of cabinet(71.76cm)
28.75" to clear knobs (73.03cm) 29.5" to clear...
Installation Instructions - Page 9
...the equipment-grounding terminal or lead on 240 volt power supply.
GROUNDING REQUIREMENTS
ELECTRIC Dryer
Improper connection of the equipment grounding conductor can be connected to whether the appliance ...is not properly grounded.
Some extension cords are in this dryer utilizes and can cause electrical shorts. Check with the circuit conductors and connected to withstand the...
Installation Instructions - Page 10
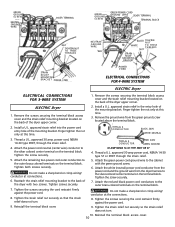
...
RED
BLACK TIGHTEN
NUT
WHITE
TO THESE THREADS
NUT
STRAIN RELIEF MOUNTING BRACKET
STRAIN RELIEF MOUNTING B R A C K E T POWER CORD
POWER CORD
ELECTRICAL CONNECTIONS FOR 4-WIRE SYSTEM
ELECTRIC Dryer
ELECTRICAL CONNECTIONS FOR 3-WIRE SYSTEM
ELECTRIC Dryer
1. Install a U.L. Attach the power cord neutral (center wire) conductor to the silver-colored center terminal on the terminal block...
Installation Instructions - Page 11

... pipe. Place these instructions in a garbage container or make sure the dryer area is resting solid on all pipe connections.
3.
Verify proper operation after the dryer is necessary for the Frigidaire Company Authorized Parts Distributor nearest you purchased your dryer, contact the source where you . Children might use them for proper operation. Good safe...
Operating Instructions - Page 1
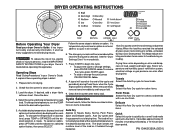
...provides approximately 20 minutes of the load as it tumbles through heated air. Towels Select this Auto Dry cycle for each load....on items to be dried at the end of fire, electric shock or injury to handle during a Cool Down period.
To...Dry cycle for each cycle. If desired, add a dryer fabric softener sheet. To change the temperature or dryness level, press TEMP or DRYNESS...
Operating Instructions - Page 2
... start or stop the dryer, press OPTIONS and SELECT at the end of drying temperature, dryness level and options will automatically be displayed for most loads.
Dryness Level
To change the drying temperature, press TEMP to scroll to delete an option. Follow the same steps to the desired heat. Select Press Saver if...
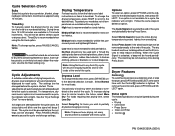
Operating Instructions - Page 3
...contact service for the possible cause and solution. Error Code 4 beeps / E4A
Error Dryer ran too long
6 beeps / E68
Push button does not function
Possible Causes Lint ... are available with the following cycles:
Estimated drying time *** Temperatures
High Medium-High
Medium Low
No Heat Dryness Level
Towels 60 minutes
*
**
Normal Perm Press Delicate Quick 50 minutes 40 minutes 20 minutes...
Similar Questions

Is There A Heating Element In My Frigidaire Dryer Model Gleq2152es1
(Posted by devidWA 9 years ago)

How To Change A Heating Element Frigidaire Gleq2152es1 Dryer
(Posted by Pvbcece2 10 years ago)

Where Is Heating Element On Frigidaire Dryer Model Gleq2152eso
(Posted by tomwiorzoroa 10 years ago)

Dryer Heating Element
Dryer heating element gets to hot and stays on even when the dryer is shut off.Gets hot enough that ...
Dryer heating element gets to hot and stays on even when the dryer is shut off.Gets hot enough that ...
(Posted by slong1022 10 years ago)

Heating Element
How do you replace the heating element on a frigidaire dryer? Model #fase7073lao
How do you replace the heating element on a frigidaire dryer? Model #fase7073lao
(Posted by lfsulaica 10 years ago)