Electrolux EIMGD60JMB Support Question
Electrolux EIMGD60JMB Support Question
Find answers below for this question about Electrolux EIMGD60JMB.Need a Electrolux EIMGD60JMB manual? We have 4 online manuals for this item!
Question posted by grasman on September 7th, 2011
Taking Drier Apart To Convert To Propane
The person who posted this question about this Electrolux product did not include a detailed explanation. Please use the "Request More Information" button to the right if more details would help you to answer this question.
Current Answers
Answer #1: Posted by OnlineOutreachSpecialist on September 8th, 2011 8:40 AM
OnlineOutreachSpecialist

Member since:
March 30th, 2011 Points: 2,848,320

Member since:
March 30th, 2011 Points: 2,848,320
Basic Step By Step Instructions:
First access the burner compartment. Usually a small access door in the lower right hand or left hand corner on some brands or models. Remove access panel.
On some brands and/or models the entire front panel must be removed. Look for screws in the door frame and/or at the base of the front panel. May have screws in both locations on some machines.
Some brands and/or models the top lid must first be lifted up wards. On many of these machines there will be no screws in the door frame. Usually only two screws are the base of the machine. Some no screws anywhere external. In this case, if there are two screws at the base remove them.
Then insert a thin blade or old credit card between the top lid and front panel about two or three inches in wards from each corner. Push in wards to release the clips while lifting up wards on the top lid. Each clip can be released separately or both at once.
Once the front panel is removed or access door is opened, look to the right of the gas control valve. There will be a tiny gas shut off valve on the gas supply pipe. Turn that tiny lever so it is across the pipe. Doing so turns off the gas to the control valve.
Than remove the wire quick disconnects from the solenoids on top of the gas valve. Than loosen and remove the hex nut on the control valve to separate the gas supply pipe from the control.
FYI:
That hex nut is reverse threaded. Which means the hex nut turns opposite (counter clock wise) to loosen it and clockwise to tighten it. Use a backup wrench to hold the pipe while turning that nut counter clock wise.
Once the pipe is removed, there will be two or more sheet metal screws holding down the plate the control is mounted onto. Remove those screws.
Than carefully remove the burner out enough to get to the wires attached to the flame sensor, which is attached to the burners shroud cover. Remove that wire quick disconnect also.
Than remove the entire burner as an assembly. Remove the brass or bronze orifice in the burners nozzle. Replace the orifice with an LP or NAT orifice to match the BTU rating of the burner.
BTU rating is on the manufacturers plate with the model and serial numbers, usually located in the door frame. Most dryers are either 18,000 or 22,000 Btu's. Install an LP or NAT orifice to match the rating.
Than convert the built into the gas valve regulator. By removing the cap on top of the tower and turning it over and reinstalling it. Cap should be marked "N" or "NAT" for natural gas and "L" or "LP" for propane.
Turning the towers cap over converts the regulator. Side of the cap facing you indicates the fuel type it is set for. Not all regulators are convertible in this manner. Check with any local appliance parts store.
Some gas control valves do not have regulators that are convertible while some have a set screw to turn to another position or a lever to turn to another position. Several variables are possible.
Appliance parts dealers are an excellent source for original replacement parts and conversion parts. Dealers are listed in the phone book under appliances.
Be sure the electrical power to the appliance is turned off, before attempting any repairs. Always check for gas leaks when reconnecting any of a gas part.
Use the reply button to add additional information or ask additional questions. Doing so will automatically move your question to the top of the forums list of questions.
DRYER SERVICE TIP:
It's always advisable to clean the entire exhaust venting system every 2 years. Or during any dryer maintenance, connection and or repairs.
Online Outreach Specialist
Related Electrolux EIMGD60JMB Manual Pages
Complete Owner's Guide (English) - Page 2
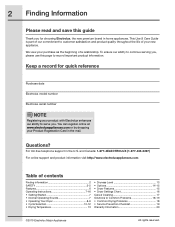
...; Cycle Selection 10-12 • Drying Temperature 13
• Dryness Level 13 • Options 14-15 • Dryer Features 15 • Dryer Settings Chart 16 Care & Cleaning 17 Solutions to continue serving you, please use this guide
Thank you . This Use & Care Guide is part of our ...
Complete Owner's Guide (English) - Page 3
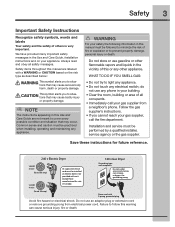
...follow this Use and Care Guide are labeled with a WARNING or CAUTION based on electric dryers (not provided with 3-prong grounded plug
Avoid fire hazard or electrical shock.
Installation...property damage.
Power cord with unit except those manufactured for future reference.
240 v Electric Dryer
120 v Gas Dryer
10-30R 3-wire
(fused 30 amp)
14-30R 4-wire
(fused 30 amp)
UL...
Complete Owner's Guide (English) - Page 4
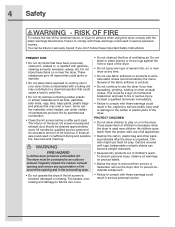
... squeaking, grinding, rubbing or other packing materials after each load. As children grow, teach them for play on or near the dryer. 4 Safety
WARNING - You can become airtight chambers.
• Keep laundry products out of mechanical breakdown and lead to catch fire.
• Do not dry articles containing rubber, plastic or...
Complete Owner's Guide (English) - Page 5
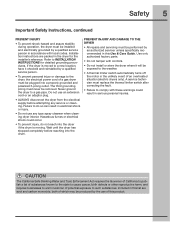
...in this list are packed in serious personal injuries. Failure to do not reach into the dryer if the drum is moved to comply with local codes. Safety 5
Important Safety Instructions, ...continued
PREVENT INJURY
• To prevent shock hazard and assure stability during operation, the dryer must be produced by the use of this product. CAUTION
The California Safe Drinking Water...
Complete Owner's Guide (English) - Page 7
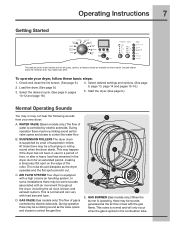
...cycle. (See page 9, pages 10-12 and page 18.)
4. During operation there may happen if the dryer has not been in use for a period of time, or after a heavy load has remained in ... 9, page 13, page 14 and pages 15-16.)
5. AIR FLOW SYSTEM Your dryer is normal and can vary with a high volume air handling system. Load the dryer. (See page 9.)
3. C. This is equipped with load size and type. A...
Complete Owner's Guide (English) - Page 8
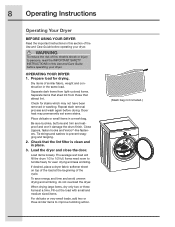
... drying and less wrinkling. Be sure buckles, buttons and trim are heatproof and won't damage the drum finish. Load the dryer and close the door. If desired, place a dryer fabric softener sheet on top of the load at a time. When drying large items, dry only two or three items at the...
Complete Owner's Guide (English) - Page 9
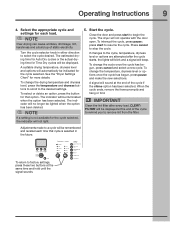
...Auto Dry cycles or the actual drying time for Time Dry cycles will beep. See the "Dryer Settings Chart" for that cycle is not available for each time that option. To change the...delete an option, press the button for more details.
Turn the cycle selector knob in the future. The dryer will not light.
5.
To change the cycle once the cycle has begun, press cancel and select a ...
Complete Owner's Guide (English) - Page 10
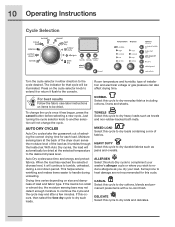
...continue to dry everyday fabrics including cottons, linens and sheets. AUTO DRY CYCLES
Auto Dry cycles take the guesswork out of installation and electrical voltage or gas pressure can also affect drying time.... overalls. With Auto Dry cycles, the load will be dried at the back of the dryer drum sense the moisture level of fabrics.
Items prone to the desired dryness level. Moisture...
Complete Owner's Guide (English) - Page 11
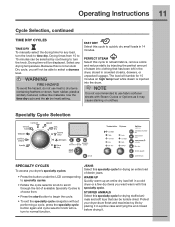
... you will be tumble dried. WARM UP Quickly warm up an entire dry load left in the dryer, stored in 14 minutes.
STUFFED ANIMALS Select this cycle to normal function. Select any load, turn...drying it may cause staining on high temp heat while steam is not an Auto Dry cycle, you dryer's specialty cycles:
• Press the button under the LCD corresponding to specialty cycles.
• ...
Complete Owner's Guide (English) - Page 12

... level and options will be indicated.
Thoroughly treat stains in washer before placing in dryer. Your personalized cycle can be washed through a full wash cycle. AIR CLEAN For dry laundry items that customized cycle to avoid stains in dryer. ACTIVE WEAR Select this specialty cycle for drying soft-sided pet beds, pet pillows...
Complete Owner's Guide (English) - Page 13

..., it cannot be selected and will be dried.
A higher temperatures is selected in the future, select max. To return to the degree of Residential Clothes Dryers
Dryness Level (Auto Dry)
The appropriate dryness level will be indicated when the cycle is not appropriate for most cotton fabrics.
If a temperature is selected...
Complete Owner's Guide (English) - Page 14
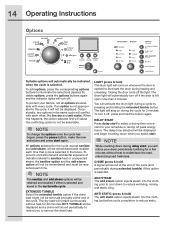
... same cycle will conflict with every cycle. ANTI STATIC (press & hold ) A signal will sound at the end of the cycle. To protect your dryer periodically tumbling for a few minutes without heat for 3 minutes. The drum light will automatically turn off peak energy hours.
All options selected for the cycle...
Complete Owner's Guide (English) - Page 15
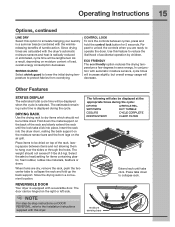
...option reduces the drying temperature a few degrees to protect fabrics from overdrying.
Use this dryer. Fold down the metal support on the back of the rack, leaving space between cycles...be lengthened. Repeat to unlock the controls when you are ready to simulate hanging your laundry in a convenient location. Other Features
STATUS DISPLAY
The estimated total cycle time will decrease....
Complete Owner's Guide (English) - Page 16
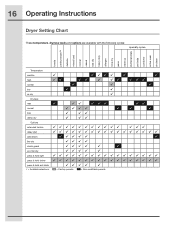
16 Operating Instructions
Dryer Setting Chart
These temperature, dryness levels and options are available with the following cycles: specialty cycles
towels perfect steam™ delicate mixed load normal casual ...
Complete Owner's Guide (English) - Page 17
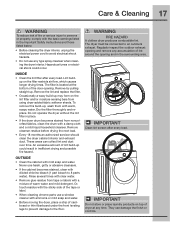
...before drying the next load.
• Every 18 months an authorized servicer should clean the dryer cabinet interior and exhaust duct. Rinse several times with clear water.
• Remove glue ...from noncolorfast fabrics, clean the drum with warm, soapy water. IMPORTANT
Do not store or place laundry products on the filter restricts air flow, which causes longer drying times. Remove the...
Complete Owner's Guide (English) - Page 18
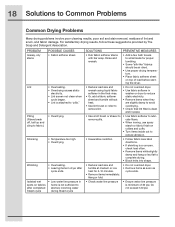
...involve poor cleaning results, poor soil and stain removal, residues of load before starting the dryer.
• Reduce load size and rewash using liquid fabric softener in the final...5-10 minutes.
• Remove items immediately.
Wrinkling
• Overloading. • Leaving items in dryer after completed Steam cycle
• Low water line pressure in place.
• Use a lint ...
Complete Owner's Guide (English) - Page 19
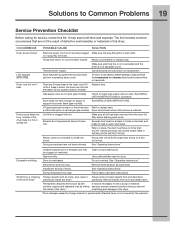
... soon as coins, pins, clips or Always remove foreign objects from drum and restart dryer. Reset circuit breaker or replace fuse.
a utility interruption of items.
See "Operating ... Drying cycle takes too long, outside of defective workmanship or materials in place, the duct must be clogged or restricted.
OCCURRENCE POSSIBLE CAUSE
SOLUTION
Dryer does not start. Dryer has been...
Installation Instructions (All Languages) - Page 6
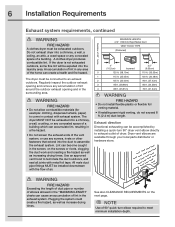
...as well as increase drying times. Do not exhaust dryer into the laundry area. A clothes dryer produces combustible lint.
The dryer MUST NOT be installed downstream with exhaust system.
...
• If installing semi-rigid venting, do not exceed 8 ft. (2.4 m) duct length. Dryer vent elbows are available through your local parts distributor or hardware store.
NOTE
Use of the home can...
Installation Instructions (All Languages) - Page 14
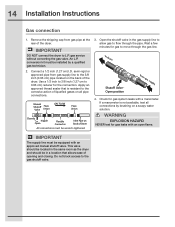
...Flare Valve Union
GAS FLOW
Flare Union
Closed Nipple
Open
Flexible Connector
Inlet Pipe on the back of the dryer. Open the shutoff valve in a location that is not available, test all connections by a quali&#... line to the gas shutoff valve. gas service without converting the gas valve. Remove the shipping cap from gas supply
4. 14 Installation Instructions
Gas connection
1.
Installation Instructions (All Languages) - Page 15

... COLD water
supply and inspect for rubber washer. Your water department can advise you of your dryer's water inlet. RUBBER WASHERS MUST BE PRESENT Remove COLD inlet hose from dryer drum and inspect hose couplings for laundry hose connection. Water pressure MUST be 3/4 inch (1.9 cm) with threading for proper placement of your water...
Similar Questions

Electrolux Dryer Model # Eied55hiw
My dryer is giving a E64 error code. How do I reset it?
My dryer is giving a E64 error code. How do I reset it?
(Posted by kgarcia200835 8 years ago)

My Dryer Edv605 Is Just A Few Months Old And Is Not Getting Warm...not Drying!
My dryer EDV605 is just a few months old and is not getting warm...not drying!
My dryer EDV605 is just a few months old and is not getting warm...not drying!
(Posted by kristine67584 11 years ago)

Dryer Stopped Turning.
Dryer stopped spinning after finding clothing wedged inbetween door and drum. After pulling out wedg...
Dryer stopped spinning after finding clothing wedged inbetween door and drum. After pulling out wedg...
(Posted by scotehoffman 11 years ago)

In My Dryer The Water Valve Inside The Dryer Is Dripping Water
please help me troubleshoot my 6 months old dryer. The water valve is dripping water and its going i...
please help me troubleshoot my 6 months old dryer. The water valve is dripping water and its going i...
(Posted by sumeshtalwar 11 years ago)