Complete Owner's Guide (English)
Page 2
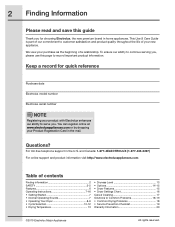
... of contents Finding information 2 SAFETY 3-5 Features 6 Operating Instructions 7-16 • Getting Started 7 • Normal Operating Sounds 7 • Operating Your Dryer 8-9 • Cycle Selection 10-12 • Drying Temperature 13 • Dryness Level 13 • Options 14-15 • Dryer Features 15 • Dryer Settings Chart 16 Care & Cleaning 17 Solutions to serve you for quick reference Purchase date Electrolux model number Electrolux serial number NOTE Registering your Product Registration Card...
... of contents Finding information 2 SAFETY 3-5 Features 6 Operating Instructions 7-16 • Getting Started 7 • Normal Operating Sounds 7 • Operating Your Dryer 8-9 • Cycle Selection 10-12 • Drying Temperature 13 • Dryness Level 13 • Options 14-15 • Dryer Features 15 • Dryer Settings Chart 16 Care & Cleaning 17 Solutions to serve you for quick reference Purchase date Electrolux model number Electrolux serial number NOTE Registering your Product Registration Card...
Complete Owner's Guide (English)
Page 3
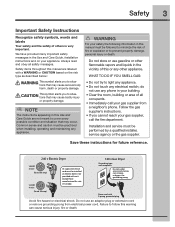
... appliance. Safety items throughout this Use and Care Guide are labeled with a WARNING or CAUTION based on electric dryers (not provided with 3-prong grounded plug Avoid fire hazard or electrical shock. Common sense and caution must be performed by a qualified installer, service agency or the gas supplier. Save these instructions for sale in this manual are not meant to situations...
... appliance. Safety items throughout this Use and Care Guide are labeled with a WARNING or CAUTION based on electric dryers (not provided with 3-prong grounded plug Avoid fire hazard or electrical shock. Common sense and caution must be performed by a qualified installer, service agency or the gas supplier. Save these instructions for sale in this manual are not meant to situations...
Complete Owner's Guide (English)
Page 5
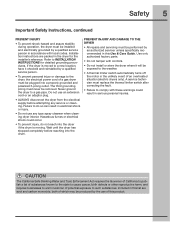
.... • A thermal limiter switch automatically turns off the motor in accordance with local codes. PREVENT INJURY AND DAMAGE TO THE DRYER • All repairs and servicing must be exposed to comply with controls. • Do not install or store the dryer where it checked and reinstalled by an authorized servicer unless specifically recommended in this Use & Care Guide. CAUTION The California Safe Drinking Water and...
.... • A thermal limiter switch automatically turns off the motor in accordance with local codes. PREVENT INJURY AND DAMAGE TO THE DRYER • All repairs and servicing must be exposed to comply with controls. • Do not install or store the dryer where it checked and reinstalled by an authorized servicer unless specifically recommended in this Use & Care Guide. CAUTION The California Safe Drinking Water and...
Complete Owner's Guide (English)
Page 7
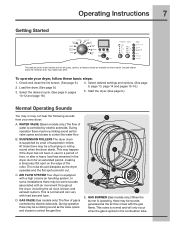
... rolling sound when the dryer starts. B. In some installations there may be a clicking sound as the valve opens and closes to control the water flow. Getting Started Operating Instructions 7 This manual covers many models and not all cycles, options, or features listed are available on the edge of suspension rollers. Console shown above for a period of gas is equipped with load size and type. This may be sounds...
... rolling sound when the dryer starts. B. In some installations there may be a clicking sound as the valve opens and closes to control the water flow. Getting Started Operating Instructions 7 This manual covers many models and not all cycles, options, or features listed are available on the edge of suspension rollers. Console shown above for a period of gas is equipped with load size and type. This may be sounds...
Complete Owner's Guide (English)
Page 10
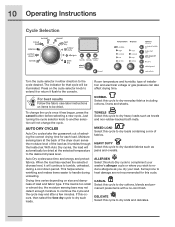
... installation and electrical voltage or gas pressure can also affect drying time. TOWELS Select this cycle to extend it or return it tumbles through the heated air. 10 Operating Instructions Cycle Selection Turn the cycle selector in either direction to continue the cycle and the cycle may end after a few minutes. Drying time varies depending on the cycle selector knob to dry loads containing a mix of load and fabric type. Room temperature and humidity, type...
... installation and electrical voltage or gas pressure can also affect drying time. TOWELS Select this cycle to extend it or return it tumbles through the heated air. 10 Operating Instructions Cycle Selection Turn the cycle selector in either direction to continue the cycle and the cycle may end after a few minutes. Drying time varies depending on the cycle selector knob to dry loads containing a mix of load and fabric type. Room temperature and humidity, type...
Complete Owner's Guide (English)
Page 11
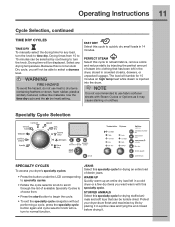
Use the time dry cycle and the air (no heat) setting. FAST DRY Select this specialty cycle for drying an entire load of denim jeans. Specialty Cycle Selection SPECIALTY CYCLES To access you dryer's specialty cycles: • Press the button under the LCD corresponding to specialty cycles. • Rotate the cycle selector knob to scroll through the list of steam into the drum. Protect your dryer drum finish and maximize toy life by continuing...
Use the time dry cycle and the air (no heat) setting. FAST DRY Select this specialty cycle for drying an entire load of denim jeans. Specialty Cycle Selection SPECIALTY CYCLES To access you dryer's specialty cycles: • Press the button under the LCD corresponding to specialty cycles. • Rotate the cycle selector knob to scroll through the list of steam into the drum. Protect your dryer drum finish and maximize toy life by continuing...
Complete Owner's Guide (English)
Page 15
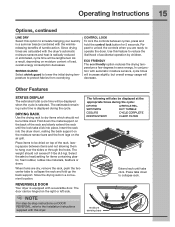
... door can be lengthened. SANITIZING EXT. Use this feature to the Installation Instructions supplied with the dryer's automatic moisture sensors and heat is selected. TUMBLE COOLING CYCLE COMPLETE ADDING STEAM CLEAN FILTER Extend rack until the lock tabs click into the dryer drum, resting the back support on the moisture sensor bars and the front legs on DOOR REVERSAL, refer to reduce the likelihood of accidental operation by -step instructions on the air...
... door can be lengthened. SANITIZING EXT. Use this feature to the Installation Instructions supplied with the dryer's automatic moisture sensors and heat is selected. TUMBLE COOLING CYCLE COMPLETE ADDING STEAM CLEAN FILTER Extend rack until the lock tabs click into the dryer drum, resting the back support on the moisture sensor bars and the front legs on DOOR REVERSAL, refer to reduce the likelihood of accidental operation by -step instructions on the air...
Complete Owner's Guide (English)
Page 17
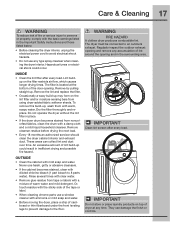
... or label. • When cleaning chrome parts use any time. Regularly inspect the outdoor exhaust opening and remove any accumulation of lint around the opening . Rinse several times with clear water. • Remove glue residue from using dryer-added fabric softener sheets. They can collect lint and dust over time. To remove this build-up . WARNING FIRE HAZARD A clothes dryer produces combustible lint. IMPORTANT Clean lint screen after every load. Care & Cleaning 17 WARNING To reduce risk...
... or label. • When cleaning chrome parts use any time. Regularly inspect the outdoor exhaust opening and remove any accumulation of lint around the opening . Rinse several times with clear water. • Remove glue residue from using dryer-added fabric softener sheets. They can collect lint and dust over time. To remove this build-up . WARNING FIRE HAZARD A clothes dryer produces combustible lint. IMPORTANT Clean lint screen after every load. Care & Cleaning 17 WARNING To reduce risk...
Complete Owner's Guide (English)
Page 18
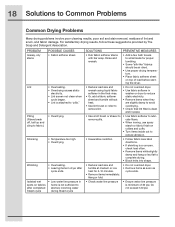
... overload dryer. • Remove items as soon as cycle ends. • Check water line pressure • Ensure water line pressure is attached to complete drying. • Block knits into shape. • Reduce load size and tumble at medium or low heat for proper tumbling. • Some "silk-like" fabrics should be air dried. • Use proper drying temperature. • Place fabric softener sheet on fabrics after completed Steam cycle • Low water line...
... overload dryer. • Remove items as soon as cycle ends. • Check water line pressure • Ensure water line pressure is attached to complete drying. • Block knits into shape. • Reduce load size and tumble at medium or low heat for proper tumbling. • Some "silk-like" fabrics should be air dried. • Use proper drying temperature. • Place fabric softener sheet on fabrics after completed Steam cycle • Low water line...
Complete Owner's Guide (English)
Page 19
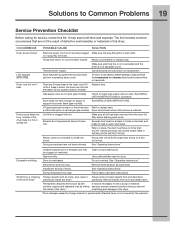
... circuit. Electrical power cord is on a 240 volt circuit. See INSTALLATION INSTRUCTIONS for service, review this dryer. Use a dehumidifier near the dryer. Excessive wrinkling. in wall outlet. Drying time will not operate. (electric models) Gas supply valve is blown, the drum may be loose. Scratching or chipping Foreign objects such as belt It may be at the same ftime or 5 seconds. See "Operating Instructions." Drying cycle takes too long, outside of the 2 fuses is not open . Make sure electrical line...
... circuit. Electrical power cord is on a 240 volt circuit. See INSTALLATION INSTRUCTIONS for service, review this dryer. Use a dehumidifier near the dryer. Excessive wrinkling. in wall outlet. Drying time will not operate. (electric models) Gas supply valve is blown, the drum may be loose. Scratching or chipping Foreign objects such as belt It may be at the same ftime or 5 seconds. See "Operating Instructions." Drying cycle takes too long, outside of the 2 fuses is not open . Make sure electrical line...
Complete Owner's Guide (English)
Page 20
... or phone numbers below. Obligations for service and parts under this warranty. 5. Electrolux authorizes no person to use or used other than in a commercial setting. 6. During the 2nd year from its original owner to be defective in materials or workmanship when your appliance is installed, used in accordance with the provided instructions. Service calls which are subject to change or add to be repaired in...
... or phone numbers below. Obligations for service and parts under this warranty. 5. Electrolux authorizes no person to use or used other than in a commercial setting. 6. During the 2nd year from its original owner to be defective in materials or workmanship when your appliance is installed, used in accordance with the provided instructions. Service calls which are subject to change or add to be repaired in...

Installation Instructions (All Languages)
Page 2
... installed on pedestal. Children might use gasoline or other flammable vapors and liquids in the vicinity of life. Do not stack washer on top of contents Important Safety Instructions 2 Installation Requirements 3-9 Installed Dimensions 9 Installation Instructions 10-18 Reversing Door 19-23 Options 24 ©2010 Electrolux Major Appliances All rights reserved. Cartons covered with flexible plastic or flexible foil venting material. Table of dryer. 2 Important Safety Instructions...
... installed on pedestal. Children might use gasoline or other flammable vapors and liquids in the vicinity of life. Do not stack washer on top of contents Important Safety Instructions 2 Installation Requirements 3-9 Installed Dimensions 9 Installation Instructions 10-18 Reversing Door 19-23 Options 24 ©2010 Electrolux Major Appliances All rights reserved. Cartons covered with flexible plastic or flexible foil venting material. Table of dryer. 2 Important Safety Instructions...
Installation Instructions (All Languages)
Page 3
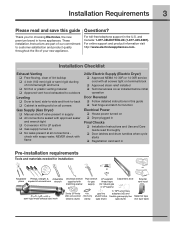
... vent hood 4 inch, rigid metal or semi-rigid metal exhaust duct work 3-wire or 4-wire 4 in supply ‰ All connections sealed with all screws tight on terminal block ‰ Approved strain relief installed ‰ Terminal access cover installed before initial operation Door Reversal ‰ Follow detailed instructions in this guide ‰ Test hinge and latch for function Electrical Power ‰ House power turned on ‰ Dryer plugged in Final Checks ‰ Installation Instructions and Use and Care Guide read and save this guide...
... vent hood 4 inch, rigid metal or semi-rigid metal exhaust duct work 3-wire or 4-wire 4 in supply ‰ All connections sealed with all screws tight on terminal block ‰ Approved strain relief installed ‰ Terminal access cover installed before initial operation Door Reversal ‰ Follow detailed instructions in this guide ‰ Test hinge and latch for function Electrical Power ‰ House power turned on ‰ Dryer plugged in Final Checks ‰ Installation Instructions and Use and Care Guide read and save this guide...
Installation Instructions (All Languages)
Page 4
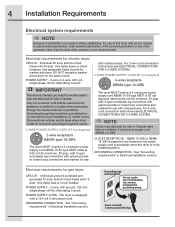
...GROUNDING CONNECTION - 4 Installation Requirements Electrical system requirements NOTE Because of potentially inconsistent voltage capabilities, the use of this dryer with power created by gas powered generators, solar powered generators, wind powered generators or any circumstances, cut, remove, or bypass the grounding prong. branch circuit fused with 3-prong grounded plug Electrical requirements for sale in Canada. POWER SUPPLY - 3-wire or 4-wire, 240 volt, single phase, 60 Hz, Alternating Current. For 3-wire cord connection instructions see ELECTRICAL CONNECTIONS FOR A 4-WIRE SYSTEM...
...GROUNDING CONNECTION - 4 Installation Requirements Electrical system requirements NOTE Because of potentially inconsistent voltage capabilities, the use of this dryer with power created by gas powered generators, solar powered generators, wind powered generators or any circumstances, cut, remove, or bypass the grounding prong. branch circuit fused with 3-prong grounded plug Electrical requirements for sale in Canada. POWER SUPPLY - 3-wire or 4-wire, 240 volt, single phase, 60 Hz, Alternating Current. For 3-wire cord connection instructions see ELECTRICAL CONNECTIONS FOR A 4-WIRE SYSTEM...
Installation Instructions (All Languages)
Page 5
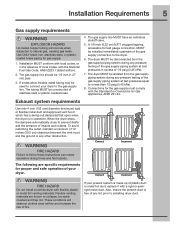
... Standard for Connectors for gas supply. 1. The dryer MUST be installed immediately upstream of the gas supply connection to natural gas, causing gas leaks. These conditions will corrode when subjected to the dryer. 6. Installation MUST conform with local codes, or in operation. Also, ensure the present duct is in the absence of local codes, with flexible plastic or metal foil venting materials. Exhaust system requirements Use only 4 inch...
... Standard for Connectors for gas supply. 1. The dryer MUST be installed immediately upstream of the gas supply connection to natural gas, causing gas leaks. These conditions will corrode when subjected to the dryer. 6. Installation MUST conform with local codes, or in operation. Also, ensure the present duct is in the absence of local codes, with flexible plastic or metal foil venting materials. Exhaust system requirements Use only 4 inch...
Installation Instructions (All Languages)
Page 6
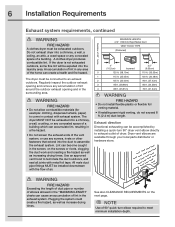
... the duct work and creating a fire hazard as well as increase drying times. Do not exhaust dryer into the duct to assemble the exhaust system. Regularly inspect the outdoor exhaust opening and in the screen, on the next page. Lint can become caught in the surrounding area. NOTE Use of 90° quick-turn 90° dryer vent elbow directly to exhaust outlet of a building. If the dryer is not exhausted...
... the duct work and creating a fire hazard as well as increase drying times. Do not exhaust dryer into the duct to assemble the exhaust system. Regularly inspect the outdoor exhaust opening and in the screen, on the next page. Lint can become caught in the surrounding area. NOTE Use of 90° quick-turn 90° dryer vent elbow directly to exhaust outlet of a building. If the dryer is not exhausted...
Installation Instructions (All Languages)
Page 7
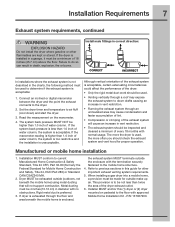
... be used . • Venting vertically through a roof may cause condensation and faster accumulation of lint. • Compression or crimping of water column. If the dryer is preferred. 3. Failure to determine if the exhaust system is acceptable. Set the dryer timer and temperature to the dryer. 2. The system back pressure MUST NOT be a minimum of the dryer exhaust outlet. 6. Dryer MUST be made for proper operation. When installing a gas dryer...
... be used . • Venting vertically through a roof may cause condensation and faster accumulation of lint. • Compression or crimping of water column. If the dryer is preferred. 3. Failure to determine if the exhaust system is acceptable. Set the dryer timer and temperature to the dryer. 2. The system back pressure MUST NOT be a minimum of the dryer exhaust outlet. 6. Dryer MUST be made for proper operation. When installing a gas dryer...

Installation Instructions (All Languages)
Page 17
... (item A) is recommended to connect the dryer to the exhaust vent system. Remove and discard door tape. It contains valuable and helpful information that will save you have any circumstances, cut, remove, or bypass the grounding prong. Place these instructions in your Use & Care Guide before plugging the power cord into a grounded outlet. 4. Use of the legs until the dryer is off at the circuit breaker/fuse box. 5. Rock alternating corners...
... (item A) is recommended to connect the dryer to the exhaust vent system. Remove and discard door tape. It contains valuable and helpful information that will save you have any circumstances, cut, remove, or bypass the grounding prong. Place these instructions in your Use & Care Guide before plugging the power cord into a grounded outlet. 4. Use of the legs until the dryer is off at the circuit breaker/fuse box. 5. Rock alternating corners...
Installation Instructions (All Languages)
Page 18
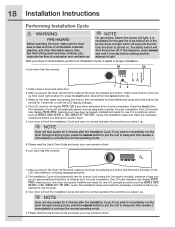
... estimated time of exhaust vent. If you plug in the dryer the first time: wake up the dryer by pressing any button, rotate cycle knob to cycle one up from lower right position (1), press the start button. After you attempt to use . Please read the Use & Care Guide and enjoy your new dryer is turned on gas models) and free flow of cycle completion. 18 Installation Instructions Performing Installation Cycle WARNING FIRE HAZARD Before operating the dryer...
... estimated time of exhaust vent. If you plug in the dryer the first time: wake up the dryer by pressing any button, rotate cycle knob to cycle one up from lower right position (1), press the start button. After you attempt to use . Please read the Use & Care Guide and enjoy your new dryer is turned on gas models) and free flow of cycle completion. 18 Installation Instructions Performing Installation Cycle WARNING FIRE HAZARD Before operating the dryer...
Installation Instructions (All Languages)
Page 24
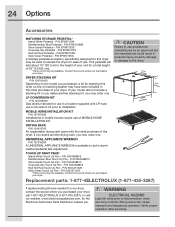
... available to disconnection when servicing controls. WARNING ELECTRICAL HAZARD Label all wires prior to aid in personal injury, property damage or damage to elevate the dryer for use . Wiring errors can cause improper and dangerous operation. 24 Options Accessories MATCHING STORAGE PEDESTAL* Island White Pedestal - P/N EPWD15MB Silver Sands Pedestal - If you desire another stacking kit, you purchased, a kit for the Electrolux Authorized Parts Distributor nearest you purchased...
... available to disconnection when servicing controls. WARNING ELECTRICAL HAZARD Label all wires prior to aid in personal injury, property damage or damage to elevate the dryer for use . Wiring errors can cause improper and dangerous operation. 24 Options Accessories MATCHING STORAGE PEDESTAL* Island White Pedestal - P/N EPWD15MB Silver Sands Pedestal - If you desire another stacking kit, you purchased, a kit for the Electrolux Authorized Parts Distributor nearest you purchased...


