
Electrolux E15TC75HPS Support Question
Electrolux E15TC75HPS Support Question
Find answers below for this question about Electrolux E15TC75HPS - Fully Integrated Trash Compactor.Need a Electrolux E15TC75HPS manual? We have 3 online manuals for this item!
Question posted by Cbkemper on January 28th, 2012
Lost The Screws That Hold The Bottom Hinge In Place. What Size Are Those Screws?
The person who posted this question about this Electrolux product did not include a detailed explanation. Please use the "Request More Information" button to the right if more details would help you to answer this question.
Current Answers
Related Electrolux E15TC75HPS Manual Pages
Specification sheet - Page 1

...Glide™ trash basket fully extends to provide easy access to Product Installation Guide for Freestanding Installation) - Ft.) Compacting Force (Lbs.) Belt-Drive, Dual-Screw Scissor System ...entire bin in mind. Under-Counter Trash Compactor
E15TC75HPS professional series
Extra-Large Capacity Up to change. One compacted bag equals six 13-gallon trash bags, keeping our environment in just ...
Specification sheet - Page 2

...; Toe Kick Accessory Kit (for top, sides or rear when used freestanding, or built in under counter. (For conversion from built-in application.
Under-Counter Trash Compactor
E15TC75HPS professional series
Top
14 7/8"
Power cord location (right top rear)
35 7/8" 2 1/2" Door in the U.S.A.
Owners Guide - Page 2

... http://www.electroluxusa.com
Table of contents
Finding information 2
Safety 3 • Important Safety Instructions 3
Features 4 • How the Compactor Works 4
Installation 6 • Free Standing 6 • Built-in Installations 6 • Leveling the Compactor 6
Preparation 7 • Use of a relationship. Printed in the U.S. This Use & Care Guide is part of our commitment to...
Owners Guide - Page 3
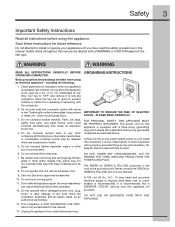
... compactor.
2. Trash might contain broken glass, sharp pieces of reach to be used as described in this appliance apart. Do not touch moving parts.
11. Please read the safety precautions in this product. The power cord on the risk type. Safety items throughout this appliance is necessary when any other containers still holding...
Owners Guide - Page 4

... Area Odor Disk Tray Ram Compaction Plate Release Tab Compaction Plate Trash Bucket Latches (2) Sliding Trash Bucket Leveling Rollers
Leveling Legs
How the compactor works
The compactor compresses household trash up to 1/6 of the way down into the trash bucket. When you will compact normal household trash including milk cartons, glass and plastic bottles, containers and jars...
Owners Guide - Page 5

... outlet in the top of the unit. Use the cord clamp to prevent excess power cord from builtin to free-standing with a 6-ft. front of compactor
As shipped, the Compactor is equipped with the use Toe Kick Accessory Kit Model ETC15TKH in .
deep. long power cord. Use these straps to secure the...
Owners Guide - Page 6

... up to the desired position. Turn the leveling legs in the front. back of compactor
slots
adjusting screws
rollers
wood block
To level the back of the compactor:
Tip the back of compactor up and onto a wood block. Loosen the adjusting screws only far enough to move the rollers to a higher or lower slot.
Remove...
Owners Guide - Page 7

... of disk in space provided.
• Write dates on the GREEN month indicator labels in the trash compactor. Make sure green label that will always move back UP when the door is closed. Press ".... You may cause moderate eye irritation. Harmful if swallowed. Odor disk, Model ETC15ODH, is in place over the top rim of the 6th month the odor status LED will not operate. Secure the bag...
Owners Guide - Page 8

....
Press "Start" button again
to set clock time: Press and hold period.
5. To set delay time. Once clock reaches delay start time: Press and hold trash for best results, Always fill each new bag completely before operating the compactor. Open door to add additional trash to previous position.
4. Compacting cycle may be 45 seconds or...
Owners Guide - Page 9

...of trash.
• Bottles and large cans compact best when laid flat near the center of the trash bucket.
• Place ...hold door closed to activate the ram until the drawer is full or nearly so, it returns to be on or around the surfaces to the up of undesirable odor.
Your compactor has been designed with twist-tie provided.
4.
Trash might shatter). bucket slide
release tab
screw...
Owners Guide - Page 10
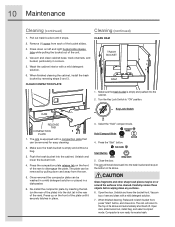
...trash. ram
Key Lock Switch
release tab
compaction plate
1. Re-install the compactor plate by inserting the tab (on the rear of the plate) into the trash bucket and stop at in place.
3. Hold... shut itself off. Compactor is empty and pushed into the cabinet. Pull out trash bucket until it stops.
CLEAN ram
2. Remove (1) screw from the ram.
5.
trash bucket
5. Wash the...
Owners Guide - Page 11

... correct, simply open the door, unlatch and open the front of the bucket, and remove the can placed near the outer edge of the trash bucket may have opened the circuit. DO NOT ATTEMPT TO OPERATE COMPACTOR IN ANY OTHER MANNER. A replacement actuator can be crushed during subsequent compacting.
8.
Troubleshooting
Before you call...
Wiring Diagram - Page 1

.../KC) 099
Copyright © 2008 Electrolux Home Products, Inc. E15TC75HPS E15TC75HSS
Series
Icon-Pro
Icon-Designer
Market
North America North America
Color
stainless steel stainless steel
Volts
120
120
Owner's Guide 99526808en 99526808en
E15TC75HP_Cover.eps E15TC75H_S_Parts-Rotated.eps
TRASH COMPACTOR
E15TC75H_Wiring.eps
Electrolux Major Appliances North & Latin America P.O.
Wiring Diagram - Page 3

... B Latch, compactor plate
Publication No: 5995529046
# Functional Parts
3
* Non-Illustrated Parts
12/08 B Door Assy, Pro, w/handle A B Hinge Assembly, with pin, cap A B Actuator, interlock A B Cover, trim, plastic, top A B Gasket Assy, door, w/frame, screws A B Frame...
A E15TC75H (E15TC75HSS) B E15TC75H (E15TC75HPS)
DESCRIPTION A - E15TC75H
RECOMMENDED SPARE PARTS
Model Index:
POS.
Similar Questions

Ram Does'nt Stay Down
Compact Hold Feature Not Working, Ram Returns To Up Position
Compact Hold Feature Not Working, Ram Returns To Up Position
(Posted by dave54g 10 years ago)

Ram
The lights are yellow for normal and hold, and the ram doesn't work.vWhat's the problem?
The lights are yellow for normal and hold, and the ram doesn't work.vWhat's the problem?
(Posted by helenbutler4 10 years ago)
Lost On/off Key
Well, actually it was refurbished and I didn't get a key with it. Is there anything else I can use? ...
Well, actually it was refurbished and I didn't get a key with it. Is there anything else I can use? ...
(Posted by pattyfig 11 years ago)

Where Do I Find The Manual For Electrolux Eidw6105gs1
(Posted by Jiminy 11 years ago)

Fully Integrated
My dishwasher has been installed but does not sit flush with the face of the adjacent cabinet face. ...
My dishwasher has been installed but does not sit flush with the face of the adjacent cabinet face. ...
(Posted by Anonymous-41725 12 years ago)