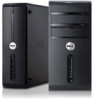
Dell Vostro 470 Support Question
Dell Vostro 470 Support Question
Find answers below for this question about Dell Vostro 470.Need a Dell Vostro 470 manual? We have 2 online manuals for this item!
Question posted by azylber on November 14th, 2014
Instalation Of A Firewire Crad
how to dismount the small grid on the lower right side on the back?
Supporting Image
You can click the image below to enlarge
Current Answers


Related Dell Vostro 470 Manual Pages
User Manual - Page 1
... drive is installed in the computer. power supply diagnostic light 15. Regulatory Model: D10M Regulatory Type: D10M002
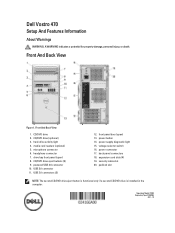
2011 - 10 hard-drive activity light 4. expansion card slots (4) 19. Front And Back View
Figure 1. USB 2.0 connector 11. power button 14. voltage selector switch 16. Front And Back View
1. microphone connector 6. Dell Vostro 470
Setup And...
User Manual - Page 5

...notice. © 2012 Dell Inc. Trademarks used in the U.S. is strictly forbidden. All rights reserved. and any proprietary interest in this text: Dell™, the DELL logo, Dell ...8482;, Precision ON™,ExpressCharge™, Latitude™, Latitude ON™, OptiPlex™, Vostro™, and Wi-Fi Catcher™ are trademarks of Intel Corporation in this publication is...
Owner's Manual - Page 2
All rights reserved. is under license. and other countries. is strictly forbidden. A00 Trademarks used in trademarks and trade ...DELL logo, Dell Precision™, Precision ON™,ExpressCharge™, Latitude™, Latitude ON™, OptiPlex™, Vostro™, and Wi-Fi Catcher™ are either the entities claiming the marks and names or their products, Dell Inc.
Owner's Manual - Page 3
... Inside Your Computer...5 Recommended Tools...6 Turning Off Your Computer...6 After Working Inside Your Computer...6
2 Removing The Cover...7
Installing The Cover...8
3 Removing The Memory...9
Installing The Memory...9
4 Removing The Expansion Card 11
Installing The Expansion Card...12
5 Removing The Optical Disk Drive 13
Installing The Optical Disk Drive...14
6 Removing The Hard Disk Drive 15...
Owner's Manual - Page 4
... Power Switch And The Hard Drive Activity LED 42
17 Removing The Front Audio Module 45
Installing The Front Audio Module...46
18 Removing The Front USB Module 47
Installing The Front USB Module...47
19 System Setup Overview...49
Entering System Setup...49 System Setup Screens...49 System Setup Options...50...
Owner's Manual - Page 5
... unplug the cable from your work surface is unplugged to help protect your computer and certain components may only be replaced or--if purchased separately--installed by its metal mounting bracket. Press and hold the power button while the computer is flat and clean to ensure your computer, perform the following...
Owner's Manual - Page 8
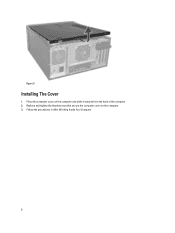
Place the computer cover on the computer. 3.
Figure 3. Installing The Cover
1. Replace and tighten the thumbscrews that secure the computer cover on the computer and slide it inwards from the back of the computer. 2. Follow the procedures in After Working Inside Your Computer.
8
Owner's Manual - Page 9
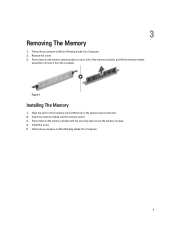
... memory modules and lift the memory module
upwards to remove it from the computer. Press down on the memory-card with the tab in place. 4. Installing The Memory
1. Install the cover. 5. 3
Removing The Memory
1.
Owner's Manual - Page 12

Push the expansion card into the card slot and secure the latch. 2. Install the expansion card retainer module to the chassis. 3. Installing The Expansion Card
1. Follow the procedures in After Working Inside Your Computer.
12 Install the cover. 4.
Owner's Manual - Page 14
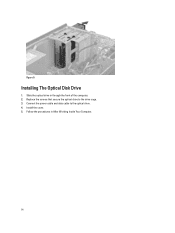
Installing The Optical Disk Drive
1.
Replace the screws that secure the optical drive to the optical drive. 4. Connect the power cable and data cable to the drive cage. 3. Slide the optical drive in After Working Inside Your Computer.
14 Follow the procedures in through the front of the computer. 2. Install the cover. 5. Figure 9.
Owner's Manual - Page 16
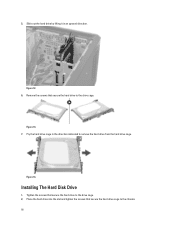
... the hard drive from the hard drive cage. Figure 12. 6. Remove the screws that secure the hard drive cage to the drive cage. 2.
Figure 14.
Installing The Hard Disk Drive
1. 5.
Owner's Manual - Page 17

Follow the procedures in After Working Inside Your Computer.
17 Connect the power cable and data cable to the hard drive. 4. Install the cover. 5. 3.
Owner's Manual - Page 20
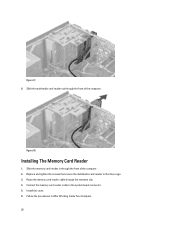
... out through the front of the computer. 2. Replace and tighten the screws that secure the multimedia card-reader to the system board connector. 5.
Installing The Memory Card Reader
1. Install the cover. 6.
Figure 17. 6. Slide the memory card-reader in After Working Inside Your Computer. 20 Connect the memory card reader cable to...
Owner's Manual - Page 22

While holding the chassis fan in After Working Inside Your Computer.
22 Install the cover. 5. Follow the procedures in place, replace the screws that secure the fan to the system board. 4. Place the fan towards the center of the computer into the chassis. 2. Reconnect the fan cable to the chassis. 3. Installing The Rear System Fan
1.
Owner's Manual - Page 23
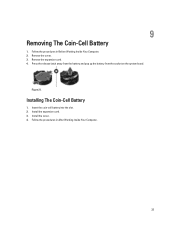
... pop up the battery from the socket on the system board.
Insert the coin-cell battery into the slot. 2. Install the expansion card. 3. Follow the procedures in Before Working Inside Your Computer. 2. Install the cover. 4. Remove the cover. 3. Follow the procedures in After Working Inside Your Computer.
23 Remove the expansion card...
Owner's Manual - Page 26

Follow the procedures in After Working Inside Your Computer.
26 Install the screws that secure the heat sink assembly to the system board. 2. Install the cover. 4. Connect the heat sink fan cable to the system board. 3. Installing The Heat Sink
1.
Owner's Manual - Page 27
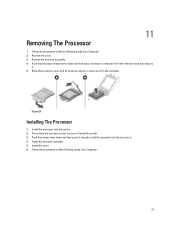
... processor into the socket. 2. Install the heat sink assembly. 5. Follow the procedures in After Working Inside Your Computer....retention hook that secures it from the computer. Push the release lever down and then press it inward to secure it . 5.
Install the cover. 6. Follow the procedures in Before Working Inside Your Computer. 2. Remove the heat sink assembly. 4. Figure 24. ...
Owner's Manual - Page 32

... the computer till it snaps into the computer. 2. Follow the procedures in After Working Inside Your Computer.
32 Install the cover. 6. Figure 31. Install the power supply unit into place. 3. Installing The Power Supply Unit
1.
Install the screws that secure the power supply unit to the system board and drives. 5. Connect all the power...
Owner's Manual - Page 49
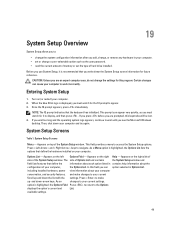
...option is highlighted, the Options Field Press to return to wait until you see the Microsoft Windows desktop. Once the F2 prompt appears, press immediately. If you press before you are an expert computer...1. NOTE: The F2 prompt indicates that define the hardware installed on the right side of
side of the System Setup window.
As an
changes to your computer to ...
Owner's Manual - Page 59

Dimensions Dimensions Height
without base with your computer. Table 10. System Information
System Information
Model
Vostro 470
Processor
Intel Core i3 (2nd Generation)
Intel Core i5 (3rd Generation)
Intel Core i7 (3rd Generation)
L2 cache
256 KB
L3 cache
up to 1600 ...
Similar Questions


Re Vostro 470 Desktop Front Panel Layout
There 4 USB ports - from left to right. No.1 has an 'lightning symbol appended to the USB sysmbol. N...
There 4 USB ports - from left to right. No.1 has an 'lightning symbol appended to the USB sysmbol. N...
(Posted by richard24277 11 years ago)

How To Install Xp Dell Vostro 470
How to install Dell Vostro 470 In win XP, and where is i find driver in XP
How to install Dell Vostro 470 In win XP, and where is i find driver in XP
(Posted by Anonymous-69001 11 years ago)