Dell Vostro 270s Support Question
Dell Vostro 270s Support Question
Find answers below for this question about Dell Vostro 270s.Need a Dell Vostro 270s manual? We have 2 online manuals for this item!
Question posted by peterkraus1 on September 14th, 2013
Hdmi Connection
If i connect my monitor over hdmi the sound is will be played on the built in Speaker on the monitor and there is no output on my connected speaker on pc.
Please can you help meE
Current Answers
Related Dell Vostro 270s Manual Pages
User Manual - Page 1

power button 2. hard drive activity light 3. Front And Back View
1. headphone connector 5. security cable slot
Regulatory Model: D06S Regulatory Type: D06S001
2012 - 02 Dell Vostro 270S
Setup And Features Information
About Warnings
WARNING: A WARNING indicates a potential for property damage, personal injury, or death. USB 2.0 connectors (2) 7. padlock ring 10.
optical drive 9. ...
User Manual - Page 2

voltage selector switch 13. power supply diagnostic light
Back Panel
14. network link integrity light 9. Connect the network cable (optional).
2 expansion card slots (2) 15. line-out connector 3. VGA connector 5. USB 3.0 connectors (2)
... Back Panel
1. network adapter connector 10. power connector 12. USB 2.0 connectors (4) 8. back panel connectors
Figure 2. HDMI connector 6.
User Manual - Page 3

...:
Figure 4. VGA Connector And HDMI Connector 3. Figure 5. If you purchased the optional discrete graphics card, connect the display to the
connector on the discrete graphics card.
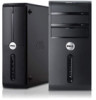
Connect the USB keyboard or mouse (optional). Figure 3. Connect the monitor using either the integrated VGA or HDMI connector. USB Connection 4. Network Connection 2. Connect the power cable(s).
3
User Manual - Page 4
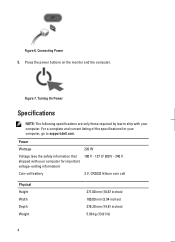
...listing of the specifications for your computer, go to ship with your computer. Figure 6. Figure 7. Press the power buttons on the monitor and the computer.
Power
Wattage
Voltage (see the safety information that shipped with your computer for important voltage-setting information)
Coin-cell ... 100.00 mm (3.94 inches) 376.20 mm (14.81 inches) 5.90 kg (13.01 lb)
4 Connecting Power 5.
User Manual - Page 5

... A/3,00 A
Information in this text: Dell™, the DELL logo, Dell Precision™, Precision ON™, ExpressCharge™, Latitude™, Latitude ON™, OptiPlex™, Vostro™, and Wi-Fi Catcher™ are registered trademarks or trademarks of Intel Corporation in compliance with your product is subject to 95 °F)
Finding...
Owner's Manual - Page 2
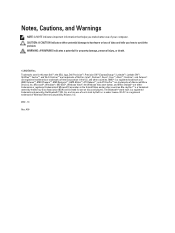
...174; SIG, Inc. Notes, Cautions, and Warnings
NOTE: A NOTE indicates important information that helps you how to avoid the problem. Trademarks used in the U.S. AMD® is a registered ...Precision™, Precision ON™,ExpressCharge™, Latitude™, Latitude ON™, OptiPlex™, Vostro™, and Wi-Fi Catcher™ are trademarks of your computer. The Bluetooth® ...
Owner's Manual - Page 5

...this document assumes that the following safety guidelines to help protect your computer from potential damage and to help to ensure your computer (see the Regulatory Compliance Homepage... or contacts on the locking tabs before you disconnect the cable. Also, before you connect a cable, ensure that came with care.
Ensure that shipped with your warranty. Disconnect...
Owner's Manual - Page 6

....
- The computer turns off when you shut down the operating system:
- CAUTION: To connect a network cable, first plug the cable into the network device and then plug it into ...; Turn Off . After Working Inside Your Computer
After you complete any replacement procedure, ensure you connect any telephone or network cables to their electrical outlets. 4.
If required, verify that the computer...
Owner's Manual - Page 12

... cage. 2. Remove the screws that secure the optical drive to the back of the drive cage. Follow the procedures in Before Working Inside Your Computer. 2. Connect the data cable and power cable to the drive cage and slide the optical drive out of the hard drive and the optical drive. 3.
Owner's Manual - Page 16

... captive screws that secure the heat-sink assembly to the system board. 5. Installing the Power Switch
1. Follow the procedures in After Working Inside Your Computer. Connect the power-switch cable to the computer and remove it from their routing channels. Remove:
a) cover b) fan shroud 3. Disconnect the fan cable from the front...
Owner's Manual - Page 17

Connect the fan cable to the system board. 3. Install:
a) fan shroud. Remove:
a) cover b) fan shroud c) front...board. 2. b) cover. 5. Follow the procedures in After Working Inside Your Computer. Installing the Heat-Sink Assembly
1. Removing the Input/Output (I /O panel cables from the system board
17 Disconnect the I /O) Panel
1.
Tighten the captive screws to secure heat-sink assembly ...
Owner's Manual - Page 19

.... 6. Tighten the screw to secure the I /O panel cables to release it from the socket, and place it with the screw holes on the front panel. 3. Connect the I /O panel to align it in antistatic bag.
19 Route the I /O panel to the front panel. 4. Lift the processor cover and remove the processor from...
Owner's Manual - Page 20

...-sink assembly h) processor 3.
Remove the screws that secure the system board to the system board. 4. Ensure the processor is properly seated. 2. Disconnect all the cables connected to the chassis and lift the system board up and out of the chassis.
20 Press the release lever down and then move it inward...
Owner's Manual - Page 21

...in the chassis.
2. Components Of The System Board
1. PCIe x1 slot 9. 4-pin CPU power connecter
10. DDR DIMM memory slots (2) 13. power button connector 2. ATX 24-pin power connector ...14. Coin-cell battery 3. processor fan connector 12. front panel USB connector 16. Connect the power-supply unit cables to the system board. 4. PCI Express x16 slot 7. Mini-Card ...
Owner's Manual - Page 29

... allows you do not have your computer's Service Tag or Express Service Code:
NOTE: For desktops, the service tag label is available. Restart the computer. 2.
If you to a power outlet...Go to step 5. 4. NOTE: For notebooks, the service tag label is fully charged and connected to change or delete the administrator password. CPU Configuration Auto Power On
Post Behaviour NumLock Key
...
Owner's Manual - Page 30
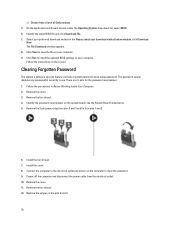
... system board, see the System Board Components. 5. Clearing Forgotten Password
The system's software security features include a system password and a setup password. Remove the fan shroud. 4. Connect the computer to the electrical outlet and power-on the computer to install the updated BIOS settings on your download method below window; The password...
Owner's Manual - Page 31

... system setup, and assign a new system or setup password.
Identify the CMOS jumper on the computer. 17. Install the drive cage. 9. Install the cover. 12. Connect the computer to the electrical outlet and power-on pins 1 and 2
8. Follow the procedures in After Working Inside Your Computer. 16. Install the front bezel...
Owner's Manual - Page 34

... the PSWD jumper from the electrical outlet. 8. Install the cover. Power-on the computer. 7. Go to the electrical outlet and power-on the computer. 13. Connect the computer to the system setup, and assign a new system or setup password. Replace the PSWD jumper on Your Computer. 12. Install the cover. 11...
Owner's Manual - Page 38

... Discrete
Table 12. one RJ45 port four 4-pin USB 2.0-compliant ports two 9-pin USB 3.0-compliant ports three audio input/output ports one audio input/microphone port one VGA port one HDMI port
one audio output/headphone port one PCI Express x16, single-width, full length graphics card.
64 MB 1 GB discrete video memory...
Owner's Manual - Page 41

... appropriate service or support link based on your area. customer, select your need.
41 6
Contacting Dell
NOTE: If you do not have an active Internet connection, you are not a U.S. Availability varies by country and product, and some services may not be available in your purchase invoice, packing slip, bill, or Dell...
Similar Questions


How To Restore Dell Desktop Vostro 200 Slim Tower Motherboard
(Posted by desanju 10 years ago)

How Can I Get Bluetooth On Dell Vostro 270s Desktop. Thx
how can I get Bluetooth on dell vostro 270s desktop. thx
how can I get Bluetooth on dell vostro 270s desktop. thx
(Posted by syhoho2 10 years ago)