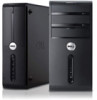
Dell Vostro 270 Support Question
Dell Vostro 270 Support Question
Find answers below for this question about Dell Vostro 270.Need a Dell Vostro 270 manual? We have 2 online manuals for this item!
Question posted by preymantas on March 26th, 2021
Uses For The 'pci Express-mini Connector' On The 270 Mt (mini-tower).
Hi! Can this port be used for a NVMe M.2 500MB SSD as a boot drive? I'm looking for maximum performance and wondering if using this port would be faster and usable without the need for an adapter for the PCIx1 solution? Also, can I use other mfg's other than Dell or am I locked into using a Dell product? I believe it must be a short car type and there are short card types on Dell and need a little knowedgable experience. Thanks!
Current Answers
Answer #1: Posted by NickFuryus on March 28th, 2021 5:14 AM
NickFuryus

Member since:
March 5th, 2019 Points: 15,950

Member since:
March 5th, 2019 Points: 15,950
Hi, to answer your question if the port can be used for a M.2 nvme drive the answer is yes, however you will have to use an adapter for the nvme drive and will be limited to the speed of the PCIe connector.
You can use other manufacturer's small sized drives as long as they fit into the form factor.There's no lock in to Dell.
Related Dell Vostro 270 Manual Pages
- Page 1

...
1. media-card reader status light 3. 19-in-1 media-card reader (optional) 4. microphone and headphone connectors
7. optical drive 2.
optical drive bay
6. hard-drive activity light
Regulatory Model: D11M Regulatory Type: D11M002
2012 - 04 Dell Vostro 270
Setup And Features Information
About Warnings
WARNING: A WARNING indicates a potential for property damage, personal injury...
- Page 2
...did not order them.
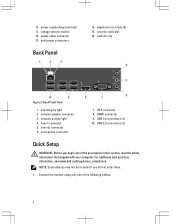
1. power-supply diagnostic light 11. padlock ring
Figure 2. network adapter connector 3. network-activity light 4. HDMI connector 9. voltage selector switch 12. line-in this section, read the safety information that shipped with your computer. microphone connector
7. For additional best practices information, see www.dell.com/regulatory_compliance NOTE: Some...
- Page 3

Figure 3.
Figure 7.
HDMI Connector
Figure 4. VGA Connector
Figure 5. Connect the USB keyboard or mouse (optional). Connect the network cable (optional). DVI Connector (optional) 2. USB Connection 3. Figure 6. Network Connection 3
- Page 4

... computer. Figure 8. Figure 9. Turning On Power
Specifications
NOTE: Offerings may vary by law to 240 V 3 V, CR2032 lithium coin cell
NOTE: Heat dissipation is calculated by using the power supply wattage rating.
4 4. Connecting Power 5. Power
Wattage
Voltage (see the safety information that shipped with your computer. Connect the power cable(s).
- Page 6
... discs and players. Other trademarks and trade names may be used in this text: Dell™, the DELL logo, Dell Precision™, Precision ON™, ExpressCharge™, Latitude™, Latitude ON™, OptiPlex™, Vostro™, and Wi-Fi Catcher™ are either the entities claiming the marks and names or their...
Owner's Manual - Page 2

...174; are registered trademarks or trademarks of such mark by Dell Inc. and any use of Intel Corporation in this text: Dell™, the DELL logo, Dell Precision&#...8482;, Precision ON™,ExpressCharge™, Latitude™, Latitude ON™, OptiPlex™, Vostro™, and Wi-Fi Catcher™ are trademarks of Wireless Ethernet Compatibility Alliance, Inc. 2012 ...
Owner's Manual - Page 5

...using a wrist grounding strap or by periodically touching an unpainted metal surface, such as a processor by its edges, not by the online or telephone service and support team. CAUTION: When you pull connectors apart, keep them evenly aligned to avoid bending any connector... and cards with locking tabs; You should only perform troubleshooting and simple repairs as authorized in
reverse order...
Owner's Manual - Page 10

... the procedures in till it snaps into it's socket and press it from the system board.
10 Ease the card up and out of its connector and remove it in Before Working Inside Your Computer. 2. Removing the System Fan
1.
Remove the cover. 3. Place the card into place. 3. Replace the cover...
Owner's Manual - Page 12
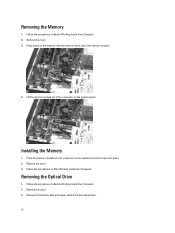
... cover. 3. Remove the cover. 3. Disconnect the data cable and power cable from the optical drive. 12 Lift the memory module out of the connector on each side of the memory module.
4. Press the memory module into it's connector on the system board till it snaps into place. 2. Follow the procedures in Before Working...
Owner's Manual - Page 15

... Your Computer.
15 Follow the procedures in After Working Inside Your Computer. Tighten the screw that secures the WLAN card to the hard drive. 5. Replace the screws to secure the brackets to the connector. 2. Replace the cover. 6. Lift and remove the WLAN card from the computer. Follow the procedures in , to the...
Owner's Manual - Page 26

... screws to secure the system board to the system board. 4. CMOS (coin-cell) battery 8. system fan connector 10. PCI Express-mini connector 17. front USB connector 3. front USB Connector 4. power connector 11. processor fan connector 13. CMOS clear reset jumper 16. Connect all the cables to the computer. 3. SATA connectors (SATA0, SATA1, SATA2, SATA3) 2. Replace the:
26 audio...
Owner's Manual - Page 30

...Navigation Allows you see the Microsoft Windows desktop.
Turn on the system
board. Table 2. CAUTION: Unless you are prompted, this keystroke will be used for this program. If you press before...user password. • read the current amount of memory or set the type of hard drive installed. Certain changes can appear very quickly, so you write down onto the pin(s) indicated...
Owner's Manual - Page 31

Appears on top of the System Setup window.
computer and make changes to display.
- Press to return to navigate through the System Setup screens: Table 4.
Use the following keys to the
displays the option's current and
Dell Diagnostics. Displays the BIOS revision.
31
Appears below the Dell Diagnostics and lists keys ...
Owner's Manual - Page 34

If you do not have your computer's Service Tag or Express Service Code:
NOTE: For desktops, the service tag label is available on the computer to... Password
The computer's software security features include a system password and a setup password. Follow the procedures in use. Install the cover. 6. Identify the latest BIOS file and click Download File. 7. click Download Now. ...
Owner's Manual - Page 36

... 32 characters. - CAUTION: Anyone can access the data stored on your system.
Use the following guidelines to your computer if is Locked, you cannot change an existing ...left unattended. The System Security screen appears.
2. In the System Security screen, verify that you need not provide the system password to log on your computer. Follow the procedures in After Working Inside...
Owner's Manual - Page 37
... deletion when promoted. 5. If you to disable a forgotten password.
1. NOTE: You can also use . Identify the PSWD jumper on or reboot.
1.
Only the following steps to save the changes....power-on Your Computer. 2. Follow the procedures in use the following special characters are not disabled (erased) until the computer boots without the jumper. 5. Connect the computer to delete...
Owner's Manual - Page 39

... Dell for specific devices require user interaction. Note the error code and contact Dell.
39 Using this program with other computers may cause invalid results or error messages. As the computer boots, press the key as system diagnostics) performs a complete check of options for particular devices or device groups allowing you to:
•...
Owner's Manual - Page 46

... drive failure during POST
Keyboard failure or loose cable. Hard Drive SELF MONITORING SYSTEM has reported that the boot sequence information is your data regularly.
Disconnect the USB device. Use... hard drive problem
A chip on hard disk drive, the hard disk drive cable is loose, or no bootable device exists.
• If the hard drive is correct. The USB device needs more power...
Owner's Manual - Page 48

... drive bays Internally accessible:
3.5 inch drive bays External Connectors Audio:
Back panel Front Panel Network USB: Front panel Back panel
48
Intel B75 64 Mb
• PCI Express 2.0 • SATA 1.0 and 2.0 • USB 2.0 • USB 3.0 • 19-in-1 media card reader (optional)
• PCI Express x1-slot (includes mini PCI-Express) support speed - 500 Mbps (Gen 1/2)
• PCI Express...
Owner's Manual - Page 49

...
• two USB 2.0 connectors
• one 15-hole VGA connector • one 19-pin HDMI connector
Control Lights And Diagnostic Lights power button light
drive activity light
white light - ... °C to 65 °C (-40 °F to the hard drive. amber light - solid amber light indicates sleep/stand by using the power supply wattage rating.
solid white light indicates power-on state....
Similar Questions

Bios Is Not Working In My Vostro 270 Slim
i can only run the diagnotics and the CD of diagnotics but i can't start my windows, how i can make ...
i can only run the diagnotics and the CD of diagnotics but i can't start my windows, how i can make ...
(Posted by lucasparnoff 9 years ago)

How To Install Pci Express Mini Card In Dell Optiplex 990
(Posted by MikeKfla 10 years ago)

How To Configure Bios To Use Pci Express On Dell 790
(Posted by gargajj 10 years ago)

To Know The Type Of Memory From The Optiplex 755 Mini Tower Chassis
How do I know the type of memory from the OptiPlex 755 Mini Tower chassis
How do I know the type of memory from the OptiPlex 755 Mini Tower chassis
(Posted by diaa5saffour 11 years ago)

Pci Express Slot
Is there a 16 channel PCI express slot in the system?
Is there a 16 channel PCI express slot in the system?
(Posted by trungtnguyen1986 12 years ago)