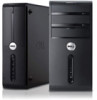
Dell Vostro 270 Support Question
Dell Vostro 270 Support Question
Find answers below for this question about Dell Vostro 270.Need a Dell Vostro 270 manual? We have 2 online manuals for this item!
Question posted by lucasparnoff on May 15th, 2014
Bios Is Not Working In My Vostro 270 Slim
i can only run the diagnotics and the CD of diagnotics but i can't start my windows, how i can make a bios in pendrive to start the windows and install the bios in the computer?? or how resolve this problem
Current Answers
Answer #1: Posted by kshitij24 on May 15th, 2014 12:17 PM
kshitij24

Member since:
November 22nd, 2013 Points: 62,680

Member since:
November 22nd, 2013 Points: 62,680
hello sir !
please take a look at the manual we provide at our site www.helpowl.com ;
most if this proble is dealt by resetting the system with a pdated version of system software.
please support my effort of research by accepting the solution to your question . It will be very kind and helpful of you to do so. For more accurate information please submit more details here and I will get
right back to you.
thankyou for asking!
Will give my best in what I can
@kshitijrathour
Related Dell Vostro 270 Manual Pages
- Page 1

... light
Regulatory Model: D11M Regulatory Type: D11M002
2012 - 04
Front And Back View
1. media-card reader status light 3. 19-in-1 media-card reader (optional) 4. Dell Vostro 270
Setup And Features Information
About Warnings
WARNING: A WARNING indicates a potential for property damage, personal injury, or death. microphone and headphone connectors
7.
- Page 6
Microsoft®, Windows®, MS-DOS®, Windows Vista®, the Windows Vista start button, and Office Outlook® are either the entities...DELL logo, Dell Precision™, Precision ON™, ExpressCharge™, Latitude™, Latitude ON™, OptiPlex™, Vostro™, and Wi-Fi Catcher™ are trademarks of Dell Inc. Intel®, Pentium®, Xeon®, ...
Owner's Manual - Page 2

...Windows Vista start button, and Office Outlook® are trademarks of Intel Corporation in the United States and/or other countries. is a registered trademark and AMD Opteron™, AMD Phenom™, AMD Sempron™, AMD Athlon™, ATI Radeon™, and ATI FirePro™ are either potential damage to avoid the problem...ON™, OptiPlex™, Vostro™, and Wi-Fi Catcher...
Owner's Manual - Page 3
... Computer...5 Turning Off Your Computer...6 After Working Inside Your Computer...6
2 Removing and Installing Components 7
Recommended Tools...7 Removing the Cover...7 Installing the Cover...8 Removing the Front Bezel...8 Installing the Front Bezel...9 Removing the Expansion Card...9 Installing the Expansion Card...10 Removing the System Fan...10 Installing the System Fan...11 Removing the Memory...
Owner's Manual - Page 4

... System Board...24 System Board Layout...25 Installing the System Board...26
3 System Setup...29
Boot Sequence...29 Navigation Keys...29 System Setup Overview...30 Enter System Setup...30 Jumper Settings...30 System Setup Screens...31 System Setup Options...31
Exit...33 Updating the BIOS ...33 Clearing Forgotten Password...34 Clearing CMOS...
Owner's Manual - Page 5

...of your computer and certain components may only be replaced or--if purchased separately--installed by performing the removal procedure in this document assumes that both connectors are ...yourself by using a wrist grounding strap or by a certified service technician. if you begin working inside your computer from the computer. 4. Disconnect your computer and all network cables from ...
Owner's Manual - Page 6

... 6 seconds to your computer. 3. In Windows XP: Click Start → Turn Off Computer → Turn Off .
Connect any replacement procedure, ensure you turn them off your computer. 1. Ensure that the computer works correctly by touching an unpainted metal surface,... system:
- CAUTION: Before touching anything inside your computer, ground yourself by running the Dell Diagnostics.
6
Owner's Manual - Page 7

Recommended Tools
The procedures in Before Working Inside Your Computer. 2. Slide the computer cover towards the back of the computer.
4. Remove the screws that secure the cover to remove or install the components from your computer. Follow the procedures in this document may require the following tools: • Small flat-blade screwdriver •...
Owner's Manual - Page 8

... Your Computer. Rotate the bezel away from the computer to the computer. 4. Follow the procedures in Before Working Inside Your Computer. 2.
Remove the cover. 3. Slide the computer cover towards the front of the bezel from the ...cover to release the hooks on the chassis. 2. Place the cover on the opposite edge of the computer. 3. Installing the Cover
1. Removing the Front Bezel
1.
Owner's Manual - Page 9

.... 2. Remove the cover. 3. Press on the notches in the card.
9 Press the front bezel till the tabs snap into place. 4. Follow the procedures in After Working Inside Your Computer. Place the hooks on the release-lever to release the securing tab from the notch in the computer. 2. Rotate the front bezel...
Owner's Manual - Page 10

... of its connector and remove it from the system board.
10 Installing the Expansion Card
1. Secure the expansion card by pushing-in till it snaps into place. 2. Follow the procedures in Before Working Inside Your Computer. 2. Follow the procedures in After Working Inside Your Computer. Removing the System Fan
1. Remove the cover. 3. Place...
Owner's Manual - Page 11

Installing the System Fan
1. Place the fan at it's location on the computer. 2. Follow the procedures in After Working Inside Your Computer.
11 Remove the fan from the computer. Connect the fan cable to the back of the computer. 3. Replace the screws that secure ...
Owner's Manual - Page 12
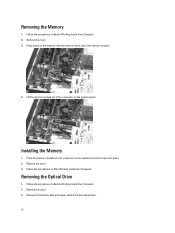
Follow the procedures in Before Working Inside Your Computer. 2. Installing the Memory
1. Removing the Optical Drive
1. Remove the cover. 3.
Press the memory module into it's connector on each side of the connector on the system board. Follow the procedures in Before Working Inside Your Computer. 2. Disconnect the data cable and power cable from the...
Owner's Manual - Page 13

... that secure the optical drive to the computer. 3. Replace the screws that secure the optical drive to the optical drive. 4. 4. Follow the procedures in After Working Inside Your Computer.
13 Slide the optical drive through the front of the computer.
Connect the data cable and power cable to the computer...
Owner's Manual - Page 14
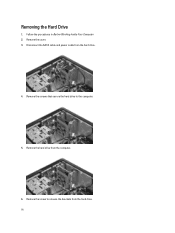
Remove the cover. 3. Remove the screws that secure the hard drive to release the brackets from the hard drive. 14 Remove the hard drive from the hard drive.
4. Disconnect the SATA cable and power cable from the computer.
6. Remove the screw to the computer.
5. Removing the Hard Drive
1. Follow the procedures in Before Working Inside Your Computer. 2.
Owner's Manual - Page 15

... to the connector. 5. Tighten the screw that secures the WLAN card to the connector. 3. Replace the cover. 5. Installing the Hard Drive
1. Removing the Wireless Local Area Network (WLAN) Card
1. Follow the procedures in After Working Inside Your Computer.
Connect the WLAN cables. 4. Replace the screws to secure the brackets to the hard...
Owner's Manual - Page 30

...until you to display, and then press . Keys Spacebar
Navigation Allows you see the Microsoft Windows desktop. Pressing in your computer. 2. Displays the System Setup help file.
Certain changes can appear... or set the type of hard drive installed.
Before you use System Setup, it is displayed, you must watch for the F2 prompt to work incorrectly. Once the F2 prompt appears,...
Owner's Manual - Page 34

... Code:
NOTE: For desktops, the service tag label is available on the ...window appears. 8. Follow the procedures in Before Working Inside Your Computer. 2. Install the cover. 6. 1. Identify the password reset jumper on the computer to install the updated BIOS...features include a system password and a setup password. Click Run to clear the password. 7. If you have your computer...
Owner's Manual - Page 36

...Anyone can have up to the BIOS settings of security for the data on the computer.
In the System BIOS or System Setup screen, select System... access and make changes to 32 characters. - Assigning a System Password and Setup Password
You can contain the numbers 0 through 9.
36 Install the cover....the procedures in After Working Inside Your Computer. 12. Setup password
Password that Password Status ...
Owner's Manual - Page 37
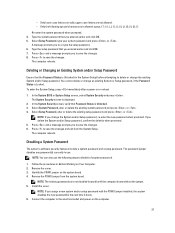
... System and/or Setup password, re-enter the new password when promoted. In the System BIOS or System Setup screen, select System Security and press . The System Security screen is Unlocked... delete the existing system password and press or . 4. Install the cover. The password jumper disables any password(s) currently in Before Working on the computer.
37
Only the following steps to the...
Similar Questions

Uses For The 'pci Express-mini Connector' On The 270 Mt (mini-tower).
Hi! Can this port be used for a NVMe M.2 500MB SSD as a boot drive? I'm looking for maximum performa...
Hi! Can this port be used for a NVMe M.2 500MB SSD as a boot drive? I'm looking for maximum performa...
(Posted by preymantas 3 years ago)


How I Can Make A New Operation System That Work Right For Dell Desktop Inspiron
570 free
570 free
(Posted by tolgnb 10 years ago)

I Can Get My Netgear Wireless Adaptor To. It Works On My Other Desktop.
(Posted by drewpierce 12 years ago)