
Dell PowerEdge 1900 Support Question
Dell PowerEdge 1900 Support Question
Find answers below for this question about Dell PowerEdge 1900.Need a Dell PowerEdge 1900 manual? We have 7 online manuals for this item!
Question posted by JULNYARKO on March 14th, 2014
How To Find Model Number For Dell Power Edge Ecm01 Like 1900 Or 2900
The person who posted this question about this Dell product did not include a detailed explanation. Please use the "Request More Information" button to the right if more details would help you to answer this question.
Requests for more information
Request from GeoffatDell on March 14th, 2014 10:27 AM
I will need more information from you to give you a correct answer! What numbers are you referring to? If you have the service tag, you can look it up on support.dell.com and will tell you the model number.
I will need more information from you to give you a correct answer! What numbers are you referring to? If you have the service tag, you can look it up on support.dell.com and will tell you the model number.
Regards,
GeoffatDell
Current Answers
Related Dell PowerEdge 1900 Manual Pages
Getting Started Guide - Page 4
... Inc. Information in trademarks and trade names other than its own.
Microsoft and Windows are registered trademark and Windows Server is a registered trademark of Dell, Inc.; SUSE is a trademark of Red Hat, Inc.; Model ECM01
February 2006
P/N DF689
Rev. is a registered trademark of Microsoft Corporation; Red Hat is strictly forbidden. Reproduction in this document...
Getting Started Guide - Page 5
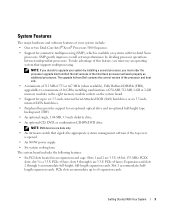
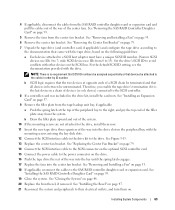
... of your system by installing a second processor, you must order the processor upgrade kits from Dell contains the correct version of the processor and heat sink.
• A minimum of 512 ...system that signals the appropriate systems management software if the top cover is opened.
• An 800-W power supply.
• Six system cooling fans.
NOTE: DVD devices are 3.3-V, 64-bit, 133-MHz ...
Hardware Owner's Manual (PDF) - Page 17
...)
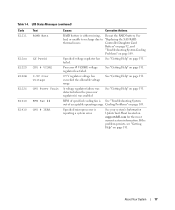
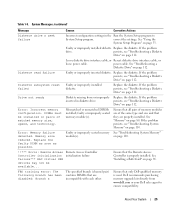
Code E1211
E12nn E1229 E122B E122C E1310 E1410
Text ROMB Batt
XX PwrGd CPU # VCORE 0.9V Over Voltage CPU Power Fault
RPM Fan ## CPU # IERR
Causes
Corrective Actions
RAID battery is either missing, Reseat the RAID battery.
See ...
See your system's Information Update Tech Sheet located on support.dell.com for the most current system information.
Table 1-4.
failed.
Hardware Owner's Manual (PDF) - Page 18
...
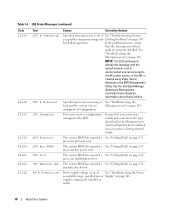
disconnected and reconnected to the type described in the Microprocessor Technical Specifications outlined in a configuration unsupported by Dell. processor protocol error.
The system BIOS has reported a See "Getting Help" on page 109. Power supply voltage is
cleared using either Server
Assistant or the BMC Management
Utility. supply is out of See "Troubleshooting the...
Hardware Owner's Manual (PDF) - Page 25
...on page 112. Loose diskette drive interface cable, or Reseat diskette drive interface cable, or
loose power cable. If the problem persists, see "Troubleshooting a Diskette Drive" on page 112. If the... a RAC Card" on page 112.
Drive not ready
Diskette missing from www.dell.com or your Dell sales agent to
System Setup program. Replace the diskette. Replace the diskette. DIMMs...
Hardware Owner's Manual (PDF) - Page 37
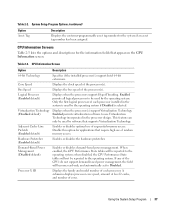
... automatically set to the operating system;
Processor X ID
Displays the family and model number of each processor. CPU Information Screen
Option
Description
64-bit Technology
Specifies if ... virtualization software to the operating system. Demand-Based Power Management (Disabled default)
Enables or disables demand-based power management. Enabled permits all logical processors to be ...
Hardware Owner's Manual (PDF) - Page 52
... 79. 5 Replace the expansion-bay and processor fans (FAN1, FAN2, and FAN3). 3 Connect the power cables to the following components where applicable (see Figure 3-4)
4 Replace the center fan bracket. Fans
The..." on top of a problem with a particular fan, the fan's number is referenced by the systems management software, allowing you to easily identify and replace the proper fan...
Hardware Owner's Manual (PDF) - Page 58
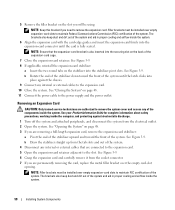
...Close the system. See Figure 3-9. NOTE: Keep this bracket if you need to the power supply and the power outlet. Filler brackets must be using. b Rotate the end of the stabilizer down toward...9 Connect any of the components inside the system.
6 Align the expansion card with the card-edge guides and insert the expansion card firmly into the expansion-card connector until the latch clicks into
...
Hardware Owner's Manual (PDF) - Page 69
... the tape drive's termination if it is no requirement that SCSI ID numbers be assigned sequentially or that devices be terminated and that came with other...power connector on the following guidelines:
a Each device attached to 7;
4 If applicable, disconnect the cables from the center fan bracket. wide SCSI devices use IDs 0 to a SCSI host adapter must have a unique SCSI ID number...
Hardware Owner's Manual (PDF) - Page 77

...3 To remove the cooling shroud, release the blue latches on the shroud by the card edges and avoid touching the DIMM components. Allow time for the DIMMs to removing the shroud. Overheating... to cool before handling them. NOTICE: Never remove the memory cooling shroud without first powering down . Installing System Components
77 Cooling Shroud
The cooling shroud produces and directs airflow ...
Hardware Owner's Manual (PDF) - Page 83
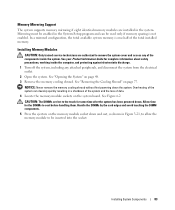
...system memory is not enabled. Allow time for some time after the system has been powered down the system. See your Product Information Guide for complete information about safety precautions, working...the system from the electrical outlet.
2 Open the system. Handle the DIMMs by the card edges and avoid touching the DIMM components.
5 Press the ejectors on the system board. Installing ...
Hardware Owner's Manual (PDF) - Page 84

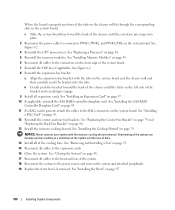
...1 memory module 4 alignment key
2 memory module socket ejectors (2)
3 socket
6 Align the memory module's edge connector with the memory cooling shroud removed. NOTE: The memory module socket has an alignment key that have .... See "Closing the System" on page 48. 11 Reconnect the system and peripherals to power and turn them on. 12 (Optional) Press to reflect the newly installed memory.
84
...
Hardware Owner's Manual (PDF) - Page 85
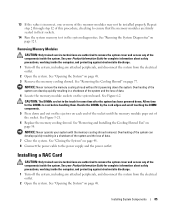
... the loss of data.
4 Locate the memory module sockets on page 48. 8 Connect the power cable to cool before handling them. NOTICE: Never operate your Product Information Guide for complete information ....
2 Open the system. Allow time for the DIMMs to the power supply and the power outlet. Handle the DIMMs by the card edges and avoid touching the DIMM components.
5 Press down the system. See...
Hardware Owner's Manual (PDF) - Page 98

...card from the expansion-bay bracket and set aside for some time after the system has been powered down. b Pull the bracket slightly forward to free the bracket from the chassis tabs and... processor(s). Allow time for the DIMMs to the expansion-bay bracket. Handle the DIMMs by the card edges and avoid touching the DIMM components.
15 Remove the memory modules. Slide the system board toward the...
Hardware Owner's Manual (PDF) - Page 100
... system board and the chassis wall and then carefully push the bracket into place.
3 Reconnect the power cables to the connectors on the chassis will fit through the corresponding slots in a shutdown of the... Card" on page 95. 11 If a RAC card is properly positioned, the tabs on the front edge of the system board. 7 Reinstall the TOE key, if applicable. See "Replacing the Center Fan Bracket...
Hardware Owner's Manual (PDF) - Page 114
...tape drive's interface/DC power cable is connected to the tape drive and SCSI controller card. 5 Verify that the tape drive is configured for a unique SCSI ID number and that the tape drive... "Installing an Expansion
Card" on page 121.
7 Open or remove the bezel. See "Using Server Administrator Diagnostics" on page 57. 11 Close the system.
Before performing any of the components inside ...
Hardware Owner's Manual (PDF) - Page 133

...) indicating the tests
you assume the risk of loss during shipment to Dell.
For the telephone number to be returned in all items being returned (such as power cables, media such
as follows: 1 Call Dell to place an order, visit the Dell website at our receiving dock and returned to you would like to obtain...
Installing a SATA Optical Drive - Page 3

...Installing a SATA Optical Drive
These instructions apply to Dell™ PowerEdge™ systems to remove the system cover and access... peripherals, and disconnect the system from the back of the optical drive.
6 PowerEdge 2900 and 1900 systems only: Perform the following steps. b Remove the center fans and the center... the data and power cables from the electrical outlet.
2 Remove the bezel.
Installing a SATA Optical Drive - Page 9

... Hardware Owner's Manual.
10 Close the system. Installing the SATA Optical Drive - 9 Replace the cooling shroud. For a PowerEdge 1900 system, connect to power and turn on the system and attached peripherals.
Installing a SATA Optical Drive
9 PowerEdge 2900 and 1900
1 If the mounting screws are not attached to the drive, install them now.
2 Align the mounting screws...
Installing a SATA Optical Drive - Page 10

... turn on system board
8 Reconnect the cables to the SAS controller daughter card.
9 Close the system. See "Closing the System" in a PowerEdge 2900 or 1900
3
2
4
5 1
1 optical drive 3 SATA data cable 5 SATA power connector on SAS
backplane (PowerEdge 2900 only)
2 SATA power cable 4 SATA connector on the system and attached peripherals.
10
Installing a SATA Optical Drive Figure 1-5.
Similar Questions

Where I Can Get Power Consumption Details Of My Dell Power Edge R620 Server
Product detailsDell Power Edge R620 Server 4 Years oldHow much power my server consumption at high u...
Product detailsDell Power Edge R620 Server 4 Years oldHow much power my server consumption at high u...
(Posted by unnam 3 years ago)

E122b 0.9 Over Volt Instruction On Dell Power Edge 2900
E122B 0.9 over volt instruction on Dell power Edge 2900, server not start
E122B 0.9 over volt instruction on Dell power Edge 2900, server not start
(Posted by mspshahriar 8 years ago)


How To Turn On Power On Dell Poweredge 1900 Server
(Posted by cilikKiyo 10 years ago)