Dell Latitude E6320 Support Question
Dell Latitude E6320 Support Question
Find answers below for this question about Dell Latitude E6320.Need a Dell Latitude E6320 manual? We have 2 online manuals for this item!
Question posted by brth on January 20th, 2014
How To Use Touchpad On Dell Latitude E6430
The person who posted this question about this Dell product did not include a detailed explanation. Please use the "Request More Information" button to the right if more details would help you to answer this question.
Current Answers
Related Dell Latitude E6320 Manual Pages
User Manual - Page 1
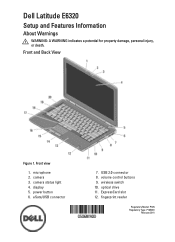
... 8. Front and Back View
Figure 1. camera 3. wireless switch 10. eSata/USB connector
7. volume control buttons 9. optical drive 11. ExpressCard slot 12. power button 6.
Front view
1. Dell Latitude E6320
Setup and Features Information
About Warnings
WARNING: A WARNING indicates a potential for property damage, personal injury, or death. display 5.
User Manual - Page 2
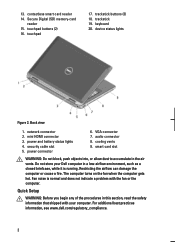
...such as a closed briefcase, while it is normal and does not indicate a problem with your computer. touchpad buttons (2) 16. mini HDMI connector 3. cooling vents 9. Restricting the airflow can damage the computer or ... slot 5.
trackstick buttons (3) 18. VGA connector 7. Do not store your Dell computer in the air vents. The computer turns on the fan when the computer gets hot...
User Manual - Page 3
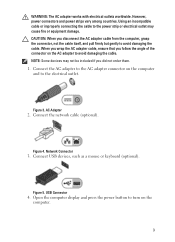
... to the power strip or electrical outlet may not be included if you did not order them. 1.
USB Connector
4. Figure 3. AC Adapter
2. Network Connector
3. Figure 5. Using an incompatible cable or improperly connecting the cable to the electrical outlet. Figure 4. When you wrap the AC adapter cable, ensure that you disconnect the...
User Manual - Page 7
..., Inc. Trademarks used in the U.S. Blu-ray Disc™ is a trademark owned by the Blu-ray Disc Association (BDA) and licensed for additional information on discs and players. only) • End User License Agreement
Information in this text: Dell™, the DELL logo, Dell Precision™, Precision ON™, ExpressCharge™, Latitude™, Latitude ON™...
Owners Manual - Page 2
... Disc Association (BDA) and licensed for property damage, personal injury, or death. Other trademarks and trade names may be used in this text: Dell™, the DELL logo, Dell Precision™, Precision ON™,ExpressCharge™, Latitude™, Latitude ON™, OptiPlex™, Vostro™, and Wi-Fi Catcher™ are registered trademarks or trademarks of...
Owners Manual - Page 9
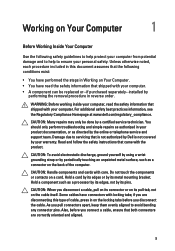
... Your Computer
1
Before Working Inside Your Computer
Use the following conditions exist:
• You have performed the steps in Working on Your Computer. • You have connectors with your personal safety. For additional safety best practices information, see the Regulatory Compliance Homepage at www.dell.com/regulatory_compliance. Do not touch the components...
Owners Manual - Page 11
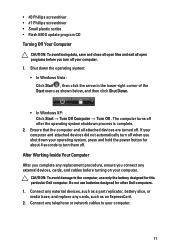
... damage to your computer. 1. Connect any external devices, cards, and cables before you connect any telephone or network cables to the computer, use batteries designed for this particular Dell computer.
After Working Inside Your Computer After you complete any replacement procedure, ensure you turn them off after the operating system shutdown process...
Owners Manual - Page 25
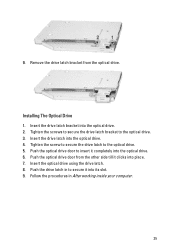
... optical drive. Insert the drive latch bracket into place. 7. 9. Push the optical drive door to secure it into the optical drive. 6. Insert the optical drive using the drive latch. 8. Push the drive latch in After working inside your computer.
25 Insert the drive latch into the optical drive. 4. Follow the procedures...
Owners Manual - Page 37
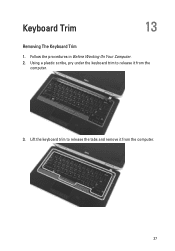
Follow the procedures in Before Working On Your Computer. 2. Lift the keyboard trim to release it from the
computer.
3. Keyboard Trim
13
Removing The Keyboard Trim
1. Using a plastic scribe, pry under the keyboard trim to release the tabs and remove it from the computer.
37
Owners Manual - Page 41
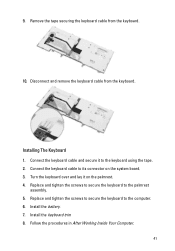
... palmrest. 4. Install the battery. 7. Install the keyboard trim 8. 9. Remove the tape securing the keyboard cable from the keyboard. Connect the keyboard cable to the keyboard using the tape. 2. Disconnect and remove the keyboard cable from the keyboard.
10.
Owners Manual - Page 43
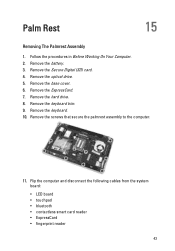
... Before Working On Your Computer. 2. Remove the hard drive. 8. Flip the computer and disconnect the following cables from the system board:
• LED board • touchpad • bluetooth • contactless smart card reader • ExpressCard • fingerprint reader
43 Palm Rest
15
Removing The Palmrest Assembly
1. Remove the keyboard trim. 9. Remove...
Owners Manual - Page 45
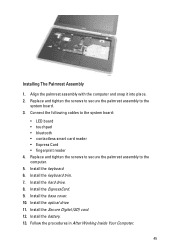
Replace and tighten the screws to secure the palmrest assembly to the system board:
• LED board • touchpad • bluetooth • contactless smart card reader • Express Card • fingerprint reader 4. Install the base cover. 10. Installing The Palmrest Assembly
1. Install the keyboard ...
Owners Manual - Page 99
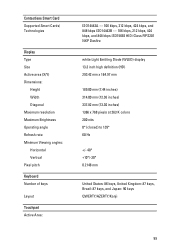
... area (X/Y) Dimensions:
Height Width Diagonal Maximum resolution Maximum Brightness Operating angle Refresh rate Minimum Viewing angles: Horizontal Vertical Pixel pitch
Keyboard Number of keys
Layout
Touchpad Active Area:
ISO14443A - 106 kbps, 212 kbps, 424 kbps, and 848 kbps ISO14443B - 106 kbps, 212 kbps, 424 kbps, and 848 kbps ISO15693 HID iClass...
Owners Manual - Page 100
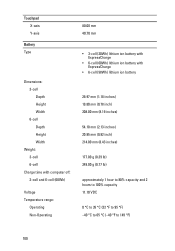
Touchpad X-axis Y-axis
Battery Type
Dimensions: 3-cell Depth Height Width 6-cell Depth Height Width
Weight: 3-cell 6-cell
Charge time with computer off: 3-cell and 6-cell (60Wh)
...
Owners Manual - Page 103
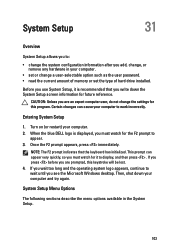
CAUTION: Unless you are prompted, this program. When the blue DELL logo is recommended that the keyboard has initialized. System Setup Menu Options
The following sections describe the menu options ...work incorrectly. Then, shut down the System Setup screen information for the F2 prompt to
appear. 3. Before you use System Setup, it is displayed, you see the Microsoft Windows desktop.
Owners Manual - Page 108
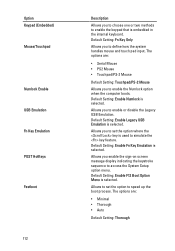
... are :
• Enable • One Time Enable • Disable
Default Setting: Enable Allows you to set an option to enter the Option ROM Configuration screens using hotkeys during POST. Allows you to enable the Trusted Platform Module (TPM) during boot. The options are :
• Disabled • Reboot bypass
Default Setting: Disabled...
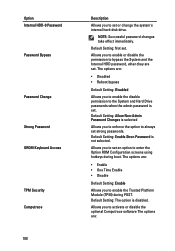
Owners Manual - Page 111
... disable the feature that automatically switches from the Off state when triggered by a LAN signal or WLAN signal or both. Default Setting: Disabled Allows you use certain power adapters. Allows you to enable USB devices to wake the system from all of the USB ports to conserve battery power. The options...
Owners Manual - Page 112
.... Default Setting: Enable Fn Key Emulation is selected.
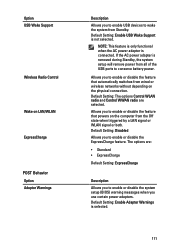
Option Keypad (Embedded) Mouse/Touchpad
Numlock Enable USB Emulation Fn Key Emulation POST HotKeys Fastboot
112
Description
Allows you to...• PS2 Mouse • Touchpad/PS-2 Mouse
Default Setting: Touchpad/PS-2 Mouse
Allows you to choose one or two methods to enable the keypad that is used to simulate the key feature.
Default...
Owners Manual - Page 115

... - LED Error Codes
The following table shows the possible LED codes that may display when your laptop.
• Alternately blinking amber light with AC adapter present.
• Constantly blinking amber light -
An unauthenticated or unsupported non-Dell AC adapter is attached to your computer is enabled.
Battery Status Lights
If the computer...
Owners Manual - Page 117
... appropriate service or support link based on your purchase invoice, packing slip, bill, or Dell product catalog. To contact Dell for sales, technical support, or customer service issues:
1. If you can find contact ...may not be available in your support category. 3. Contacting Dell
33
Contacting Dell
NOTE: If you do not have an active Internet connection, you are not a U.S. Select...


