
Dell Inspiron One 2320 Support Question
Dell Inspiron One 2320 Support Question
Find answers below for this question about Dell Inspiron One 2320.Need a Dell Inspiron One 2320 manual? We have 3 online manuals for this item!
Question posted by mhoras on September 5th, 2013
How To Use The Hdmi Cable On Inspiron Desktop Inspiron One 2330
The person who posted this question about this Dell product did not include a detailed explanation. Please use the "Request More Information" button to the right if more details would help you to answer this question.
Current Answers
Related Dell Inspiron One 2320 Manual Pages
Quick Start Guide (PDF) - Page 1
...functies en geavanceerde opties die voor uw desktop beschikbaar zijn.
• Ga naar dell...3355).
Dell™, the DELL logo, and Inspiron™ are trademarks of problemen voor de klantenservice....el mouse Conecte o teclado e o mouse
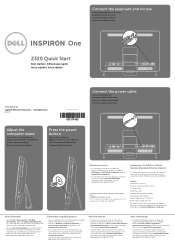
One
2320 Quick Start
Snel starten | Démarrage rapide...the power cable
Sluit de stroomkabel aan Branchez le câble d'alimentation Conecte el cable de ...
Owners Manual - Page 2
... any proprietary interest in trademarks and trade names other countries. Other trademarks and trade names may be used in this document is strictly forbidden.
Trademarks used in this text: Dell™, the DELL™ logo, and Inspiron™ are either potential damage to change without the written permission of your computer. Notes, Cautions...
Owners Manual - Page 3
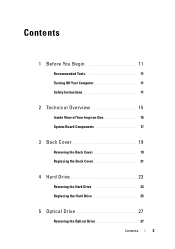
Contents
1 Before You Begin 11
Recommended Tools 11 Turning Off Your Computer 11 Safety Instructions 11
2 Technical Overview 15
Inside View of Your Inspiron One 15 System Board Components 17
3 Back Cover 19
Removing the Back Cover 19 Replacing the Back Cover 21
4 Hard Drive 23
Removing the Hard ...
Owners Manual - Page 12
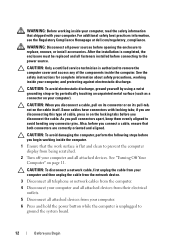
...connectors apart, keep them evenly aligned to avoid bending any of cable, press in on the locking tabs before connecting to replace, remove, or install accessories.
See... about safety precautions, working inside the computer. CAUTION: To avoid electrostatic discharge, ground yourself by using a wrist grounding strap or by periodically touching an unpainted metal surface (such as a connector on...
Owners Manual - Page 15
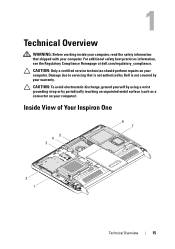
... on your computer). Damage due to servicing that shipped with your computer. CAUTION: To avoid electrostatic discharge, ground yourself by using a wrist grounding strap or by your warranty. Inside View of Your Inspiron One
45 3
6 7
2 1
Technical Overview
15 For additional safety best practices information, see the Regulatory Compliance Homepage at dell.com...
Owners Manual - Page 23
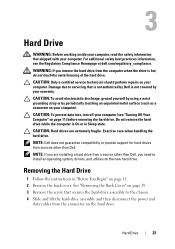
...page 11) before removing the hard drive. CAUTION: To avoid electrostatic discharge, ground yourself by using a wrist grounding strap or by your computer (see the Regulatory Compliance Homepage at dell.com/.... 4 Slide and lift the hard-drive assembly and then disconnect the power and
data cables from a source other than Dell, you need to install an operating system, drivers, ...
Owners Manual - Page 27
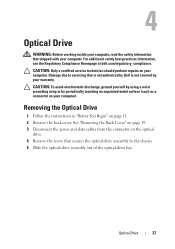
... in "Before You Begin" on your computer.
CAUTION: To avoid electrostatic discharge, ground yourself by using a wrist grounding strap or by your computer. Optical Drive
27
See "Removing the Back Cover" on page ...19. 3 Disconnect the power and data cables from the connector on the optical
drive. 4 Remove the screw that is not authorized by ...
Owners Manual - Page 47
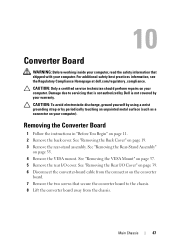
...an unpainted metal surface (such as a connector on page 39. 6 Disconnect the converter-board cable from the chassis. Removing the Converter Board
1 Follow the instructions in "Before You Begin" .... See "Removing the Rear I /O cover.
CAUTION: To avoid electrostatic discharge, ground yourself by using a wrist grounding strap or by your computer). See "Removing the Rear-Stand Assembly"
on page...
Owners Manual - Page 51
...
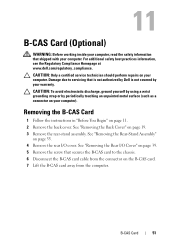
on your computer. B-CAS Card
51 CAUTION: To avoid electrostatic discharge, ground yourself by using a wrist grounding strap or by your warranty. CAUTION: Only a certified service technician should... www.dell.com/regulatory_compliance.
Damage due to the chassis. 6 Disconnect the B-CAS card cable from the computer.
11
B-CAS Card (Optional)
WARNING: Before working inside your computer,...
Owners Manual - Page 63

Replacing the Mini-Card(s)
CAUTION: The connectors are keyed to the computer. The following table provides the antenna cable color scheme for the Mini-Card(s) supported by your computer.
Use of the Mini-Card down and replace the two screws that secure the Mini-Card to the system-board connector. 5 Connect the appropriate...
Owners Manual - Page 65
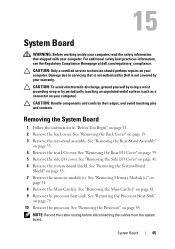
... yourself by using a wrist grounding strap or by periodically touching an unpainted metal surface (such as a connector on page 35. 4 Remove the rear I /O cover. Removing the System Board
1 Follow the instructions in "Before You Begin" on page 53. 7 Remove the memory module(s). NOTE: Record the cable routing before disconnecting the cables from the...
Owners Manual - Page 75
...dell.com/regulatory_compliance. Ensure that it .
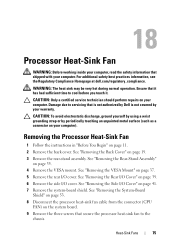
CAUTION: To avoid electrostatic discharge, ground yourself by using a wrist grounding strap or by your computer. 18
Processor Heat-Sink Fan
WARNING: Before working... "Removing the System-Board
Shield" on page 53. 8 Disconnect the processor heat-sink fan cable from the connector (CPU
FAN) on the system board. 9 Remove the three screws that ...
Owners Manual - Page 89
...See "Removing the Back Cover" on your warranty. CAUTION: To avoid electrostatic discharge, ground yourself by using a wrist grounding strap or by your computer).
See "Removing the System-Board
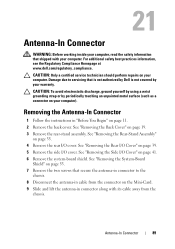
Shield" on page 53...screws that secure the antenna-in connector to servicing that shipped with its cable away from the
chassis. See "Removing the Rear-Stand Assembly"
on the Mini-Card. 9 Slide...
Owners Manual - Page 93
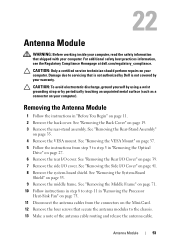
... 11. 2 Remove the back cover. Antenna Module
93
CAUTION: To avoid electrostatic discharge, ground yourself by using a wrist grounding strap or by your warranty. See "Removing the Rear I /O cover. See "Removing...8 to step 11 in "Removing the Processor
Heat-Sink Fan" on page 75. 11 Disconnect the antenna cables from step 3 to step 5 in "Before You Begin" on page 27. 6 Remove the rear ...
Owners Manual - Page 97
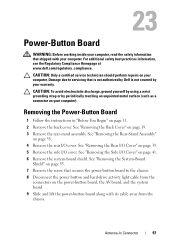
.... Damage due to the chassis. 8 Disconnect the power button and hard-drive activity light cable from the chassis. Removing the Power-Button Board
1 Follow the instructions in "Before You ...the power-button board along with your computer). CAUTION: To avoid electrostatic discharge, ground yourself by using a wrist grounding strap or by your computer. See "Removing the Side I /O cover. See ...
Owners Manual - Page 101
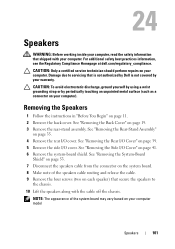
...on your computer. See "Removing the System-Board
Shield" on page 53. 7 Disconnect the speakers cable from the connector on the system board. 8 Make note of the system board may vary based on...39. 5 Remove the side I /O cover. CAUTION: To avoid electrostatic discharge, ground yourself by using a wrist grounding strap or by your warranty. Removing the Speakers
1 Follow the instructions in "Before ...
Owners Manual - Page 105
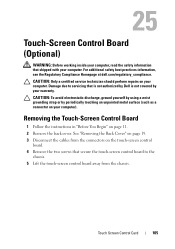
...Screen Control Card
105 See "Removing the Back Cover" on page 19. 3 Disconnect the cables from the chassis.
For additional safety best practices information, see the Regulatory Compliance Homepage at ...page 11. 2 Remove the back cover.
CAUTION: To avoid electrostatic discharge, ground yourself by using a wrist grounding strap or by your computer. Damage due to the
chassis. 5 Lift ...
Owners Manual - Page 111
Display
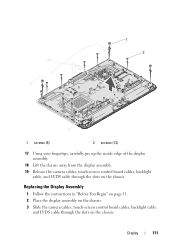
111 1 2
1 screws (5)
2 screws (13)
17 Using your fingertips, carefully pry up the inside edge of the display assembly.
18 Lift the chassis away from the display assembly. 19 Release the camera cables, touch-screen control board cables, backlight
cable, and LVDS cable through the slots on the chassis.
Replacing the Display Assembly
1 Follow the instructions...
Owners Manual - Page 125
... screen, and key functions. System Setup Utility
125 If you see the Microsoft Windows desktop.
If you wait too long and the operating system logo appears, continue to wait until...configuration information for the F2 prompt to appear and
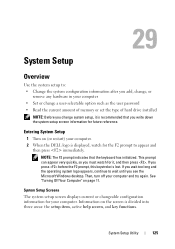
then press immediately. 29
System Setup
Overview
Use the system setup to: • Change the system configuration information after you add, change ...
Owners Manual - Page 132
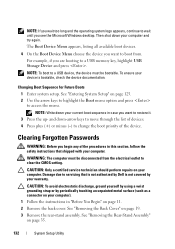
...key, highlight USB Storage Device and press . For example, if you see the Microsoft Windows desktop. Changing Boot Sequence for Future Boots 1 Enter system setup. NOTE: Write down your current boot... back cover.
CAUTION: Only a certified service technician should perform repairs on page 125. 2 Use the arrow keys to highlight the Boot menu option and press to servicing that shipped with your...
Similar Questions

Error Message When Using Hdmi Cable On Dell Inspiron 620i
(Posted by rdvlooky 9 years ago)

How To Set Up Tv Tuner Using Local Cable Connection On Dell Inspiron 2320
(Posted by nadeb 10 years ago)


