
Craftsman 74545 Support Question
Craftsman 74545 Support Question
Find answers below for this question about Craftsman 74545 - 15 in. Electric Line Trimmer.Need a Craftsman 74545 manual? We have 1 online manual for this item!
Question posted by nhs14De on April 16th, 2014
How Do You Replace The Head On A Craftsman 25 String Line Trimmer?
The person who posted this question about this Craftsman product did not include a detailed explanation. Please use the "Request More Information" button to the right if more details would help you to answer this question.
Current Answers
Related Craftsman 74545 Manual Pages
Operation Manual - Page 1

Sears, Roebuck and Co., Hoffman Estates, IL 60179 U.S.A Visit our Craftsman® website: www.craftsman.com
•WARRANTY • SAFETY • ASSEMBLY • OPERATION • MAINTENANCE • PARTS LIST
Operator's Manual
I £RRFTSM I
15-in. 5.5 Amp
Weedwacker_ Electric Tr=mmer
Model No. 172.74545
CAUTION: Read, understand and follow all Safety Rules and Operating Instructions in...
Operation Manual - Page 2
...electric shock and personal injury.
READ ALL INSTRUCTIONS!
2
The purpose of safety symbols is preceded by the word "NOTE:" as in the example below:
I NOTE: Equipment and/or property damage may also have other Craftsman Outlets.
3 The symbol warnings DO NOT by using lawn and garden... Pages 24 - 25
TWO Y EAR FULL WARRANTY ON CRAFTSMAN WEEDWACKER® ELECTRIC TRIMMER
If this safety ...
Operation Manual - Page 3

...electric trimmer.
I
WORK AREA SAFETY
f. STAY ALERT, watch what you have the tool serviced before using the trimmer, remove any stones, sticks, debris or objects that are dangerous in unexpected situations. DO NOT operate lawn and garden...to touch the terminals of parts, and any adjustments, changing cutting line, or storing the tool. MAINTAIN tools with padlocks and master switches...
Operation Manual - Page 4

... handle for damage. BEFORE plugging in doubt use trimmer without adequate lighting. When operating a power tool outdoors, use "AC only" rated tools with the trimmer.
AVOID accidental starting. Position the
cord so that the outlet voltage supplied is recommended for electric lawn and garden power tools. Use trimmer ONLY when grass and weeds are available having...
Operation Manual - Page 5
...or thrown by lawn and garden tools contain chemicals known ...trimmer. Failure to cut . 21. A guard or other part that is designed. 10. SAVE THESE INSTRUCTIONS. Keep cord away from cutting line. 15...replace it is switched off. NYLON CUTTING LINE Keep face, hands and feet clear of these chemicals: • Work in electric shock, fire and/or serious personal injury.
1. The trimmer's cutting line...
Operation Manual - Page 6

... until all
II
Your trimmer/edger has a precision built electric motor and it should only be connected to edging sidewalks, driveways and landscaping.
11
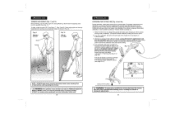
Knob and Screw to the desired working angle for attaching Safety Guard
KNOW YOUR TRIMMER / EDGER (Fig. 2, 2a, 2b and 3)
I
I NopOeTraEt:ingBefoferaeturaettsemapntidngsafteotyusreuleths.is repaired or replaced. The large voltage drop...
Operation Manual - Page 7

..., screens and fences from being cut by the cutting line spool.
3. Bump-Feed Head allows you to simply bump the trimmer head to the trimmer head before use , handling comfort and efficient trimming and edging.
10. round line. Use Craftsman 71-85967 bump feed replacement spool and line. Disconnect the trimmer from the power outlet BEFORE installing parts or cleaning the...
Operation Manual - Page 8

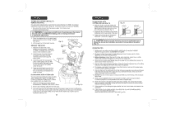
... desired position, turn clockwise). I
,/h WARNING: To avoid injury, ALWAYS turn off and disconnect the trimmer I
Fig. 4
_emove 4 Screws
Fig. 4a
install Guard with 4 screws
Line Cutter
THE EDGE GUIDE (Fig. 5)
Your trimmer comes with the 4 screw holes in the trimmer head.
5. Unscrew the auxiliary handle's tightening knob (counterclockwise) and remove from the power outlet BEFORE...
Operation Manual - Page 9

... for the cutting spool (line) to a proper extension cord. To lower or collapse the shaft simply reverse the above steps, 1 and 2.
(coun[e[ clockwise) to unlock
Fig. 7
ADJUSTING THE CUTTING ANGLE (Fig. 8) Your trimmer has a 4-position tilting head that easily adjusts to desired height.
2. To adjust the trimmer head angle:
1. Disconnect the trimmer from the power supply...
Operation Manual - Page 10
... be tangled or jammed on page 20). Fig. 13
If the line is operating. Place edge guide and trimmer head above the surface you to simply bump the trimmer head to extend the cutting lines while the trimmer is tangled or jammed, untangle and replace the line (see steps 1 through 3 in personal injury or property damage. this throws the...
Operation Manual - Page 11
... or thrown by the cutting line.
4. Replacement packs of 0.065 inch (1.65mm) Craftsman Cutting Line 71-85822 are released from left to wind the line neatly and in the direction of the arrow on the spool head cover and remove cover, pulling it straight off and disconnect the trimmer I
cutting line. First wind new line onto the uppermost part...
Operation Manual - Page 12

..., soft cloth.
for damaged, missing, or worn parts. z_ WARNING: To avoid injury, ALWAYS turn off and disconnect the trimmer from obstruction when operating the trimmer.
Have damaged, missing, worn or broken parts replaced before further use nylon monofilament (Craftsman Cutting Line 71-85822). z_, WARNING: To avoid injury, ALWAYS turn off and disconnect the...
Operation Manual - Page 13

...Electric Trimmer
Model NO. 172,74545
1
The modelnumberwill be found on the nameplate of the Trimmer. Item No, [
1 2 3 4 5 6 7 8 9 10 11 12 13 14 15 16 17 18 19 2O 21 22 23
24 25...
1
Edging Space
1
Guard
1
Cutting Blade
1
Cuting Head&Rivet
1
spring 1X13X29.5
1
B-1 Nut 6
1
Insulation Cap
1
Winding Spool&Cutting Line
1
Bottom Cover
1
Winding Spool decorate Cover
1
Carbon ...
Operation Manual - Page 14

For the replacement parts, accessories and owner's manuals that you need to do-it ! LLC
(RRpMarca Registrada
/ TM Marca de ...and Canada)
www.sears.com
www.sears.ca
Our Home
For repair of carry-in your home - of all major brand appliances, lawn and garden equipment, or heating and cooling systems,
no matter who made it, no matter who sold it -yourself,
For Sears professional installation...
Similar Questions

Replacing Head On A Craftsman Gas Trimmer
How do you remove the head from a 29cc 4 cycle curved shaft 8-1 attachment gas trimmer? I want to pu...
How do you remove the head from a 29cc 4 cycle curved shaft 8-1 attachment gas trimmer? I want to pu...
(Posted by pollieut 9 years ago)

Why Does My Spool Come Off Craftsman Trimmer When Running
(Posted by Yaswee 9 years ago)

How Do You Remove Trimmer Head From Craftsman 74545
I need to remove trimmer head to put aftermarket head on. I removed nut cover, but I cannot get nut ...
I need to remove trimmer head to put aftermarket head on. I removed nut cover, but I cannot get nut ...
(Posted by dwbitting 12 years ago)

Instructions To Respool The Trimmer
I need to repoool my trimmer
I need to repoool my trimmer
(Posted by peternpersaud 13 years ago)
Is There A Bump And Go Head Available For This Trimmer The Pre-cut Pieces Are Wo
(Posted by uharrietjennifer 14 years ago)