Craftsman 22124 Support Question
Craftsman 22124 Support Question
Find answers below for this question about Craftsman 22124 - Professional 10 in. Table Saw.Need a Craftsman 22124 manual? We have 1 online manual for this item!
Question posted by Spauldid51 on April 29th, 2013
Or91721 Replacement Belt
What is a replacement belt that can purchased with out a month relay from order from Sears Parts?
Current Answers

Related Craftsman 22124 Manual Pages
Owners Manual - Page 1
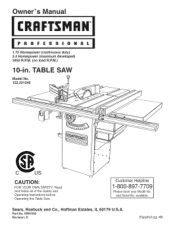
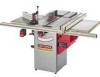
.... Sears, Roebuck and Co., Hoffman Estates, IL 60179 U.S.A. TABLE SAW
Model No. 152.221240
CAUTION:
FOR YOUR OWN SAFETY;
OR91552 Revision: D
Espa5ol pg. 48 Part No. Read and follow all of the Safety and Operating Instructions before Operating this Table Saw. Owner's
uai
CRRFrSMRH
1.75 Horsepower (continuous duty) 2.4 Horsepower (maximum developed) 3450 R.P.M. (no load R.P.M.)
10-in...
Owners Manual - Page 2
... to the left of the blade
2-1/4-in. 30-in. 18-in . Connect to the Table Saw ...Maintenance ...Troubleshooting Guide ...Part List ...Espanol ...Service Information ... To avoid shock or fire, replace power cord immediately if it to a defect in a damp environment. Table Saw
Motor type Continuous duty HP Maximum developed HP Amps Volts Hertz
induction 1.75 2.4 15...
Owners Manual - Page 4
....
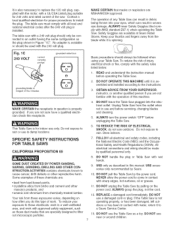
8. DO NOT remove the 3rd prong. ALWAYS UNPLUG THE TOOL FROM THE ELEC= TRICAL RECEPTACLE when making adjustments, changing parts or performing any way. Make sure that are available at Sears Retail Stores. BEFORE USING THE TABLE SAW
9. See Grounding Instructions.
3. DO NOT Use electrical tools in doubt, check the instruction manual that comes with that...
Owners Manual - Page 6
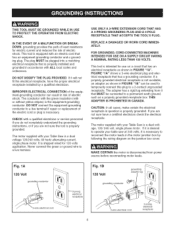
...WIRE EXTENSION CORD THAT HAS A 3=PRONG GROUNDING PLUG AND A 3-POLE RECEPTACLE THAT ACCEPTS THE TOOL'S PLUG. This tool is not available, an adapter as shown in FIGURE "IB" can result in risk of... disconnected from it is desired to a live terminal if repair or replacement of electric shock. The motor supplied with your table saw at 240 volts, it will not fit the electrical receptacle, have...
Owners Manual - Page 7
...and Health Regulations (OSHA).
DO NOT handle the plug or Table Saw with ANSi standard Z87.1) when operating the Table Saw. REPLACE a damaged cord immediately.
ALWAYS wear Safety Goggles (that comply... these chemicals are MSHA/NIOSH approved. Basic precautions should be made by Sears.
10. Unplug Table Saw from these chemicals: work with sharp edges, hot surfaces, oil or ...
Owners Manual - Page 8

... the safe and proper operation of saw blade.
25.
NEVER have any part of the saw blade when using auxiliary fence as ... the machine "OFF" and unplugging it from the following sources:
Power Tool Institute 1300 Summer Avenue Cleveland, OH 44115-2851 www.powertoolinstitute.org
National ...power source. Clean off the table/work area before table saw . Department of Labor regulations www...
Owners Manual - Page 9
Standard
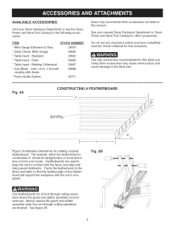
29880 29882
* Table Insert - Molding Cutterhead * Saw Blade - See your Sears Hardware Department or see the Sears
Power and Hand Tool Catalog for making a typical featherboard.
The material, which the featherboard is completed. See figure 2B.
Using other accessories may recommend other accessories. Always replace the guard and splitter assembly when the non-through ...
Owners Manual - Page 11

...-40 on them on your table saw.
4. TABLE SAW 1. Handwheel lock knob (2) 5. Fence hook (2)
10. Switch 14. Remove parts from all the parts have been obtained and installed correctly. Make sure to buff out the wax before table
saw .
The saw carton also contains a box of the protective coatings are removed completely. Polly-V belt 11. This table saw is shipped in the power...
Owners Manual - Page 16
... sturdily supported before proceeding. two people may be permanently attaching your table saw.
DUST PORT ASSEMBLY
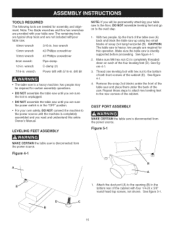
MAKE CERTAIN the table saw is disconnected from the power source. TOOLS REQUIRED
The following tools are not included withyour table saw.
18mm wrench
3/16-in. Make sure the table saw up using two small blocks of the cabinet (E). Figure 44
1. two people are...
Owners Manual - Page 17
... been removed from the power source. The right extension wing must be connected to the power source.
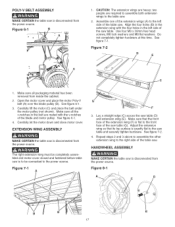
POLY=V BELT ASSEMBLY
MAKE CERTAIN the table saw table (G). See figure 7-1. Open the motor cover and place the motor Poly-V belt (A) over the blade pulley (B).
Make sure that its top surface is exactly flat to the right side...
Owners Manual - Page 18

... figure 9-1.
18
See figure 9-1.
2. Place one of the handwheels (A) onto the bevel shaft (B) located on the side of the shaft (F). Figure 10=1 B
F
2. WRENCH AND FENCE HOOK ASSEMBLY
MAKE CERTAIN the table saw is disconnected from the power source. Place the threaded end of the mounting splitter rod (A) through the hole (B) in the back...
Owners Manual - Page 19
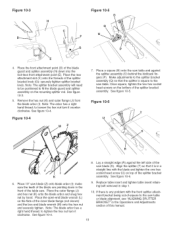
... hex socket head screws on top of the blade are pointing down into the tool-less front attachment point (E). Replace table insert and tighten table insert retaining bolt removed in the
front of -square to the saw . See figure 10-4. See figure 10-3.
5. Place the rear attachment slot (F) onto the threads of the splitter bracket assembly. Align...
Owners Manual - Page 25
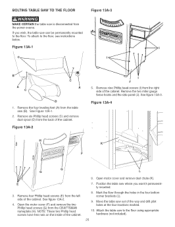
.... Open motor cover and remove dust chute (K).
7. Attach the table saw where you wish, the table saw out of the cabinet. See Figure 13A-1.
2. Remove four Phillip head screws (E) from the back of the way and drill pilot holes at the four locations marked.
10. Open the motor cover (F) and remove the two Phillip head...
Owners Manual - Page 26
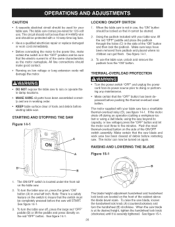
... scale. Using the padlock included with your table saw has a resettable thermal-overload relay (D), see figure 14-1.
Make sure keys have been ...replace damaged or worn cord immediately.
• Before connecting the motor to rain or operate the in working order.
• KEEP table surface clear of the ON/OFF switch assembly. Push the reset thermal-overload button on the table saw...
Owners Manual - Page 30

... is in line with the miter gauge groove.
If the rip fence is parallel with the saw table (B). To adjust the table insert, loosen and remove table insert retaining bolt (C). See figure 19-1.
2. See figure 18-2. See figure 18-2.
5, Replace the rip fence on the fence lock handle (C). ADJUSTING CLAMPING ACTION OF FENCE LOCKING HANDLE...
Owners Manual - Page 31

... and disconnect power cord from the factory for 240-volt operation.
1. Replace junction box cover and close motor cover. 6. Replace 120 volt plug with 5/8-in . Thetableinsertis equippedwitha fingerhole(E) foreasyremovalS. The table saw with the table saw blade.
• USE ONLY 10-in . See figure 21-1.
8. Replace blade guard and splitter
31 See figure 20-1.
3. Using wiring diagram...
Owners Manual - Page 32
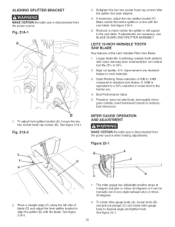
... still square to industrybest tolerances. ALiGNiNG SPLITTER BRACKET MAKE CERTAIN the table saw blades. High cut steel body, best quality micrograin carbide, hand hammered (tuned) to the saw blade.
See figure 22-1.
32 LEITZ 10=INCH VARIABLE TOOTH SAW BLADE
Key features of blade (D) and adjust the front splitter bracket to 50%.
2. Place a straight edge...
Owners Manual - Page 33
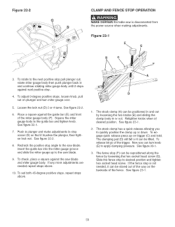
...(F) can turn miter gauge over.
5. To set both 45-degree positive stops, repeat steps above .
10. See figure 23-1.
3, The fence stop is disconnected from the power source when making adjustments. See ...until it can be lifted. Figure 22=2
G D
CLAMP AND FENCE STOP OPERATION
MAKE CERTAIN the table saw is not needed repeat steps above .
Figure 23=1 E
B
\C
3, To rotate to the next...
Owners Manual - Page 40

...Blade is not parallel to blade.
1. Sharpen or replace blade. 2. Replace drive belt. 3. Adjust leveling feet, if
supplied with saw , turn the power switch to the "OFF" position...Reposition saw is not mounted securely.
40
1. If saw on motor, slow down feed rate of cabinet.
1. Adjust 90 and 45-degree positive stops.
1. TOPREVENTINJURYTOYOURSELF or damage to the table saw . ...
Owners Manual - Page 41

...NUT M10x1.5
2
BELT (28" 6Rib Jsection...replace electrical parts on this table saw may create a HAZARD or cause product damage. Always order by PART NUMBER, not by key number. *AVAILABLE AT MOST RETAIL STORES
Key No. PART...OR91721...PART No.
Repair service is available at your nearest Sears Service Center. KICKBACK FINGER
T:1.6ram)
SET SCREW 1/4-28 x 3/8", NYLOCK TABLE...22124 10" TaNe Saw
BLADE GUARD...
Similar Questions

Arbor Nut For A Craftsman Professional Table Saw
(Posted by jimszawara 7 months ago)

Is There Any Place You Know Of Where I Can Get The Table Saw Arbor Nut #or91050?
Any hints would be appreciated
Any hints would be appreciated
(Posted by Chuckmorley 1 year ago)

Table Saw Switch Malfunction
Today I pushed my switch on the table saw and it didn't turn off! I had to unplug the table saw. I s...
Today I pushed my switch on the table saw and it didn't turn off! I had to unplug the table saw. I s...
(Posted by gringoticahouse 11 years ago)

What Is A Sears Electronic 10'table Saw Worth
what is a sears electronic 10" table saw w/ext,& base model 113.290650 worth?, it works great
what is a sears electronic 10" table saw w/ext,& base model 113.290650 worth?, it works great
(Posted by mastercook76 11 years ago)

Need Wiring Diagram For 71/2 Craftman Table Saw-mdl 113.24151
(Posted by darent 12 years ago)