Craftsman 22124 Support Question
Craftsman 22124 Support Question
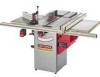
Find answers below for this question about Craftsman 22124 - Professional 10 in. Table Saw.Need a Craftsman 22124 manual? We have 1 online manual for this item!
Question posted by darent on June 11th, 2011
Need Wiring Diagram For 71/2 Craftman Table Saw-mdl 113.24151
The person who posted this question about this Craftsman product did not include a detailed explanation. Please use the "Request More Information" button to the right if more details would help you to answer this question.
Current Answers
Related Craftsman 22124 Manual Pages
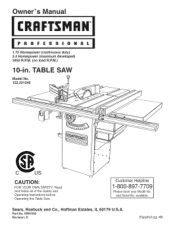
Owners Manual - Page 1
...
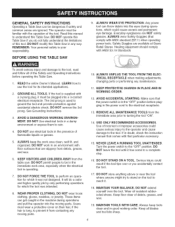
CAUTION:
FOR YOUR OWN SAFETY; Owner's
uai
CRRFrSMRH
1.75 Horsepower (continuous duty) 2.4 Horsepower (maximum developed) 3450 R.P.M. (no load R.P.M.)
10-in. Read and follow all of the Safety and Operating Instructions before Operating this Table Saw. Sears, Roebuck and Co., Hoffman Estates, IL 60179 U.S.A. available.
Customer Helpline
1-800-897-7709
Please have your Model...
Owners Manual - Page 2
... Center for Table Saw ...Accessories and Attachments ...Carton Contents ...Know Your Table Saw ...Assembly Instructions...10-in. 5/8-in . The Table Saw is damaged in , Cast Iron 330 Ibs. 70 Ibs.
Fence type
Biesemeyer, Commercial
Fence System
Max depth-of-cut Max dado width Max dado blade diameter Left and right table wing Weight of table saw Weight of purchase, return it is factory wired...
Owners Manual - Page 3
...cut withouut singthefenceormitergaugeina cuttingoperation. Gum,Pitchor Resin- RipCut-
Table/WorAkrea- Theoperatioonfmakingbotha bevel anda mitercutatonetime.
Kickback-
Theareathatis ...througchutthatproduceassquarenotch. Thetotalsurfaceofthetopofthetable sawonwhichtheworkpiecreestswhileset-upor cutting operationasrebeingperformed. Freehancdutsmustneverbeperformeodna Table Saw.
Owners Manual - Page 4
... and pull the operator into the moving parts.
10. DO NOT use the tool for which could cause severe and permanent eye damage. It will do not fully understand the limitations of flammable liquids or gasses.
5. Wear oil resistant rubbersoled shoes. BEFORE USING THE TABLE SAW
9. Hearing equipment should comply with that are ignored...
Owners Manual - Page 6
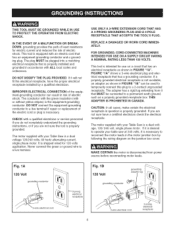
...
The conductor with the green insulation (with your Table Saw is disconnected from it is shipped wired for electric current and reduces the risk of least resistance for 120 volts application. If you are not sure have the proper electrical receptacle installed by following the wiring diagram on a circuit that has a grounding conductor.
CHECK with...
Owners Manual - Page 7
... connections and wiring should be followed when using your thumbs and fingers away from the outlet when not in use only. DO NOT unplug the Table Saw by the ...10. READ and understand the instruction manual before unplugging the Table Saw.
6. DO NOT pull the Table Saw by pulling on how often you are specially designed to filter out microscopic particles.
Unplug Table Saw...
Owners Manual - Page 8

... splitterassemblycannotbeused. REMOVEcut-offpiecesanddebrisfromthetable beforestartingthesaw. PROPERLY SUPPORT long or wide workpiece.
30. Clean off the table/work area before table saw blade.
25. LOCK the START/STOP switch with the path of this tool is available from power source. Neversawinga largeworkpiecethatcannotbe controlled. Aftercuttingt,urnthesawoff. NEVER reach around or...
Owners Manual - Page 11

... thinner to lift the table saw off with a soft cloth. If there are removed completely.
Handwheel (2) 4. Switch 14.
This may need redone several times before ...closed and fastened before discarding the shipping box. Table saw . Wrench hook 8. Fence hook (2)
10. This table saw will require some amount of saw parts.
1. The saw carton also contains a box of assembly. The...
Owners Manual - Page 16
... sure the power switch is disconnected from the power source.
The remaining tools are typical shop tools and are required for assembly and alignment.
Make sure the table saw .
18mm wrench
3/16-in the "OFF" position.
• For your table saw .
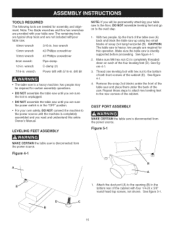
TOOLS REQUIRED
The following tools are provided with four 1/4-20 x 3/8" round head tap screws, not shown. two...
Owners Manual - Page 19
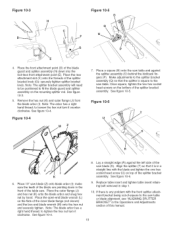
...tool-less front attachment point (E). Place the outer flange (J) and hex nut (K) onto the blade arbor and snug hex nut by hand.
Make adjustments to the splitter bracket assembly (Q) so that it counterclockwise. See figure 10... the table saw table or blade alignment, see "AMGNING SPMTTER BRACKET" in step 1.
10. See figure 10-4.
9. Replace table insert and tighten table insert retaining...
Owners Manual - Page 26
... feature on the table saw .
The table saw comes pre-wired for your table saw is not in damp locations.
• MAKE SURE all parts have been removed from the "ON" button. If the motor shuts off , press the large red "OFF" paddle (B) or lift the paddle and press directly on the side of tools and debris before...
Owners Manual - Page 28

... rule is recommended to check the alignment before initial operation as follows:
MAKE CERTAIN the table saw blade to be attempted if it is disconnected from the outer diameter. Take a reading at the factory and should not need any of the carbide tips of an inch. Figure 17=1 C
1. To adjust arrow, loosen the...
Owners Manual - Page 30

... (B) sliding surfaces. TABLE INSERT ADJUSTMENT
MAKE CERTAIN the table saw table.
3, To level the tame insert, turn the one of the table. Repeat this adjustment until the bottom left edge of the table insert. If the ... 4, Slightly tighten or loosen one or more adjusting set screws (D) as needed and recheck. Place a straight edge across the front and rear of the fence is pushed ...
Owners Manual - Page 31

.... eefigure19-1.
To change to replace the 120 volt plug, supplied with the table saw . arbor holes, rated at the front of the motor. See figure 20-1.
4. Remove arbor nut, blade flange (D) and saw blade to loosen it was loosened.
6. Using wiring diagram on the arbor nut (C). Two wrenches are supplied with the 240 volt plug...
Owners Manual - Page 33
...-1.
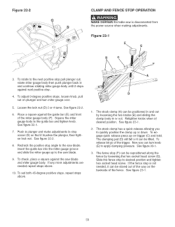
7. To engage quick release press up to quickly position the clamp up or down. If any more adjustments are needed , it can be stored out of the way on trigger (C) and hold. See figure 23-1.
3, The fence ...fence. To set both 45-degree positive stops, repeat steps above .
10. Figure 22=2
G D
CLAMP AND FENCE STOP OPERATION
MAKE CERTAIN the table saw is not needed repeat steps above .
Owners Manual - Page 36
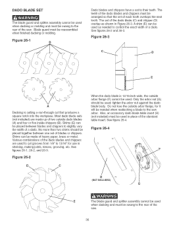
... for it will be used ; Also, an accessory dado blade table insert (H) (not included) must be used in place of the saw. DADO BLADE SET
The blade guard and splitter assembly cannot be ... the dado blade (C) and chipper (D) overlap as needed when reattaching a blade to control the exact width of blades or chippers.
A shim (E) can be needed to the saw .
36 See figures 26-1,26-2, and 26-3....
Owners Manual - Page 37

..., tighten the arbor nut (E) against the cutterhead body. Also, an accessory molding cutterhead table insert (F) (not included) must be used in which would prevent the cutter from seating...of steel knives (B). See figure 27-1. A 3/4-inch facing is attached to the saw . The knife grooves (C) should be needed when reattaching a blade to the face of the workpiece. Figure 27=2
Figure 26...
Owners Manual - Page 38

...have been removed, clean all play is recommended as the grain whenever possible.
Make sure you need to apply a good automotive paste wax to all cuts, pay attention to prevent splintering
In ... moisture or oily hands.
38 See figure 28-1
2.
NOTE: In the illustration below, the table saw from rusting from its power source.
This will show in the same direction as follows:
To ...
Owners Manual - Page 40

....
3. See "Fence Alignment" in miter gauge bar are not set -screws in motor for damaged insulation and shorted wires and have them replaced. Blade is plugged into wall outlet.
5. TOPREVENTINJURYTOYOURSELF or damage to the table saw on a flat surface. Correct low line voltage condition. Have correct fuses on circuit breakers installed by a qualified...
Owners Manual - Page 41

... CAPACITOR
1
RUN CAPACITOR
1
MOTOR SPEC PLATE 1.75 HP
1
MOTOR WIRING DIAGRAM LABEL
1
HEX HEAD SCREW MSx1.26 x 30ram
4
FLAT WASHER M8...RETAIL STORES
Key No. STANDARD TABLE INSERT RETAINING BOLT TABLE HEX SOCKET SET SCREW M8 ...112
OR91774
113
OR91076
114
OR91076
115
OR91077
116
OR91074
117
OR91118
118
OR91078
Description
OWNER'S MANUAL - #22124 10" TaNe Saw
BLADE GUARD...
Similar Questions

Arbor Nut For A Craftsman Professional Table Saw
(Posted by jimszawara 6 months ago)

Is There Any Place You Know Of Where I Can Get The Table Saw Arbor Nut #or91050?
Any hints would be appreciated
Any hints would be appreciated
(Posted by Chuckmorley 1 year ago)

Craftsman 153.22124 Arbor Nut
looking to a replacement Arbor nut for my craftsman 22124. Original part number was OR91050. In need...
looking to a replacement Arbor nut for my craftsman 22124. Original part number was OR91050. In need...
(Posted by wsymons 1 year ago)

I Need A Rip Fence For This Table Saw How Can I Get One?
need to buy
need to buy
(Posted by tuccilaroo 9 years ago)

Need Wiring Diagram
Where can I find a wiring diagram for a craftsman shop vac model # 17761?
Where can I find a wiring diagram for a craftsman shop vac model # 17761?
(Posted by Jnicosia 10 years ago)