
Canon PIXMA MX360 Support Question
Canon PIXMA MX360 Support Question
Find answers below for this question about Canon PIXMA MX360.Need a Canon PIXMA MX360 manual? We have 5 online manuals for this item!
Question posted by wilnap69 on October 6th, 2012
How Can I Clear The Message Clear Paper Jam Then Press Ok But No Respond
The person who posted this question about this Canon product did not include a detailed explanation. Please use the "Request More Information" button to the right if more details would help you to answer this question.
Current Answers


Related Canon PIXMA MX360 Manual Pages
MX360 series Getting Started - Page 31
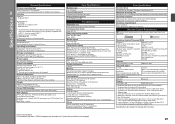
... width 8 inches/203.2 mm (for others , both in height Legal size: max. 5 sheets (20 lb/75 gsm paper), up to 0.16 inches/4 mm in standard mode or Canon FAX Standard chart No.1, standard mode.) Color: Approx. 1 ...each 16 bit/8 bit)
*1 A computer that complies with the Canon inkjet printer before upgrading from Mac OS X v.10.5 or lower to Mac OS X
v.10.6, install software bundled with ...
Selecting Best Receive Mode - Page 17
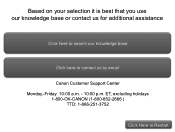
ET, excluding holidays 1-800-OK-CANON (1-800-652-2666 )
TTD: 1-866-251-3752
Click Here to contact us for additional assistance
Click here to search our knowledge base
Click here to Restart Based on your selection it is best that you use our knowledge base or contact us by email Canon Customer Support Center Monday.-Friday 10:00 a.m. - 10:00 p.m.
Setting Default Mode - Page 19

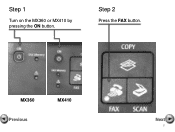
Step 1
Turn on the MX360 or MX410 by pressing the ON button. Step 2
Press the FAX button. MX360 Previous
MX410
Next
19
Setting Default Mode - Page 20
Previous
Next
20
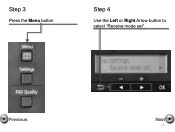
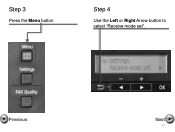
Step 3
Press the Menu button
Step 4
Use the Left or Right Arrow button to select "Receive mode set".
Setting Default Mode - Page 21
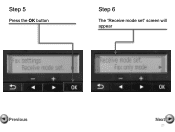
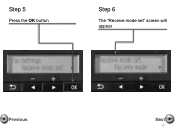
Step 5
Press the OK button
Step 6
The "Receive mode set" screen will appear
Previous
Next
21
Setting Default Mode - Page 23
screen will appear
Previous
Next
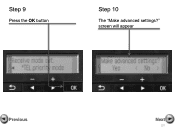
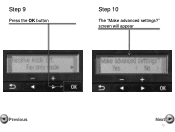
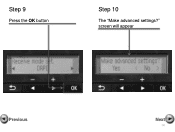
23 Step 9
Press the OK button
Step 10
The "Make advanced settings?"
Setting Default Mode - Page 25
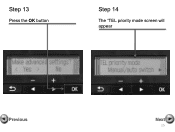
Step 13
Press the OK button
Step 14
The "TEL priority mode screen will appear
Previous
Next
25
Setting Default Mode - Page 27
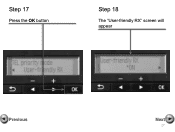
Step 17
Press the OK button
Step 18
The "User-friendly RX" screen will appear
Previous
Next
27
Setting Default Mode - Page 29
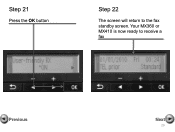
Your MX360 or MX410 is now ready to the fax standby screen. Step 21
Press the OK button
Step 22
The screen will return to receive a fax
Previous
Next
29
Fax Setup Guide - Page 9
Step 2
Press the FAX button.
Step 1
Turn on the MX360 or MX410 by pressing the ON button.
MX360 Previous
MX410
Next
9
Fax Setup Guide - Page 10
Previous
Next
10 Step 3
Press the Menu button
Step 4
Use the Left or Right Arrow button to select "Receive mode set".
Fax Setup Guide - Page 11

Step 5
Press the OK button
Step 6
The "Receive mode set" screen will appear
Previous
Next
11
Fax Setup Guide - Page 13
screen will appear
Previous
Next
13 Step 9
Press the OK button
Step 10
The "Make advanced settings?"
Fax Setup Guide - Page 14
Previous
Next
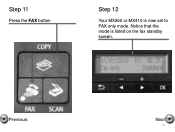
14 Step 11
Press the FAX button
Step 12
Your MX360 or MX410 is listed on the fax standby screen.
Notice that the mode is now set to FAX only mode.
DRPD Setup Guide - Page 10

Step 1
Turn on the MX360 or MX410 by pressing the ON button.
MX360 Previous
MX410
Next
10 Step 2
Press the FAX button.
DRPD Setup Guide - Page 12
Step 5
Press the OK button
Step 6
The "Receive mode set" screen will appear
Previous
Next
12
DRPD Setup Guide - Page 14
screen will appear
Previous
Next
14 Step 9
Press the OK button
Step 10
The "Make advanced settings?"
DRPD Setup Guide - Page 16
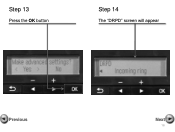
Step 13
Press the OK button
Step 14
The "DRPD" screen will appear
Previous
Next
16
DRPD Setup Guide - Page 18
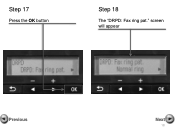
Step 17
Press the OK button
Step 18
The "DRPD: Fax ring pat." screen will appear
Previous
Next
18
DRPD Setup Guide - Page 19
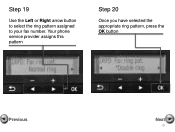
Step 19
Use the Left or Right arrow button to select the ring pattern assigned to your fax number. Your phone service provider assigns this pattern
Step 20
Once you have selected the appropriate ring pattern, press the OK button
Previous
Next
19
Similar Questions


How Can I Clear The Message Clear Paper Jam Then Press Ok
(Posted by wilnap69 11 years ago)

Pixma Mx330 Paper Output Slot Error Saying To Clear Paper Jam Will Not Clear
pixma mx330 paper output slot error saying to clear paper jam will not clear even thogh theres's no ...
pixma mx330 paper output slot error saying to clear paper jam will not clear even thogh theres's no ...
(Posted by romasoogrim 12 years ago)