
Brother International SE-400 Support Question
Brother International SE-400 Support Question
Find answers below for this question about Brother International SE-400.Need a Brother International SE-400 manual? We have 4 online manuals for this item!
Current Answers
Related Brother International SE-400 Manual Pages
Users Manual - English - Page 12
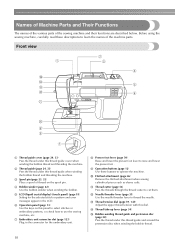
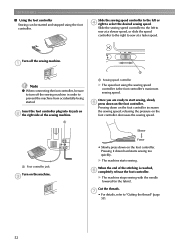
... guide when winding the bobbin thread and threading the machine. c Spool pin (page 23, 32) Place a spool of the machine parts. e LCD (liquid crystal display) (touch panel) (page 18) Setting for the embroidery unit.
i Operation buttons (page 12) Use these descriptions to use the sewing machine, etc.
g Embroidery unit connector slot (page 123) Plug in...
Users Manual - English - Page 15

For details, refer to the previous screen. b Back key Press to return to "LCD (Liquid Crystal Display) Operation" (page 18). into the sewing machine memory.
Displays simple explanations of setting upper thread / bobbin winding / setting bobbin thread / needle replacement / embroidery unit attachment / embroidery frame attachment / embroidery foot attachment / presser foot replacement.
13
h...
Users Manual - English - Page 19
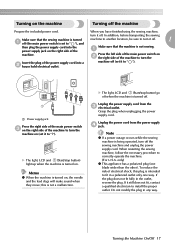
... reduce the risk of electrical shock, this is turned
machine to another location, be sure to turn the
machine on (set it to " ").
1
a Power supply jack
Press the right side of the main power switch c on the right side of the
Make sure that the sewing machine is not a malfunction. If it still does not...
Users Manual - English - Page 20

...LCD (liquid crystal display) on the front of the sewing machine. For details, refer to be used c Stitches d Stitch settings and twin needle sewing e Stitch width f Stitch length g Number of the... unit is attached. GETTING READY
LCD (Liquid Crystal Display) Operation
Selected stitch, pattern settings and messages are explained in
"Selecting an embroidery pattern" (page 137). When you touch...
Users Manual - English - Page 21

.../ Italian/Dutch/Spanish/ Japanese/Danish/Norwegian/ Finnish/Swedish/Portuguese/ Russian/Korean/Thai/others
LCD brightness
Adjust the brightness of purchase.
Changing the machine settings
Various sewing machine operations and sewing settings can be set are listed below.
For details on the embroidery screen (page 133). Changes the thread color display on operation, refer to be changed...
Users Manual - English - Page 22

... highlighted display is the individual number for the
sewing machine. X The LCD comes on the display
Example: Changing the needle stop position
X The setting screen appears.
X The initial stitch screen appears again. Memo
z "NO" is the initial setting. Press b panel.
(Settings key) on . c
Switch the screen using
(Previous page
key) and
(Next page key).
•...
Users Manual - English - Page 23

...bobbin winding / setting bobbin thread / needle replacement / embroidery unit attachment /
Example: Upper threading
embroidery frame attachment / embroidery foot attachment / presser foot replacement on . Turn on
b the display panel. Press
(Sewing machine help screen appears. X The initial stitch screen appears again. X The sewing machine help key) on the sewing machine. LCD (Liquid...
Users Manual - English - Page 27
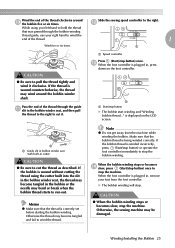
... remove your foot from the machine while winding the bobbin.
Slide the sewing speed controller to wind the thread.
m When the foot controller is correctly set before starting the bobbin winding.... stops or becomes slow, stop . a a Start/stop the bobbin winding. Otherwise, the sewing machine may bend or break when the bobbin thread starts to stop button
X The bobbin start winding...
Users Manual - English - Page 28
Memo
z When the sewing machine is started or the handwheel is turned after winding the bobbin, the machine will not move. (Sewing is impossible.)
Slide the sewing speed controller back to its p ...seat even if the thread become tangled under the bobbin winder seat.
When the foot controller is set to the right side, the needle will make a clicking sound;
you cannot wind off the ...
Users Manual - English - Page 34
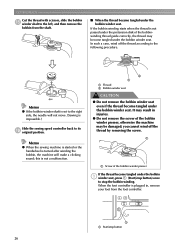
... position button) once or c twice to the front at the bottom.
32 If the upper threading is not raised, the sewing machine cannot be threaded.
GETTING READY
Threading the upper thread
Set the spool of thread onto the spool pin. Check the handwheel and, if this mark is inserted onto the spool pin...
Users Manual - English - Page 38
...c thread.
If the needle threader is accidentally pressed, the machine starts sewing, and your finger may be pricked with the twin needle, the sewing machine may be damaged.
36
Using the twin needle
With the twin...wing needle or the twin needle which cannot be used with the twin needle, refer to "Stitch Setting Chart" (page 70). Be sure to steps a through the eye of the needle c from ...
Users Manual - English - Page 39
....
Attach zigzag foot "J". Turn on the sewing machine and select a h stitch.
• For stitch selection see "Selecting stitching" (page 49).
• See "Stitch Setting Chart" (page 70) for stitches that ... use a twin needle.
If the needle threader is used with the twin needle, the sewing machine may be sure to
"Replacing the Presser Foot" (page 43). Then, thread the upper...
Users Manual - English - Page 46
... notch in the holder.
Check that the correct presser foot is installed, turn off the sewing machine, attach the correct presser foot, and then select the desired stitch again. Position the presser...foot below the holder e so that the presser foot pin is aligned with the selected stitch, refer to "Stitch Setting Chart" (page 70).
44 a
Note
z When a stitch is attached. a b
c
d
a Presser ...
Users Manual - English - Page 51

... the screen.
z For details on the sewing machine. Determine the stitch to be used , and get the a matching presser foot ready.
• Refer to "Setting the Stitch" (page 57).
Attach the ...the icon for the presser foot that the correct presser foot is installed, turn off the sewing machine, attach the correct presser foot, and then select the desired stitch again.
Example: 11 ...
Users Manual - English - Page 54
... b the right side of the stitching is the foot controller's maximum sewing speed.
releasing the pressure on the machine.
a
a
a Sewing speed controller
X The speed set using the foot controller.
When the end of the sewing machine. SEWING BASICS
■ Using the foot controller
Sewing can be sure to prevent the machine from accidentally being started and stopped using the...
Users Manual - English - Page 55

... used for example, at
stop button), or press down , the machine sews at the
sewing is stopped, refer to the machine or injuries may occur. set so that the needle stays up when
sewing is stopped.
a a Start/stop button) is held down on b the foot controller. Sewing 53 For details on the foot controller, otherwise damage to...
Users Manual - English - Page 57
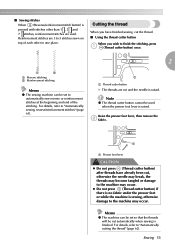
... to finish the stitching, press a (Thread cutter button) once.
2
a
b
a Reverse stitching b Reinforcement stitching
Memo
z The sewing machine can be set to the machine may occur. a
a Presser foot lever
CAUTION
z Do not press (Thread cutter button) after threads have finished sewing, cut the thread. ■ Using the thread cutter button
When you have already been cut...
Users Manual - English - Page 60
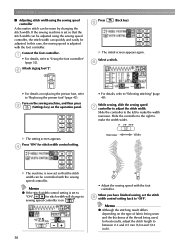
... with the foot controller. Attach zigzag foot "J". Slide the controller to the left to "Replacing the presser foot" (page 43).
Turn on the sewing machine, and then press
c
(Settings key) on replacing the presser foot, refer to make the width wider.
Memo
z Although the stitching result differs depending on the type of fabric...
Users Manual - English - Page 63
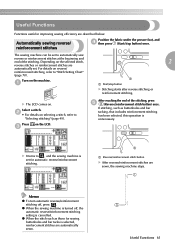
.... Memo
z To turn automatic reverse/reinforcement
stitching off , the
automatic reverse/reinforcement stitching setting is set . Useful Functions 61
b • For details on .
The sewing machine can be set to , and the sewing machine is cancelled.
Automatically sewing reverse/ reinforcement stitches
Position the fabric under the presser foot, and d then press (Start...
Instruction Manual/USB Connection - English and Spanish - Page 2

... Corporation 100 Somerset Corporate Boulevard Bridgewater, NJ 08807-0911 USA TEL : (908) 704-1700
declares that the product
Product Name: Model Number:
Brother Sewing Machine HE-240 /SE-400/LB-6800
This device complies with the instructions, may cause harmful interference to the following two conditions: (1) this device may cause undesired operation. These limits ...
Similar Questions

Need An Instruction Manual For A Brother Embroifery &sewing Machine Se-350 Enthu
(Posted by Anonymous-147250 9 years ago)

Manual In Portuguese Brother Sewing Machine Pc6500
How can I get this manual in portuguese of Brazil?
How can I get this manual in portuguese of Brazil?
(Posted by rosana33 9 years ago)

What Are The Default Settings For Brother Se 400 Embroidery And Sewing Machine
(Posted by sardskid 10 years ago)
Brother Ls 2000 Sewing Machine Price
I Want To Know Above Sewing Machine Price In Indian Rupees,please Anser Me Imediately
I Want To Know Above Sewing Machine Price In Indian Rupees,please Anser Me Imediately
(Posted by iladave84503 10 years ago)
Brother Emboridery & Sewing Machine Se 400
Please help me... i only received this machine a week now, first it work well then it start making a...
Please help me... i only received this machine a week now, first it work well then it start making a...
(Posted by natashap4 11 years ago)