
Brother International PE770 Support Question
Brother International PE770 Support Question
Find answers below for this question about Brother International PE770 - Computerized Embroidery Machine.Need a Brother International PE770 manual? We have 3 online manuals for this item!
Question posted by ligialevin on March 18th, 2012
Why The Machine Does Not Cut After Changing The Collor? Suddenly It Stops Cuttin
The person who posted this question about this Brother International product did not include a detailed explanation. Please use the "Request More Information" button to the right if more details would help you to answer this question.
Current Answers
Related Brother International PE770 Manual Pages
Users Manual - English - Page 1
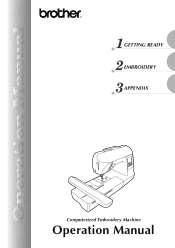
GETTING READY EMBROIDERY APPENDIX
Computerized Embroidery Machine
Operation Manual
Users Manual - English - Page 2
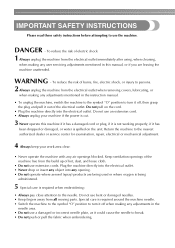
... away from the electrical outlet when removing covers, lubricating, or
when making any adjustments in this machine if it has a damaged cord or plug, if it is not working properly, if it...dealer or service center for examination, repair, electrical or mechanical adjustment.
4 Always keep your machine if the power is cut.
3 Never operate this manual, or if you are being used or where oxygen is ...
Users Manual - English - Page 3
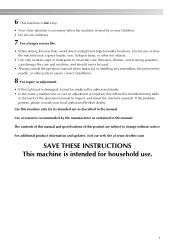
If the problem persists, please consult your local authorized Brother dealer. Use this machine only for household use as contained in this product are subject to change without notice. Use accessories recommended by authorized dealer. • In the event a malfunction occurs or adjustment is intended for its intended use .
1 For additional product ...
Users Manual - English - Page 5

...14 Attaching the Embroidery Unit 15
Embroidery unit precautions ...15 Attaching the embroidery unit ...15 Removing the embroidery unit ...16
Turning the Machine On/Off 18
Power supply precautions ...18
Turning on the machine ...19 Turning off the machine ...19
LCD (Liquid Crystal Display) Operation 20
Viewing the LCD...20
Changing the machine settings ...21
Checking machine operating procedures...
Users Manual - English - Page 6

... out partway through a design...65 Stopping while embroidering ...66
Bobbin Case Adjustment 68
Correct tension...68 Bobbin thread is loose...68 Bobbin thread is tight ...68
APPENDIX
69
Care and Maintenance ...70
Cleaning the machine surface ...70 Cleaning the race ...70
Attaching the Embroidery Foot 72
Attaching the embroidery Foot "Q" ...72
Troubleshooting ...74
Error...
Users Manual - English - Page 7

... for the correct operation of the various functions.
d Embroidery You can start embroiderying without pulling up the bobbin thread (page 28). Before using the machine, carefully read the "IMPORTANT SAFETY INSTRUCTIONS", and then study this embroidery machine.
Machine Features
1
23
4
a Simple bobbin-winding The bobbin can be cut automatically after you for purchasing this manual for...
Users Manual - English - Page 9
...
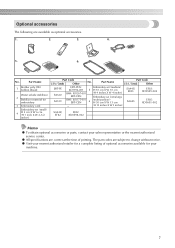
Part Code
U.S.A. / Canada
Other
EBT-PE SA520 SA519
EBT-PEN:
Embroidery set (medium)
XC5996-001 5 H 10 cm X W 10 cm
BM4: X81267-001
(H 4 inches X W 4 inches)
EBT-CEN
Embroidery set (small)
4
H 2 cm X W 6 cm (H 1 inch X W 2-1/2
inches)
Part Code
U.S.A. / Canada
Other
No. Optional accessories
The following are subject to change without notice. z All specifications are correct...
Users Manual - English - Page 12
... not embroider.
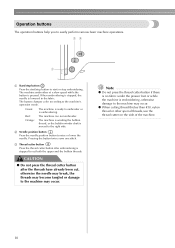
Pressing the button twice sews one stitch. z When cutting thread thicker than #30, nylon thread or other special threads, use the thread cutter on the side of the machine.
10 The machine embroiders at a slow speed while the button is embroidering.
a Start/stop button
Press the start/stop button to easily perform various basic...
Users Manual - English - Page 15

... 14 Attaching the Embroidery Unit 15
Embroidery unit precautions 15 Attaching the embroidery unit 15 Removing the embroidery unit 16 Turning the Machine On/Off 18 Power supply precautions 18 Turning on the machine 19 Turning off the machine 19 LCD (Liquid Crystal Display) Operation 20 Viewing the LCD 20 Changing the machine settings 21 Checking machine operating procedures 23...
Users Manual - English - Page 17
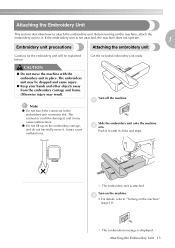
... 15 It may cause malfunctions. a
Slide the embroidery unit onto the machine b arm.
Turn on the machine, attach the
embroidery unit to it clicks and stops. z Do not lift up on the embroidery carriage, and do not forcefully move the machine with the embroidery unit in place. Attaching the Embroidery Unit
This section describes how to "Turning on the...
Users Manual - English - Page 18
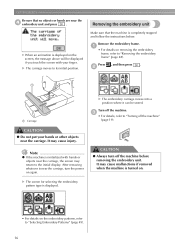
... displayed.
• For details on again. Make sure that no objects or hands are near the carriage.
GETTING READY
Be sure that the machine is completely stopped and follow the instructions below. X The carriage moves to "Selecting Embroidery Patterns" (page 49).
16 It may cause injury.
a
• For details on .
Turn off the...
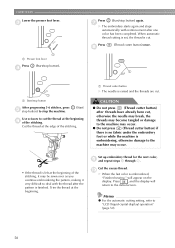
Users Manual - English - Page 20
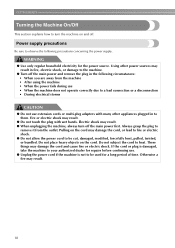
...; During electrical storms
CAUTION
● Do not use . ● Unplug the power cord if the machine is damaged, take the machine to your authorized dealer for the power source. If the cord or plug is not to be cut, damaged, modified, forcefully bent, pulled, twisted, or bundled. Do not subject the cord to...
Users Manual - English - Page 21
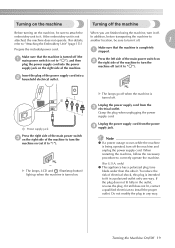
... plug in the outlet, reverse the plug. If the embroidery unit is turned off.
Insert the plug of the power supply cord into the power supply jack on the right side of electrical shock, this plug is completely a stopped.
When restarting the machine, follow the necessary procedure to install the proper outlet. To...
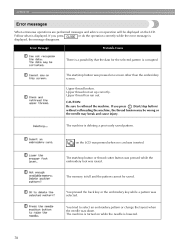
Users Manual - English - Page 23
...
Darker
Display the service count and the total
Stitch counter
number of purchase.
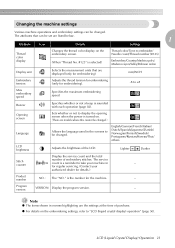
Changing the machine settings
Various machine operations and embroidery settings can be set are listed below.
1
Attribute
Icon
Details
Settings
Thread color display
Changes the thread color display on the embroidery screen.
(When "Thread No. #123" is selected)
Thread color/Time to embroider...
Users Manual - English - Page 29
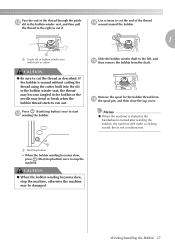
...; When the bobbin winding becomes slow, press (Start/stop the machine, otherwise the machine may become tangled in the bobbin winder seat, and then pull
the thread to the right to cut the thread as described. If the bobbin is turned after winding the bobbin, the machine will make a clicking sound;
Slide the bobbin winder...
Users Manual - English - Page 53
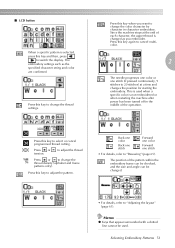
... the machine after power has been turned off in character embroidery.
Press or tension.
Since the machine stops at a time and changes the position for starting the embroidery.
Back...cutting. Selecting Embroidery Patterns 51 Press this key to change the thread settings. The position of each character, the upper thread is changed .
• For details, refer to change...
Users Manual - English - Page 60
...).
58 Press (Start/stop button). g
X The embroidery starts again and stops automatically with the thread after the pattern is embroidering, otherwise damage to the machine may be sewn over as you continue embroidering the pattern, making it may occur.
• If the thread is embroidered,
"Finished sewing."
Cut the thread at the beginning. Cut the excess thread...
Users Manual - English - Page 61
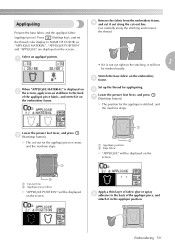
..., so "APPLIQUE MATERIAL", "APPLIQUE POSITION" and "APPLIQUE" are displayed on the embroidery e frame. X The cut -out line. Appliquéing
Prepare the base fabric and the appliqué fabric
(appliqué piece).
Cut carefully along the cut -out for the appliqué piece is stitched, and the machine stops.
Stretch the base fabric on the screen.
Users Manual - English - Page 76
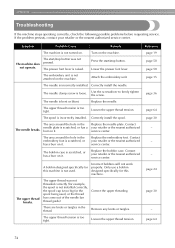
... around the hole in the embroidery foot is scratched, or has a burr on the machine. Contact
The needle breaks. your retailer or the nearest authorized service center.
Incorrect bobbins will not work properly.
page 64
74
Turn on . The start /stop button was not threaded correctly (for this machine is incorrectly installed.
needle plate...
Users Manual - English - Page 80
...
You tried to rethread the machine. CAUTION Be sure to select an embroidery pattern or change the layout when the needle was selected.
The machine is turned on while the ...stop button) without rethreading the machine, the thread tension may be wrong or the needle may break and cause injury.
on the LCD. The start /stop button or thread cutter button was pressed while the embroidery...
Similar Questions

How To Change A Belt On A Ls2300prw A Brother Sewing Machine
(Posted by v5g5ma 9 years ago)

How Do You Change The Size Of The Letters On The Brother Pe-770 Embroidary
machine
machine
(Posted by buckma 9 years ago)

Needles, What Kind And Brand Of Needles Do I Use For This Machine Pe 770
can i get different sizes for this machine and what brands and product numbers can i use
can i get different sizes for this machine and what brands and product numbers can i use
(Posted by curtisclan2006 10 years ago)
How To Change A Broken Needle In A Brother Lx2500 Sewing Machine?
(Posted by starkcudd 10 years ago)

Pe-770 Not Cutting The Top Thread?
Everything on Brother PE-770 works fine except the automatic thread cutter. It only cuts the bobbin ...
Everything on Brother PE-770 works fine except the automatic thread cutter. It only cuts the bobbin ...
(Posted by dory36478 10 years ago)