
Brother International PE770 Support Question
Brother International PE770 Support Question
Find answers below for this question about Brother International PE770 - Computerized Embroidery Machine.Need a Brother International PE770 manual? We have 3 online manuals for this item!
Question posted by Jatimm on February 1st, 2014
How To Restart A Embroidery Design In A Certain Place On Brother Pe770
The person who posted this question about this Brother International product did not include a detailed explanation. Please use the "Request More Information" button to the right if more details would help you to answer this question.
Current Answers
Related Brother International PE770 Manual Pages
Users Manual - English - Page 1
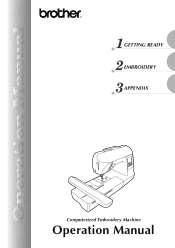
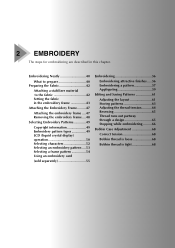
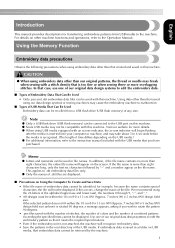
GETTING READY EMBROIDERY APPENDIX
Computerized Embroidery Machine
Operation Manual
Users Manual - English - Page 3
... For additional product information and updates, visit our web site at www.brother.com
SAVE THESE INSTRUCTIONS This machine is damaged, it must be replaced by or near a space heater,.... If the problem persists, please consult your local authorized Brother dealer. Benzene, thinner, and scouring powders can damage the case and machine, and should never be used by authorized dealer. •...
Users Manual - English - Page 6

... runs out partway through a design...65 Stopping while embroidering ...66
Bobbin Case Adjustment 68
Correct tension...68 Bobbin thread is loose...68 Bobbin thread is tight ...68
APPENDIX
69
Care and Maintenance ...70
Cleaning the machine surface ...70 Cleaning the race ...70
Attaching the Embroidery Foot 72
Attaching the embroidery Foot "Q" ...72
Troubleshooting ...74...
Users Manual - English - Page 7

... patterns, characters, framed decorations, and designs from optional embroidery cards (page 39).
5
In addition, after you for the correct operation of the various functions. d Embroidery You can start embroiderying without pulling up the bobbin thread (page 28). c Automatic thread cutting The thread can be accessed for future reference. Machine Features
1
23
4
a Simple bobbin-winding...
Users Manual - English - Page 9
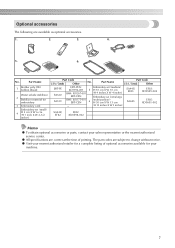
... / Canada
Other
EBT-PE SA520 SA519
EBT-PEN:
Embroidery set (medium)
XC5996-001 5 H 10 cm X W 10 cm
BM4: X81267-001
(H 4 inches X W 4 inches)
EBT-CEN
Embroidery set (small)
4
H 2 cm X W 6 cm (H 1 inch X W 2-1/2
inches)
Part Code
U.S.A. / Canada
Other
No. The part codes are available as optional accessories.
1.
2.
3.
4.
5.
6.
Part Name
1
Brother poly #90 bobbin thread...
Users Manual - English - Page 10

... read these buttons to the machine, and then attach the embroidery frame.
i Presser foot lever Raise and lower the presser foot lever to raise and lower the presser foot
j Operation buttons Use these descriptions to place the spool of the machine and their functions are described below. l Thread cutter Pass the threads through the...
Users Manual - English - Page 16

...
For the bobbin thread, wind embroidery bobbin thread and set it in place. GETTING READY
Embroidery Step by Step
The basic steps for embroidery are as follows.
1
Attaching the embroidery unit
Attach the embroidery unit. (If the embroidery unit is not attached, the machine does not operate.) For details, refer to "Attaching the embroidery unit" (page 15).
↓
2 Checking...
Users Manual - English - Page 17
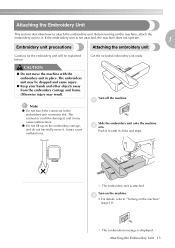
... cause malfunctions. z Do not lift up on the embroidery carriage, and do not forcefully move the machine with the embroidery unit in place. Attaching the Embroidery Unit 15 Attaching the Embroidery Unit
This section describes how to "Turning on the machine" (page 19). Turn off the machine. Push it in the embroidery unit connector slot. Note
z Do not touch...
Users Manual - English - Page 35
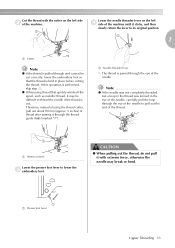
...thread is cut correctly, lower the embroidery foot so that the thread is held in the eye of the needle, carefully pull the loop through the eye of the machine.
a Needle threader lever
X ..."7").
Note
z If the needle was not completely threaded, but a loop in the thread was formed in place before cutting the thread. CAUTION
● When pulling out the thread, do not pull it with the ...
Users Manual - English - Page 38
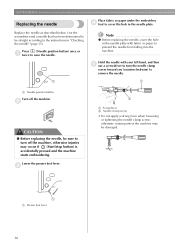
...or tightening the needle clamp screw, otherwise certain parts of the machine may occur if (Start/stop button) is accidentally pressed and the machine starts embroidering. Press (Needle position button) ...the machine.
Hold the needle with fabric or paper to prevent the needle from falling into the machine.
GETTING READY
Replacing the needle
Place fabric or paper under the embroidery d ...
Users Manual - English - Page 41
... pattern 54 Using an embroidery card
(sold separately 55
Embroidering 56
Embroidering attractive finishes .....56 Embroidering a pattern 57 Appliquéing 59
Editing and Saving Patterns 61
Adjusting the layout 61 Storing patterns 63 Adjusting the thread tension...........64 Resewing 65 Thread runs out partway through a design 65 Stopping while embroidering .........66...
Users Manual - English - Page 42

... larger than the embroidery frame that are too thick. Use a water soluble sheet on lightweight or stretch fabrics. What to prepare
The following is space between the embroidery foot and the fabric, the fabric can be sure to break.
For details, refer to prevent poor quality embroidery designs.
■ Fabric Prepare the fabric for embroidery machines.
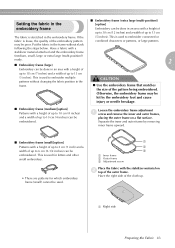
Users Manual - English - Page 44
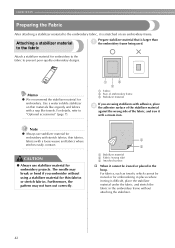
... stabilizer material for embroidery to the fabric to prevent poor quality embroidery designs. For details, refer to "Optional accessories" (page 7).
1
3
2
a Fabric b Size of embroidery frame c Stabilizer ..., such as towels, which cannot be ironed or placed in the embroidery frame without using stabilizers with adhesive, place b the adhesive surface of the stabilizer material
against the...
Users Manual - English - Page 45
... of
up to 30 cm (12 inches) and a width of up to embroider connected or combined characters or patterns, or large patterns. Loosen the embroidery frame adjustment a screw and remove the inner and outer frames,
placing the outer frame on b top of the outer frame. This is loose, the quality of the...
Users Manual - English - Page 47
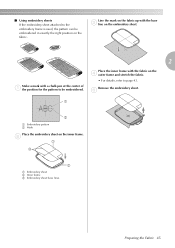
... and stretch the fabric.
• For details, refer to page 43.
b
1
3
2
a Embroidery sheet b Inner frame c Embroidery sheet base lines
Preparing the Fabric 45
■ Using embroidery sheets If the embroidery sheet attached to the embroidery frame is used, the pattern can be embroidered.
Place the inner frame with a chalk pen at the center of a the position...
Users Manual - English - Page 49
... onto the pin so that it into place.
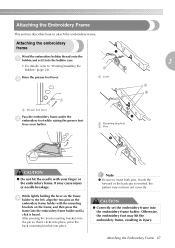
Attaching the Embroidery Frame 47
If only the forward or the back pin is heard.
Note
z Be sure to attach the embroidery frame.
Attaching the embroidery frame
Wind the embroidery bobbin thread onto the a bobbin and set the embroidery frame into the embroidery frame holder until a click is inserted...
Users Manual - English - Page 67
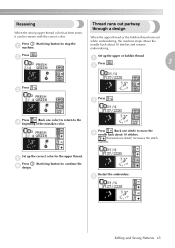
....
Set up the upper or bobbin thread.
Restart the embroidery.
b
Set up the correct color for the upper thread.
e
Editing and Saving Patterns 65
Press . c
Press
(Back one stitch) increases the stitch
number.
a
Press
.
2
b
Press . e
Press (Start/stop the a machine. Thread runs out partway through a design
When the upper thread or the bobbin thread...
USB GUIDE - Multi - Page 3
...machine, and may break when sewing with a stitch density that is recognized. (The length of the file. If the selected pattern does not fit within the 18 cm (H) × 13 cm (W) (Approx. 7 inches (H) × 5 inches (W)) design field size. If embroidery... degrees. • .pes files saved with the number of stitches, the number of colors and the number of embroidery data cannot be displayed....
USB GUIDE - Multi - Page 4
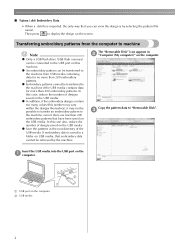
... USB media, that you can be transferred to "Removable Disk". z Embroidery patterns cannot be transferred to display the design on the USB media.
z In addition, if the embroidery designs contain too many colors (this
machine. Copy the pattern data to
the machine from the computer to machine
Note
z Only a USB flash drive (USB flash memory)
can be...
USB GUIDE - Multi - Page 5
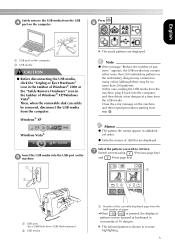
... patterns are displayed. f
a USB port on the e machine. Windows® XP
Windows Vista®
Insert the USB media into the computer, and then delete a few designs at a time from the computer.
appears, the USB media may contain either more than 200 embroidery patterns or the embroidery designs may contain too many colors (although there may...
Similar Questions

How To Reposition An Embroidery Design On A Brother Pe770
(Posted by StevenHuMARYLAND 9 years ago)

How To Get Custom Designs Using The Brother Pe770
(Posted by pawsal 9 years ago)

How To Skip Steps On An Emboridery Design On A Brother Pe770
(Posted by WaddyBR 9 years ago)


How To Make Design Bigger On Brother Pe770
(Posted by jdejyann 10 years ago)