
Brother International PE770 Support Question
Brother International PE770 Support Question
Find answers below for this question about Brother International PE770 - Computerized Embroidery Machine.Need a Brother International PE770 manual? We have 3 online manuals for this item!
Question posted by WaddyBR on March 2nd, 2014
How To Skip Steps On An Emboridery Design On A Brother Pe770
The person who posted this question about this Brother International product did not include a detailed explanation. Please use the "Request More Information" button to the right if more details would help you to answer this question.
Current Answers
Related Brother International PE770 Manual Pages
Users Manual - English - Page 1
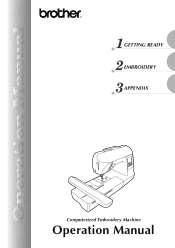
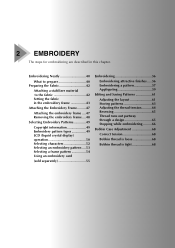
GETTING READY EMBROIDERY APPENDIX
Computerized Embroidery Machine
Operation Manual
Users Manual - English - Page 3
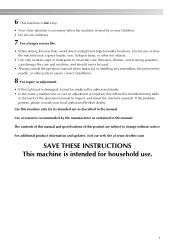
... for household use as contained in the manual. For additional product information and updates, visit our web site at www.brother.com
SAVE THESE INSTRUCTIONS This machine is intended for its intended use .
1 Use accessories recommended by authorized dealer. • In the event a malfunction occurs or adjustment is required, first follow the...
Users Manual - English - Page 5

... buttons ...10
Operation panel ...11
GETTING READY
13
Embroidery Step by Step 14 Attaching the Embroidery Unit 15
Embroidery unit precautions ...15 Attaching the embroidery unit ...15 Removing the embroidery unit ...16
Turning the Machine On/Off 18
Power supply precautions ...18
Turning on the machine ...19 Turning off the machine ...19
LCD (Liquid Crystal Display) Operation 20
Viewing...
Users Manual - English - Page 6

... runs out partway through a design...65 Stopping while embroidering ...66
Bobbin Case Adjustment 68
Correct tension...68 Bobbin thread is loose...68 Bobbin thread is tight ...68
APPENDIX
69
Care and Maintenance ...70
Cleaning the machine surface ...70 Cleaning the race ...70
Attaching the Embroidery Foot 72
Attaching the embroidery Foot "Q" ...72
Troubleshooting ...74...
Users Manual - English - Page 7

... for future reference.
b Quick-set bobbin You can embroider built-in embroidery patterns, characters, framed decorations, and designs from optional embroidery cards (page 39).
5 c Automatic thread cutting The thread can quickly and easily be cut automatically after you for purchasing this embroidery machine. Machine Features
1
23
4
a Simple bobbin-winding The bobbin can be wound with...
Users Manual - English - Page 9
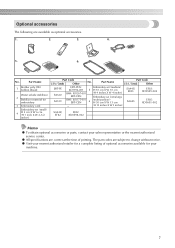
... authorized retailer for a complete listing of printing. z All specifications are available as optional accessories.
1.
2.
3.
4.
5.
6. Part Name
1
Brother poly #90 bobbin thread
Water solude stabilizer
2 Stabilizer material for embroidery
3 Embroidery card
Embroidery set (extra large
BM3: X81175-001 EBT-CEN
6
(multi-position)) H 30 cm X W 13 cm
-
(H 12 inches X W 5 inches...
Users Manual - English - Page 15

Embroidery Step by Step 14 Attaching the Embroidery Unit 15
Embroidery unit precautions 15 Attaching the embroidery unit 15 Removing the embroidery unit 16 Turning the Machine On/Off 18 Power supply precautions 18 Turning on the machine 19 Turning off the machine 19 LCD (Liquid Crystal Display) Operation 20 Viewing the LCD 20 Changing the machine settings 21 Checking machine operating ...
Users Manual - English - Page 16

... details on replacing the needle, refer to the fabric. GETTING READY
Embroidery Step by Step
The basic steps for embroidery are as follows.
1
Attaching the embroidery unit
Attach the embroidery unit. (If the embroidery unit is not attached, the machine does not operate.) For details, refer to "Attaching the embroidery unit" (page 15).
↓
2 Checking the needle
Use a needle matched...
Users Manual - English - Page 35
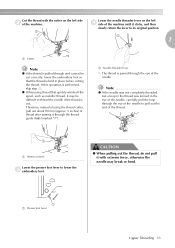
...extreme force, otherwise the needle may be cut . If this operation is cut correctly, lower the embroidery foot so that quickly winds off the spool, such as metallic thread, it may break or ...lever to thread the needle if the thread is performed, skip step c. Lower the needle threader lever on the left d side of the machine until it through the thread guide disks (marked "7").
...
Users Manual - English - Page 41
... the fabric 42 Setting the fabric in this chapter.
2 EMBROIDERY
The steps for embroidering are described in the embroidery frame 43
Attaching the Embroidery Frame.........47
Attaching the embroidery frame .... 47 Removing the embroidery frame .... 48
Selecting Embroidery Patterns 49
Copyright information 49 Embroidery pattern types 49 LCD (liquid crystal display) operation 50 Selecting...
Users Manual - English - Page 42

...material for embroidery machines. To check the fabric thickness, attach the embroidery frame to the embroidery unit, and use (Needle position button) to "Optional accessories" (page 7).
■ Embroidery thread For the upper thread, use stabilizer for embroidering. For details, refer to raise the needle. For the bobbin thread, use embroidery thread designed for embroidery. Otherwise, the...
Users Manual - English - Page 44
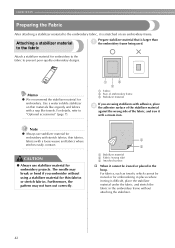
... embroider without attaching the stabilizer.
42
CAUTION
● Always use stabilizer material for embroidery projects.
Memo
z We recommend the stabilizer material for embroidery to the fabric to prevent poor quality embroidery designs. Note
z Always use stabilizer material for embroidery with stretch fabrics, thin fabrics, fabrics with a loose weave and fabrics where stitches...
Users Manual - English - Page 45
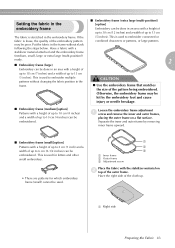
... combined characters or patterns, or large patterns.
This is used to embroider multiple patterns without slack following the steps below.
This is used for letters and other small embroidery.
• There are patterns for which embroidery frame (small) cannot be used.
1
2 3
a Inner frame b Outer frame c Adjustment screw
Place the fabric with the stabilizer...
Users Manual - English - Page 46
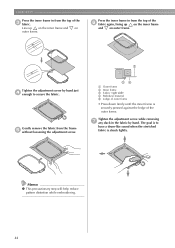
... the inner frame is struck lightly. The goal is to secure the fabric.
Memo
z This precautionary step will help reduce pattern distortion while embroidering.
44
Gently remove the fabric from the top of the c fabric. EMBROIDERY
Press the inner frame in from the top of the f fabric again, lining up on the...
Users Manual - English - Page 58

...
Upper thread Bobbin thread
Use embroidery thread, or country embroidery thread intended for use with this machine.
If you use with this machine. Another important point is enough thread in the range of motion of threads below. Note
z Before embroidering, check that go into sewing beautiful embroidery. This section describes the steps for use threads other heavy...
Users Manual - English - Page 59
... thread of the thread through the
embroidery foot hole.
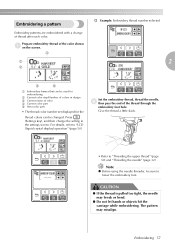
Embroidering a pattern
† Example: Embroidery thread number selected
Embroidery patterns are embroidered with a change the setting in design c Current name of color d Current color part e Next color part
• The thread color number set displayed for
embroidering b Current color step/Number of colors in the settings...
Users Manual - English - Page 78
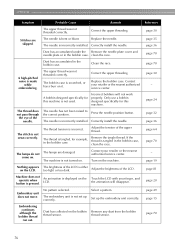
... An animation is not set up the embroidery unit correctly.
The embroidery unit is displayed on the LCD. Select ... case.
Incorrect bobbins will disappear. The lamps are skipped.
Set up correctly. Embroidering continues
although the bobbin ... A bobbin designed specifically for this machine is bent or blunt.
Only use a bobbin designed specifically for this machine.
The needle ...
USB GUIDE - Multi - Page 3
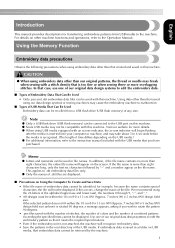
... flash memory) of any size. Using the Memory Function
Embroidery data precautions
Observe the following precautions when using our data design systems or sewing machines may cause the embroidery machine to malfunction.
■ Types of USB Media That Can Be Used Embroidery data can be connected to the machine. Using data other than our original patterns, the thread...
USB GUIDE - Multi - Page 5
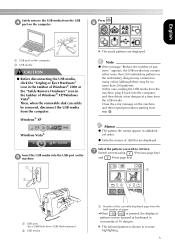
... reverse highlighting.
3 English
Safely remove the USB media from step e.
Press
. Then, when the removable disk can safely be no more than 200 embroidery patterns or the embroidery designs may contain too many colors (although there may be removed, disconnect the USB media from the machine, plug it back into the USB port on the...
USB GUIDE - Multi - Page 7
... media.)
Insert the USB media into your sewing machine.
However, saved embroidery patterns are erased. X The following screen appears.
Remove the USB media, and turn the machine off and on the b machine.
c X The following screen appears. English
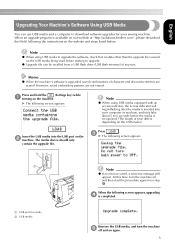
Upgrading Your Machine's Software Using USB Media
You can be recalled from step a. Note
z When using USB media equipped...
Similar Questions

How To Clean Brother 10 Needle Embroidery Machine
(Posted by pythiabdo 9 years ago)
Brother Bas 423a Embroidery Machine Powers On, But Will Not Display Or Move.
The power in my shoppe went out 2 days ago, and since that time my embroidery machine will power on,...
The power in my shoppe went out 2 days ago, and since that time my embroidery machine will power on,...
(Posted by Anonymous-140596 9 years ago)

Service Manual For The Brother Pc-8200 Embroidery Machine
I am looking for the Service Manual for the Brother PC-8200 embroidery machine. I have the Operation...
I am looking for the Service Manual for the Brother PC-8200 embroidery machine. I have the Operation...
(Posted by rialeslj 9 years ago)

How To Embroider Letters Above A Design Brother Pe770
(Posted by 6thJmdoz 10 years ago)

How To Get Design From Computer To Embroidery Machine Pe770
(Posted by Sogorsher 10 years ago)