
Brother International LX2500 Support Question
Brother International LX2500 Support Question
Find answers below for this question about Brother International LX2500.Need a Brother International LX2500 manual? We have 2 online manuals for this item!
Question posted by ingenuebabe on November 16th, 2013
Heavy Duty Needles
I installed a "universal" heavy duty needle into my Lx2500 machine to sew on thicker fabric. Used my manuel to make sure I installed the needle correctly. Plus a test run on thinner denim fabric. All went well. However when I went to sew on the actual item. Heard a "crunch" sound & stopped immediatly. Switched the needle back to original & it's sewing ok. However it looks like the piece that holds the foot in place got bent! However it's sewing normally on regular fabric. What size needle or what else do I need to sew on "THICK" fabric. Also is my machine damaged?
Current Answers
Related Brother International LX2500 Manual Pages
Users Manual - English and Spanish - Page 2
... sure to the needle.
IMPORTANT SAFETY INSTRUCTIONS
Please read these safety instructions
before attempting to make any sudden or careless movements, otherwise you may injure your back or knees.
4 Always keep your machine if the power is cut.
3 Never operate this machine if it has
a damaged cord or plug, if it is being used or where...
Users Manual - English and Spanish - Page 4

... BUTTONHOLES AND BUTTONS 27
Making a buttonhole 27 Adjusting buttonholes 28 Sewing buttons 29
5. KNOWING YOUR SEWING MACHINE 4
ACCESSORIES 4 Optional accessories 4
THE MAIN PARTS 5 Flat bed attachment 5
USING YOUR SEWING MACHINE 6 Connecting plugs 6 Main power and sewing light switch 7 Foot controller 7 Checking the needle 7 Replacing the needle 7 Changing the presser foot 8
THE...
Users Manual - English and Spanish - Page 7

...the machine.
● Make sure that the plugs on the power cord are firmly inserted into the electrical outlet and the power supply jack on the machine.... sewing machine is not to
them.
USING YOUR SEWING MACHINE
1
WARNING
● Use only regular household electricity for a long period of electric shock, this machine. ● Do not use • When the machine does not operate correctly due...
Users Manual - English and Spanish - Page 8

... the needle
The sewing needle must always be used on the foot controller when the machine is not in use . When you press the foot controller down lightly, the machine will stop.
■ Checking the needle correctly Put the flat side of any bent needles safely.
1
2
1 Parallel space 2 Level surface (bobbin cover, glass, etc.)
Replacing the needle
1
2
1 Slower 2 Faster
You should make sure...
Users Manual - English and Spanish - Page 9

... the sewing machine may be damaged.
● Always turn the
needle clamp screw counterclockwise to
Changing the presser foot
remove the needle. Turn off the machine before you
(counterclockwise) so that the mark on what you want to turn off the machine. 1 Raise the presser foot lever.
CAUTION
CAUTION
● Before replacing the needle, place fabric
● Make sure you use...
Users Manual - English and Spanish - Page 13
...1
2
1
1 1 cm (1/2 inch)
CAUTION
● Make sure you do not cut the excess thread completely before winding the bobbin, when the thread runs low it may occur when the thread is wound around the bobbin... foot off the foot
controller. Note
● When the sewing machine is started or the handwheel is not a malfunction.
● The needle bar does not move when you slide the bobbin winder shaft...
Users Manual - English and Spanish - Page 14

... shown.
• If the thread is not correctly inserted through the tension-adjusting spring of the bobbin case, it may break the needle. CAUTION
● Make sure you could be incorrect or break the needle. CAUTION
● Make sure you
(counterclockwise) and raise the presser foot lever. KNOWING YOUR SEWING MACHINE
CAUTION
● Not winding the bobbin properly may...
Users Manual - English and Spanish - Page 15
If the upper threading is not correct, the thread may become tangled or the needle may bend or break.
● Never use a thread weight of the
machine (as shown in the correct combination. Put the 6 projection into the race retainer groove
and push closed.
1 2
• Make sure that the end of the thread comes
out from the cover...
Users Manual - English and Spanish - Page 16
... the 6 following illustration.
1
CAUTION
● If the spool of 4 thread on this pin. Make sure you
(counterclockwise) so that the spring in the wrong place, or is not correctly raised, the sewing machine can not be threaded.
KNOWING YOUR SEWING MACHINE
Raise the needle by turning the handwheel toward you (counterclockwise) so that the mark on the wheel...
Users Manual - English and Spanish - Page 17
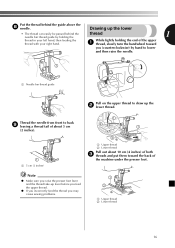
...needle.
Note
● Make sure you raise the presser foot lever and the thread take-up the 2 lower thread. Put the thread behind the needle bar thread guide by hand to lower
and then raise the needle.
1
1 Needle...about 10 cm (4 inches) of
the machine under the presser foot. Thread the needle from front to draw up lever before ...sewing problems.
1 2
1 Upper thread 2 Lower thread
16
Users Manual - English and Spanish - Page 18
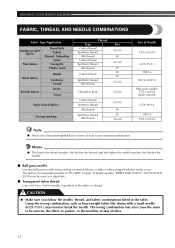
..., the thicker the thread; CAUTION
● Make sure you follow the needle, thread, and fabric combinations listed in the table. Using the wrong combination, such as heavyweight fabric like denim with a small needle (65/9-75/11), may also cause the seam to be used as a substitute.
■ Transparent nylon thread Use a 90/14 to skip stitches.
17 KNOWING YOUR SEWING MACHINE
FABRIC...
Users Manual - English and Spanish - Page 20
... details.
Lower the presser foot lever.
8
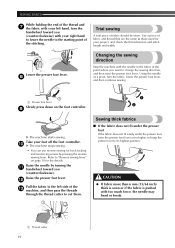
Changing the sewing direction
Stop the machine with the needle in the fabric at the point where you
(counterclockwise).
Raise the needle by pressing the reverse sewing lever. Take your foot off the foot controller. 0 X The machine stops sewing.
• You can use reverse sewing for your project, and check the thread tension and...
Users Manual - English and Spanish - Page 21
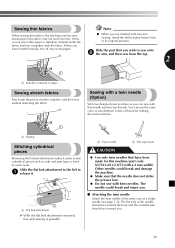
... of the needle should face toward the back and the rounded side should face toward you wish to 1 release it together with free-arm sewing, install the flat bed attachment back in the same way as cuffs and pant legs, or hardto-reach areas.
The needle could break and damage the machine.
● Make sure that you...
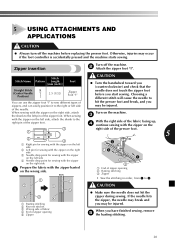
Users Manual - English and Spanish - Page 26
... the presser foot so 2 that it will be used to hold the reinforcement fabric.
1 Wrong side of fabric 2 Right side of the hem. BUILT-IN STITCHES
Slide the part that you wish to sew onto 7 the arm, make sure that the fabric feeds
correctly, and then start sewing.
1
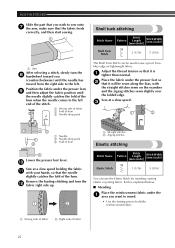
Shell tuck stitching
Stitch Name
Shell Tuck Stitch
Pattern
Stitch Length...
Users Manual - English and Spanish - Page 30

... Sewing Darning
Foot Plate "M"
Button Sewing Darning
Foot Plate "M"
Measure the distance between the foot and the 6 fabric and make sure that the needle enters
the holes without hitting the button. The needle may break and you may be injured. Turn on the needle 4 plate. Place the darning plate on the machine.
5
29
If it with the desired width. X Use...
Users Manual - English and Spanish - Page 31
... the fabric with the zipper on the wrong side.
2
13
1 2
3
1 End of zipper opening 5 Zipper
CAUTION
● Make sure the needle does not hit the zipper during sewing. Stitch
Stitch Name Pattern Length
Foot
[mm (inch)]
CAUTION
● Turn the handwheel toward you have finished sewing, remove 5 the basting stitching.
30
When sewing
Turn on the machine.
3
with...
Users Manual - English and Spanish - Page 35
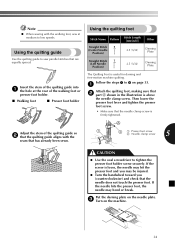
... the darning plate on the needle plate. 3 Turn on page 33.
1
Attach the quilting foot, making sure that 2 part A shown in the illustration is useful for darning and free-motion machine quilting.
A
Adjust the stem of the quilting guide so 2 that the quilting guide aligns with the walking foot, sew at the rear of the quilting...
Users Manual - English and Spanish - Page 40
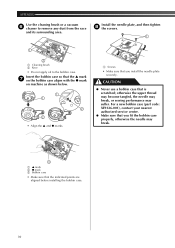
... ● mark
on machine as shown below.
1 1
2
2
• Align the ▲ and ● marks.
1 Screws
• Make sure that is scratched; otherwise the upper thread may become tangled, the needle may break, or sewing performance may break.
3
1 ▲ mark 2 ● mark 3 Bobbin case
• Make sure that you install the needle plate securely. Install the needle plate, and then tighten...
Users Manual - English and Spanish - Page 42
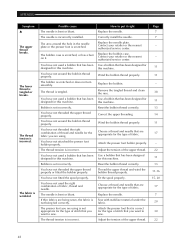
... the bobbin thread properly. The lower thread is incorrectly installed. The needle is tangled or breaks.
Use a bobbin that you are appropriate for this machine. The bobbin case is correct for the type of fabric. The bobbin is bent or blunt.
The presser foot you want to sew. Wind the bobbin thread properly. Attach the presser foot...
Users Manual - English and Spanish - Page 43
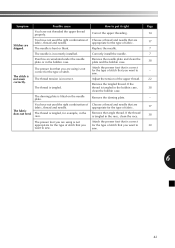
....
Attach the presser foot that is correct for the type of fabric. Possible cause You have not used the right combination of fabric, thread and needle.
Choose a thread and needle that you want to put it right
Correct the upper threading.
How to sew.
Replace the needle.
Dust has accumulated under the needle plate or in the bobbin case.
The...
Similar Questions

Needle Will Not Sew
I have a 12 head machine. I have 6 needles that will not sew. The needle will not go up and down Ple...
I have a 12 head machine. I have 6 needles that will not sew. The needle will not go up and down Ple...
(Posted by cjqclark 9 years ago)

Brother Sewing Machine Sc9500 How To Use Auto Threading
(Posted by bhuarmon 9 years ago)
What Stitch To Use On A Brothers Lx2500 Sewing Machine For Stretchy Fabrics
(Posted by linlul 10 years ago)

How To Change A Broken Needle In A Brother Lx2500 Sewing Machine?
(Posted by starkcudd 10 years ago)

Brother Lx2500 Sewing Machine
I have a Brother LX2500 sewing machine and at tops the top thread pops right off the machine. Is the...
I have a Brother LX2500 sewing machine and at tops the top thread pops right off the machine. Is the...
(Posted by Aprille2175 10 years ago)