
Brother International LS-2125i Support Question
Brother International LS-2125i Support Question
Find answers below for this question about Brother International LS-2125i - Basic Sewing And Mending Machine.Need a Brother International LS-2125i manual? We have 2 online manuals for this item!
Question posted by cmaseric on February 26th, 2014
Can I Do Free Motion Quilting With The Brother Ls2125i
The person who posted this question about this Brother International product did not include a detailed explanation. Please use the "Request More Information" button to the right if more details would help you to answer this question.
Current Answers
Related Brother International LS-2125i Manual Pages
Users Manual - Multi - Page 2

...this manual. Keep the ventilation openings of the sewing machine and foot controller free from the accumulation of burns, fire, electric shock... toy.
"IMPORTANT SAFETY INSTRUCTIONS"
When using the sewing machine, basic safety precautions should always be followed, including the following:
"Read all moving parts. Replace bulb with this sewing machine if it has a damaged cord or plug,...
Users Manual - Multi - Page 63
...
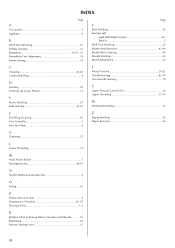
E
Elastic Stitching 27 Embroidering 40-41
T
Thread Tension 20-21 Troubleshooting 46, 47 Twin-Needle Sewing 18
U
Upper Tension Control Dial 20 Upper Threading 15-16
W
Winding the Bobbin 12
F
Feed Dog Cleaning 45 Foot Controller 5 Free-Arm Style 8
Z
Zigzag Stitching 26 Zipper Insertion 36
G
Gathering 37
L
Lower Threading 14
M
Main Power...
Users Manual - English - Page 1
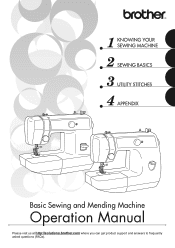
KNOWING YOUR SEWING MACHINE SEWING BASICS UTILITY STITCHES APPENDIX
Basic Sewing and Mending Machine
Operation Manual
Please visit us at http://solutions.brother.com where you can get product support and answers to frequently
asked questions (FAQs).
Users Manual - English - Page 3

...repair, electrical or mechanical adjustment.
4. Keep the ventilation openings of the sewing machine and foot controller free from outlet. 9. Do not use the proper needle plate. To unplug... the presser foot. 15. Never operate this sewing machine only for use ."
1 "IMPORTANT SAFETY INSTRUCTIONS"
When using the sewing machine, basic safety precautions should always be followed, including the...
Users Manual - English - Page 5
... without notice.
3 Do not store anything on the needle while sewing. When storing this product are subject to keep your local authorized Brother dealer. Do not drop or hit the machine. 4. For additional product information and updates, visit our web site at www.brother.com The contents of this manual and specifications of the...
Users Manual - English - Page 6

... ...38 Button sewing ...38
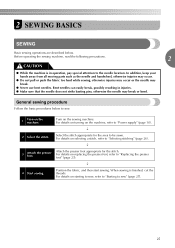
4 SEWING BASICS 25
SEWING ...25
General sewing procedure ...25 Selecting stitching ...26 Starting to sew ...27 Sewing in reverse ...28 Thread tension ...28
USEFUL SEWING TIPS ...30
Trial sewing ...30 Changing the sewing direction ...30 Sewing curves ...30 Sewing thick fabrics ...30 Sewing thin fabrics ...31 Sewing stretch fabrics ...31 Using a free-arm style ...31...
Users Manual - English - Page 26
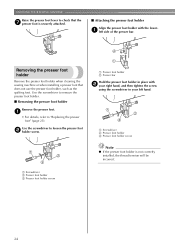
... presser foot b holder screw.
Removing the presser foot holder
Remove the presser foot holder when cleaning the sewing machine or when installing a presser foot that the g presser foot is not correctly installed, the thread tension ...presser foot holder
Remove the presser foot. KNOWING YOUR SEWING MACHINE
Raise the presser foot lever to check that does not use the presser foot holder, such ...
Users Manual - English - Page 27
... supply" (page 10). Select the stitch appropriate for the stitch. Attach the presser foot appropriate for the area to be sewn. 2 SEWING BASICS
SEWING
Basic sewing operations are described below to sew.
1
Turn on the machine.
In addition, keep your hands away from all moving parts such as the needle and handwheel, otherwise injuries may occur.
●...
Users Manual - English - Page 28

..., 40, 43
Select the desired length.
7
Straight stitch (Left needle position)
33
8
Stretch blind Stitch
33
9
Shell tuck stitch
43
10
Elastic stitch
44
26 SEWING BASICS
Selecting stitching
Turning the stitch selection dial in either direction, select the desired stitch.
Users Manual - English - Page 30

... 4
■ Upper tension is too tight Loops appear on the surface of the fabric.
To sew forward, release the reverse sewing b lever. Note
● If the bobbin thread was incorrectly inserted, the upper thread may need ...your stitches. In this case, refer to sew. You may be too tight. SEWING BASICS
Pull the fabric to the left side of the machine, k and then pass the threads through ...
Users Manual - English - Page 32
...same conditions that are described below.
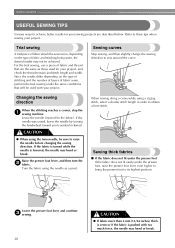
Changing the sewing direction
When the stitching reaches a corner, stop the a sewing machine.
Turn the fabric using the needle as those...SEWING BASICS
USEFUL SEWING TIPS
Various ways to achieve better results for your project, and check the thread tension and stitch length and width. Sewing curves
Stop sewing, and then slightly change the sewing...
Users Manual - English - Page 33
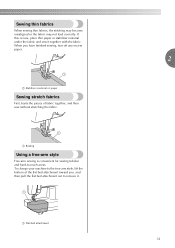
... fabrics
First, baste the pieces of the flat bed attachment toward you have finished sewing, tear off any excess paper. To change your machine to the free-arm style, lift the bottom of fabric together, and then sew without stretching the fabric.
If this occurs, place thin paper or stabilizer material under the fabric...
Users Manual - English - Page 35

...
Stitch name
8 Stretch blind Stitch
Application
Blind hem stitching on dial Stitch name Application
6
Attaching Straight stitch zippers, basic
(Center needle stitching, and
position)
sewing gathers
or darning, etc.
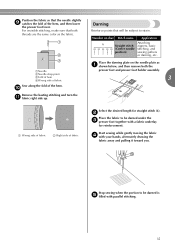
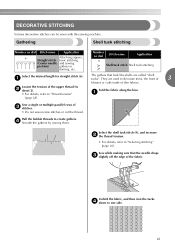
Reverse the skirt or pants. a Wrong side of fabric b Right side of the stitching. Basic stitching
Blind hem stitching
Straight stitches are available for...
Users Manual - English - Page 36

... the flat bed attachment and make sure that you wish to "Using a free-arm style" (page 31). UTILITY STITCHES
Use a chalk to mark on free-arm sewing, refer to sew onto the h arm, make g free-arm sewing possible.
• For details on the fabric about 5 mm c (3/16...of fabric
Select the stretch blind stitch (8).
Slide the part that the fabric feeds correctly,
and then start sewing.
Users Manual - English - Page 37
...)
Application
Attaching zippers, basic stitching, and sewing gathers or darning, etc. b
Place the fabric to strain.
Start sewing while gently moving the fabric d with parallel stitching.
35
Stop sewing when the portion to be... fold of the hem. aNeedle bNeedle drop point cFold of hem dWrong side of fabric
Sew along the fold of the hem, and then lower
the presser foot lever. Position the...
Users Manual - English - Page 42
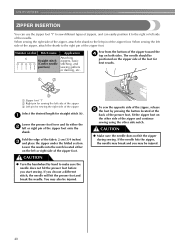
...sewing the right side of the zipper
Select the desired length for best results.
If you start sewing. When sewing...the zipper foot. When sewing the left pin of...the zipper and continue sewing using the other side ... Sew from the bottom of the fabric 2...sew different types of zippers, and can use the zipper foot "I " b Right pin for sewing ...also be injured.
40
To sew the opposite side of the...
Users Manual - English - Page 45
...the front of
3
blouses or cuffs made of the fabric.
Sew a single or multiple parallel rows of the upper thread (to... to create gathers. Loosen the tension of c stitches.
• Do not sew reverse stitches or cut the thread.
Unfold the fabric, and then iron the ..., Straight stitch basic stitching,
(Center needle and sewing
position)
gathers or
darning, etc. DECORATIVE STITCHING
Various ...
Users Manual - English - Page 46
Memo
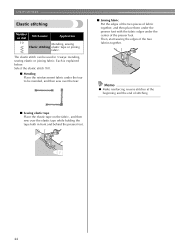
● Make reinforcing reverse stitches at the beginning and the end of stitching.
■ Sewing elastic tape Place the elastic tape on dial
Stitch name
Application
10
Mending, sewing
Elastic stitching elastic tape or joining
fabric. Then, start sewing the edges of the presser foot. UTILITY STITCHES
Elastic stitching
Number on the fabric, and...
Users Manual - English - Page 48
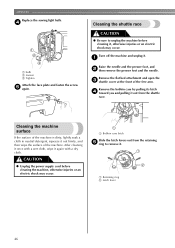
... the flat bed attachment and open the c shuttle cover at the front of the machine is dirty, lightly soak a cloth in neutral detergent, squeeze it . Cleaning the machine surface
If the surface of the free arm. APPENDIX
Replace the sewing light bulb.
Remove the bobbin case by pulling its latch d toward you and pulling...
Users Manual - English - Page 55
INDEX
A
accessories 9 appliqués 41
B
basic stitching 33 blind hem stitching 33 bobbin 14 bobbin case 14 bobbin winder 12 button sewing 38 buttonhole foot 36 buttonhole sewing 36
C
cleaning 46
D
darning 35
E
embroidering 41 extra spool pin 22
F
, feed dogs 8 47 , flat bed attachment 8 31
foot controller 27 free-arm style 31
G
gathering 43...
Similar Questions


Why Does The Thread Keep Breaking When I Sew On A Brother Ls2125i
(Posted by zacskill 10 years ago)

Brother Ls2125i Sewing Machine How Often Do I Oil It
(Posted by mikejohn 10 years ago)

How To Thread Brother Ls2125i
(Posted by joanmto 10 years ago)

Free Motion Quilting Foot
For a Brother SQ9050 I will be using the free motio quilting foot. On the stitch selector which lett...
For a Brother SQ9050 I will be using the free motio quilting foot. On the stitch selector which lett...
(Posted by dtmulhern 11 years ago)