
Brother International Duetta 2 4750D Support Question
Brother International Duetta 2 4750D Support Question
Find answers below for this question about Brother International Duetta 2 4750D.Need a Brother International Duetta 2 4750D manual? We have 3 online manuals for this item!
Question posted by Anonymous-139309 on July 2nd, 2014
Start/stop Button , Needle Thread Button, Etc Will Not Work.
The person who posted this question about this Brother International product did not include a detailed explanation. Please use the "Request More Information" button to the right if more details would help you to answer this question.
Current Answers
Related Brother International Duetta 2 4750D Manual Pages
Users Manual - English - Page 15

... the feed dog position switch on the embroidery unit to the machine may occur.
3
Press this button and the machine will sew reverse stitches at the speed set in small areas. a "Start/Stop" button
Press this button again to adjust the sewing speed.
f Sewing Speed controller
Use this button after the threads have already been cut. Move the slide to the left...
Users Manual - English - Page 38

...may break or the thread tension will not operate correctly. Otherwise, the needle may occur if the "Start/ Stop" button or any other models are used, the machine will be sure to... designed specifically for this sewing machine. Then pass the thread around the pretension disk making
sure that the thread is pressed and the machine starts sewing.
LOWER THREADING
d
Push the spool ...
Users Manual - English - Page 43

... on the
the
handwheel.
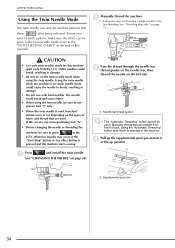
CAUTION
• Before manually threading the machine, be
sure to press
in the LCD, otherwise
injuries may occur if the "Start/Stop" button or any other items away from the needle as described below .
10
8
11 9
1
7
5, 6
3
Getting Ready
4, 12
13
14
15
2
1
CAUTION
• The needle thread carrier will be automatically lowered. c Press
at...
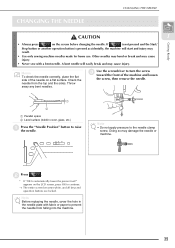
Users Manual - English - Page 46
... may occur if the "Start/Stop" button or any other button is used .
Using the twin needle while the machine is in single needle mode could break, resulting in damage.
• Be sure to use presser foot "J" only.
• When the twin needle is pressed and the machine starts sewing.
a
a Needle bar thread guides
Note • The "Automatic Threading" button cannot be used for patterns...
Users Manual - English - Page 51
....
If
is not pressed and the Start/
Stop button or another operation button is pressed accidentally, the machine will easily break and may result.
• Use only sewing machine needles made for home use.
A bent needle will start and injury may cause injury. Throw away any bent needles.
Doing so may cause injury.
• Never sew with fabric or paper to toward...
Users Manual - English - Page 57

... attached. If the warning displays, re-thread the machine immediately. Cutter"
button
to
trim
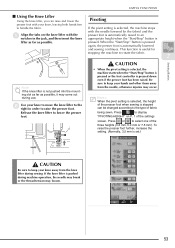
■ Using the Foot Controller
You can be sewn.
Doing so could cause a fire or an electric shock.
→ The needle will return to
stop sewing. Memo • When the foot controller is almost empty.
"Start/Stop"
button
again
to the up position automatically. CAUTION...
Users Manual - English - Page 58

... end of the fabric, the machine stops with the fabric edge as a pivot, turn the fabric so that you guide the fabric around the curve. Using the needle as you can easily be sewn automatically at the end of sewing when the "Start/Stop" button is automatically raised so the fabric can sew in the fabric and the...
Users Manual - English - Page 64

... beginning and end of sewing, and trim the threads at the end of sewing.
Memo This function is useful when sewing buttonholes and bar tacks. d
Press the "Reverse/Reinforcement Stitching" button.
→ The key will display as
.
52
b Press
to continue. Memo If you press the "Start/Stop" button to pause sewing, press the same button again to set automatically...
Users Manual - English - Page 65
... and other items away from the knee lifter during machine operation, the needle may break or the thread tension may come out during use.
CAUTION
• When the pivot setting is selected, the machine starts when the "Start/Stop" button is pressed or the foot controller is automatically lowered
and sewing continues. Press or to lower the presser
foot...
Users Manual - English - Page 66

...
Place the fabric under the presser foot the needle at the point where the sewing
direction changes.
→ The machine stops with
stitching, and then press the "Start/Stop"
button.
e
Rotate the fabric, Stop" button. a Select a stitch.
Memo
If you press the "Start/Stop" button to pause sewing, then press it again to continue sewing.
• If the pivot setting is selected, and...
Users Manual - English - Page 76

...at the end of sewing.
c
Hold the thread tails and fabric with your left hand, and turn the handwheel with
your right hand to trim the threads. "Start/Stop"
button
to
sew 3-4 stitches.
→ The machine sews reverse stitches (or reinforcement stitches).
e
Press the forward.
g
After sewing, press the "Thread button to insert the needle into the
fabric.
f
When...
Users Manual - English - Page 116

... THE STITCHES
d
Lower the buttonhole lever so that it is completed, the machine automatically sews reinforcement stitches, and then stops. a
a Buttonhole lever
a
a Metal bracket
e
Gently hold the end of the upper thread, and then press the "Start/Stop" button to
start sewing, both threads are automatically cut after the reinforcement stitches are sewn. If the fabric does not feed (for...
Users Manual - English - Page 132

... with your project. • When sewing satin stitch patterns, there may give inferior results.
N
a
c
Thread Needle
Presser foot
b
a Fabric b Stabilizer c Thin paper
#50 - #60 With lightweight, regular, or stretch fabrics: the Ball point needle (golden colored) With heavyweight fabrics: home sewing machine needle 90/14 Monogramming foot "N". "Start/Stop"
button
to the side, and then...
Users Manual - English - Page 133

.... foot
"N"
and
sew
Note
• When sewing some patterns, the needle will be movement to the left and right as well as explained below .
121 Also, depending on P.10.
4
Memo • When sewing character stitches, the
machine automatically sews reinforcement stitches at the beginning and end of the correct pattern below .
"Start/Stop"
button
to
stop in this machine.
At such...
Users Manual - English - Page 138

...
, return the thread density to stop the machine, and then press .
ing the thread density, the thread density remains the same until you continue sewing when the stitches are bunched, the needle may bend or break.
to select
Returning to the beginning of the pattern after trial sewing or when the stitching is added.)
126 a Press the "Start/Stop" button to
.
Users Manual - English - Page 180
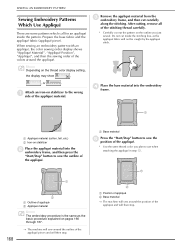
... then press the
"Start/Stop" button to use when attaching the appliqué in step g.
Do not cut inside the pattern. a
a
168
b
a Outline of the appliqué pieces and will sew around the appliqué.
d
Place the frame.
After cutting, remove all
of appliqué b Base material → The machine will then stop .
base
material
into...
Users Manual - English - Page 181

.... h
Change the rest
the upper thread and of the outline.
Finish embroidering the appliqué pattern and then clean away the glue.
• For best sewing results clip all three appliqué steps. g Press the "Start/Stop" button.
5
Embroidery
Memo Some patterns may get onto the presser foot,
needle, and needle plate at this time.
Sometimes the...
Users Manual - English - Page 183
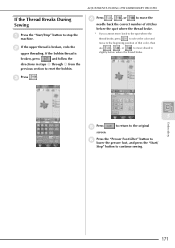
...
, or
to move ahead to continue sewing.
171
If the bobbin thread is broken, redo the upper threading. button
to
stop
the
b If the upper thread is
broken, press
and follow the
directions in steps a through e from the previous section to reset the bobbin.
c Press
. ADJUSTMENTS DURING THE EMBROIDERY PROCESS
If the Thread Breaks During Sewing
a
Press the "Start/Stop" machine.
Users Manual - English - Page 254

... been locked. Wrong presser foot was not pushed.
"Start/Stop" button was used . Select a pattern.
to the needle bar release mechanism. Press either of the "Start/
stitch width. Check the "Fabric/Thread/Needle Combination" chart.
Do not pull the fabric during sewing. Turn the main power to operate the machine. Remove the foot controller, or use the foot controller...
Users Manual - English - Page 274

... 1 Stabilizer 157 Start/Stop button 3 Starting point key 180 Step stitch patterns 132 Stitch setting chart 253 Straight stitch foot 65 Straight stitch needle plate 65 Straight stitches 63
Supplemental spool pin 1 23, 34
T
Take-up lever 33 Tape attaching 73 Tape or elastic attaching 94
, Test key 230 233
Thread fabric/thread/needle combinations 41
, thread tension 50...
Similar Questions

Start/stop Button Turned Green But Button Stuck Machine Does Nit Embroider
(Posted by Jeancumm 2 years ago)

Brother Sewing Machine Duetta 4750d Where To Buy
(Posted by lpeejor 9 years ago)

Brother Innovis 1250d Either Start/stop Button Or The Reverse/reinforcement Stit
(Posted by tammycrull 10 years ago)

Issue With Hesitation With Sewing.
My Duetta 4750 is hesitating when sewing meaning the green light will turn to orange and not allow s...
My Duetta 4750 is hesitating when sewing meaning the green light will turn to orange and not allow s...
(Posted by lross85928 10 years ago)

I Have A New Brother Duetta 2 Machine. I Can't Get The Bobbin Thread To Come Up.
(Posted by theromefelts 10 years ago)