Bosch TKN68E75UC Support Question
Bosch TKN68E75UC Support Question
Find answers below for this question about Bosch TKN68E75UC - Benvenuto Coffee System.Need a Bosch TKN68E75UC manual? We have 3 online manuals for this item!
Question posted by tamiamilakessectioniv on July 3rd, 2022
Looking For A Technician, In Miami For Repair My Bosh Coffee Machine?
My coffee machine Bosh model # e.nr.tkn68e75uc , do not fill up the pipe system.
Current Answers
Answer #1: Posted by SonuKumar on July 10th, 2022 5:54 AM
SonuKumar

Member since:
May 9th, 2021 Points: 16,633,680

Member since:
May 9th, 2021 Points: 16,633,680
Please respond to my effort to provide you with the best possible solution by using the "Acceptable Solution" and/or the "Helpful" buttons when the answer has proven to be helpful.
Regards,
Sonu
Your search handyman for all e-support needs!!
Related Bosch TKN68E75UC Manual Pages
Installation Instructions - Page 2

... a warming drawer, the height of the relevant regulations. If installing the appliance above .
Secure with a conventional bracket. The ideal installation height for the fully automatic espresso machine, measured from the floor to the wall with the preĆassembled screws d.
en
Connection
d CAUTION
The appliance is 371/4 inch (950 mm).
2 S Insert the...
Instructions for Use - Page 3
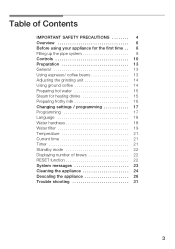
... SAFETY PRECAUTIONS 4 Overview 6 Before using your appliance for the firstĂtime . . 8 Filling up the pipe system 9 Controls 10 Preparation 13 General 13 Using espresso/ coffeeĂbeans 13 Adjusting the grindingĂunit 14 Using ground coffee 14 Preparing hot water 15 Steam for heating drinks 15 Preparing frothy milk 16 Changing settings...
Instructions for Use - Page 4
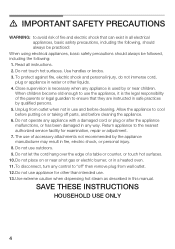
..., it is necessary when any appliance with a damaged cord or plug or after the appliance malfunctions, or has been damaged in use appliance for examination, repair or adjustment. 7. Do not let the cord hang over the edge of a table or counter, or touch hot surfaces. 10.Do not place on or...
Instructions for Use - Page 5

q Do not immerse base in their use. Repair should be performed by an authorized service representative. q Never use warm or hot water to disassemble. Extension cords are available and may be done by ...
Instructions for Use - Page 6
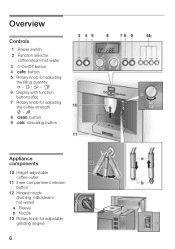
.../Off button 4 2 button 5 Rotary knob for adjusting
the filling quantity x - )/ 8 - 9 6 Display with function buttons (6b) 7 Rotary knob for adjusting the coffee strength / - 7 8 + button 9 4 descaling button
Appliance components
10 HeightĆadjustable coffee outlet
11 Inner compartment release button
12 Hinged nozzle (frothing milk/steam/ hot water)
a Sleeve b Nozzle 13 Rotary knob for...
Instructions for Use - Page 7
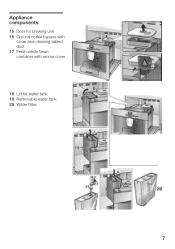
Appliance components
15 Door for brewing unit 16 Ground coffee bypass with
cover and cleaning tabled duct 17 Fresh whole bean container with aroma cover
18 Lid for water tank 19 Removable water tank 20 Water Filter
7
Instructions for Use - Page 8

... 25 Sensor Contacts
Before using your appliance for the firstĂtime
General
Fill the respective containers with the enclosed test strip. Do not use coffee beans which have been glazed, caramelized or treated with other than 3 is indicated, switch on the appliance and program accordingly (see page 18).
8 Ascertain the...
Instructions for Use - Page 9
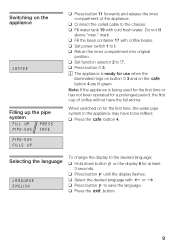
...Ăgreen. q Set function selector 2 to I.
Note: If the appliance is ready for the first time, the water pipe system in the appliance may have the full aroma. q Fill water tank 19 with coffee beans. mark. i The appliance is being used for the first time or has not been operated for at...
Instructions for Use - Page 10
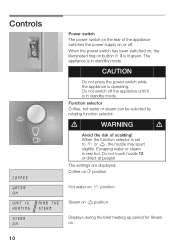
... water or steam is set to 0 or =, the nozzle may spurt slightly. The settings are displayed:
Coffee on X position
Hot water on 0 position
Steam on =position
Displays during the brief heating up period for...the function selector is very hot. Do not touch nozzle 12 or direct at people! Controls
COFFEE
WATER ON
UNIT IS HEATING
STEAM ON
MIND THE STEAM
Power switch
The power switch on the...
Instructions for Use - Page 11
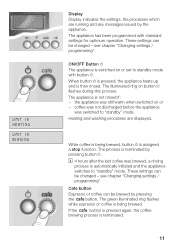
... are displayed. The appliance has been programmed with button d. These settings can be brewed by the appliance. The process is not rinsed if: - Cafe button Espresso or coffee can be changed ć see chapter Changing settings / programming".
When button d is pressed, the appliance heats up and is terminated.
11 The illuminated ring...
Instructions for Use - Page 12
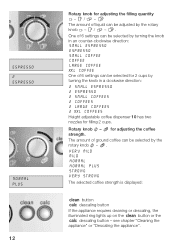
... the filling quantity ( - One of 6 settings can be selected by turning the knob in a clockwise direction: 2 SMALL ESPRESSO 2 ESPRESSO 2 SMALL COFFEES 2 COFFEES 2 LARGE COFFEES 2 XXL COFFEES Height adjustable coffee dispenser 10 has two nozzles for filling 2 cups. u / 8 - 9 The amount of ground coffee can be selected for 2 cups by turning the knob in an counterĆclockwise direction: SMALL...
Instructions for Use - Page 13
... pressing theĂ2 button or button d again. Preparation
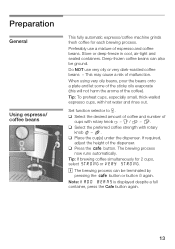
General
Using espresso/ coffeeĂbeans
This fully automatic espresso/coffee machine grinds fresh coffee for 2 cups, selectĂSTRONG or VERY STRONG.
Preferably use very oily or very darkĆroasted coffee beans - q Select the desired amount of coffee and number of the dispenser. When using very oily beans...
Instructions for Use - Page 14
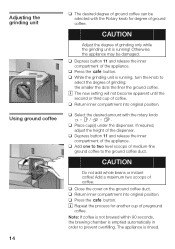
...with the rotary knob ( - q Depress button 11 and release the inner compartment of coffee. q Place cup(s) under the dispenser.
q Return inner compartment into original position. The appliance is ...Ărunning , turn the knob to the ground coffee duct. Adjusting the grindingĂunit Using ground coffee 14
q The desired degree of ground coffee can be damaged. i The new setting will not...
Instructions for Use - Page 17
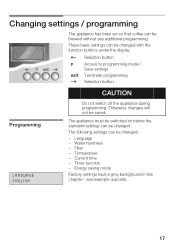
Water hardness - Temperature - Changing settings / programming
The appliance has been set so that coffee can be changed. Filter - The appliance must be switched on before the standard settings can be brewed without any additional programming. Energy saving mode
Factory ...
Instructions for Use - Page 20
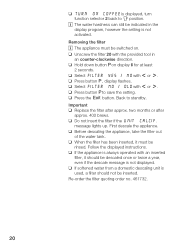
... qto save the setting. q Do not insert the filter if the UNIT CALCIF. ReĆorder the filter quoting order no. 461732.
20 q TURN ON COFFEE is displayed, turn function selector 2 back to standby. q Hold down button qon display 6 for at least
2 seconds. q Press button q, display flashes.
q If softened water from...
Instructions for Use - Page 21
....
21
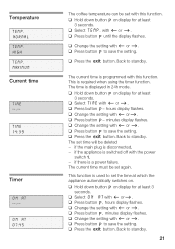
q Press button %, hours display flashes. q Press the 6 button. Back to standby. high
ÄÄTMÄÄEAMXÄÄIPM.UÄÄM
The coffee temperature can be deleted -
q Press button %- Timer
This function is used to save the setting.
q Change the setting with < or>. Temperature
ÄÄÄTn...
Instructions for Use - Page 22
... only
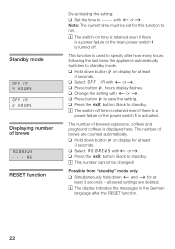
q Simultaneously hold down button % on display for at least 3 seconds.
q Hold down < and > for this function to standby mode.
The number of brewed espressos, coffees and preground coffees is used to specify after the RESET function.
22 i The display indicates the messages in the German language after how many hours following the...
Instructions for Use - Page 23

....
Run descaling program ć see chapter Cleaning the appliance".
Pour fresh, cold water into the water tank.
Water pipe system in the water tank. Tray 23 and coffee dreg Insert tray 23 and coffee dreg
tray 21 are full, or conĆ tacts 25 soiled. The illuminated ring on the 4 descaling button is...
Instructions for Use - Page 24
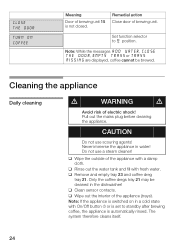
...: While the messages ADD WATER, CLOSE THE DOOR, EMPTY TRAYS or TRAYS MISSING are displayed, coffee cannot be cleaned in water! q Wipe the outside of electric shock! q Clean sensor contacts. Set function selector ...q Wipe out the interior of brewing unit.
Do not use scouring agents! Only the coffee dregs tray 21 may be brewed.
Pull out the mains plug before cleaning the appliance.
...
Instructions for Use - Page 25
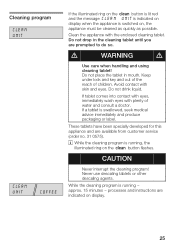
... with the enclosed cleaning tablet. If tablet comes into contact with eyes, immediately wash eyes with plenty of children.
Cleaning program
CLEAN UNIT
CLEAN UNIT
COFFEE
If the illuminated ring on the + button is lit red and theĂmessage CLEAN UNIT is indicated on display when the appliance is swallowed...
Similar Questions

Coffee Machine
I need a brewing unit for Bosch TKN68E75UC/03. Part number 00648024
I need a brewing unit for Bosch TKN68E75UC/03. Part number 00648024
(Posted by laliwagner1962 1 year ago)
I Have A Benvenuto B30 Bosch Coffee Machine And I Need Somebody To Service It..
I have a Benvenuto B 30 Bosch coffee machine I'm wondering if somebody can call me or message me tex...
I have a Benvenuto B 30 Bosch coffee machine I'm wondering if somebody can call me or message me tex...
(Posted by Redtwizzler 2 years ago)

Is There A Repair Center For Bosch Benvenuto 30 Coffe Machines
(Posted by guymossman 3 years ago)

I Have A New Bosch Coffee Machine (tcc78k750) Benvenuto Built-in And Have Tried
to create my first coffee. It works, but no hot water. I have tried everything and cannot work out w...
to create my first coffee. It works, but no hot water. I have tried everything and cannot work out w...
(Posted by kurtdenby 11 years ago)

No Hot Water
I have a new Bosch coffee machine (TCC78K750)Benvenuto Built-Inand have tried to create my first cof...
I have a new Bosch coffee machine (TCC78K750)Benvenuto Built-Inand have tried to create my first cof...
(Posted by shunt 14 years ago)