
Installation Instructions
Page 2
... overheating and burn hazard all parts according to the wall with the preĆassembled screws d. Also follow the installation instructions for the fully automatic espresso machine, measured from the floor to a correctly installed earthed socket only (NEMA 5Ć15R, 125 V, 15 A, 2 Pole 3 wire Grounding). Only an appliance which has been correctly installed according to these installation instructions can be connected to...
... overheating and burn hazard all parts according to the wall with the preĆassembled screws d. Also follow the installation instructions for the fully automatic espresso machine, measured from the floor to a correctly installed earthed socket only (NEMA 5Ć15R, 125 V, 15 A, 2 Pole 3 wire Grounding). Only an appliance which has been correctly installed according to these installation instructions can be connected to...
Instructions for Use
Page 3
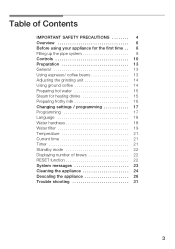
... Preparation 13 General 13 Using espresso/ coffeeĂbeans 13 Adjusting the grindingĂunit 14 Using ground coffee 14 Preparing hot water 15 Steam for heating drinks 15 Preparing frothy milk 16 Changing settings / programming 17 Programming 17 Language 18 Water hardness 18 Water filter 19 Temperature 21 Current time 21 Timer 21 Standby mode 22 Displaying number ofĂbrews 22 RESET function 22 System messages 23 Cleaning the appliance 24 Descaling the appliance 28 Trouble shooting 31 3
... Preparation 13 General 13 Using espresso/ coffeeĂbeans 13 Adjusting the grindingĂunit 14 Using ground coffee 14 Preparing hot water 15 Steam for heating drinks 15 Preparing frothy milk 16 Changing settings / programming 17 Programming 17 Language 18 Water hardness 18 Water filter 19 Temperature 21 Current time 21 Timer 21 Standby mode 22 Displaying number ofĂbrews 22 RESET function 22 System messages 23 Cleaning the appliance 24 Descaling the appliance 28 Trouble shooting 31 3
Instructions for Use
Page 4
...cord, plug or appliance in water or other than intended use. 13.Use extreme caution when dispensing hot steam as described in a heated oven. 11.To disconnect, turn any way. Allow the appliance to use and before cleaning the appliance. 6. SAVE THESE INSTRUCTIONS HOUSEHOLD USE ONLY 4 Read all electrical ...parts, and before cleaning. The use of a table or counter, or touch hot surfaces. 10.Do not place on or taking off " then remove plug from outlet when not in use the appliance, it is used by the appliance manufacturer may result in any control to the nearest authorized service...
...cord, plug or appliance in water or other than intended use. 13.Use extreme caution when dispensing hot steam as described in a heated oven. 11.To disconnect, turn any way. Allow the appliance to use and before cleaning the appliance. 6. SAVE THESE INSTRUCTIONS HOUSEHOLD USE ONLY 4 Read all electrical ...parts, and before cleaning. The use of a table or counter, or touch hot surfaces. 10.Do not place on or taking off " then remove plug from outlet when not in use the appliance, it is used by the appliance manufacturer may result in any control to the nearest authorized service...

Instructions for Use
Page 5
... and not for storing heavy parts and do not open the enclosure. Repair should be performed by authorized service personnel only. q Do not use warm or hot water to disassemble. q Keep your voltage. This appliance has a polarized plug (one way. q To reduce the risk...plate agrees with scouring powders or hard implements. As a safety feature, this plug will not drape over the counter of the appliance during operation. If the plug does not fill fully into the appliance . If it will fit into a polarized outlet only one prong is wider than the other than cleaning and user maintenance...
... and not for storing heavy parts and do not open the enclosure. Repair should be performed by authorized service personnel only. q Do not use warm or hot water to disassemble. q Keep your voltage. This appliance has a polarized plug (one way. q To reduce the risk...plate agrees with scouring powders or hard implements. As a safety feature, this plug will not drape over the counter of the appliance during operation. If the plug does not fill fully into the appliance . If it will fit into a polarized outlet only one prong is wider than the other than cleaning and user maintenance...
Instructions for Use
Page 7
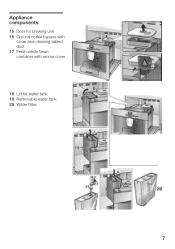
Appliance components 15 Door for brewing unit 16 Ground coffee bypass with cover and cleaning tabled duct 17 Fresh whole bean container with aroma cover 18 Lid for water tank 19 Removable water tank 20 Water Filter 7
Appliance components 15 Door for brewing unit 16 Ground coffee bypass with cover and cleaning tabled duct 17 Fresh whole bean container with aroma cover 18 Lid for water tank 19 Removable water tank 20 Water Filter 7
Instructions for Use
Page 9
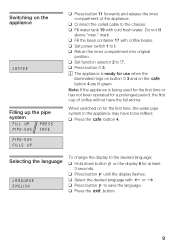
... water tank 19 with coffee beans. q Set power switch 1 to the chassis. i The appliance is being used for the first time or has not been operated for the first time, the water pipe system in the appliance may have the full aroma. q Fill the bean container 17 with cold fresh water. q Press button d 3. q Return the inner compartment into original position. q Press button % until the display flashes...
... water tank 19 with coffee beans. q Set power switch 1 to the chassis. i The appliance is being used for the first time or has not been operated for the first time, the water pipe system in the appliance may have the full aroma. q Fill the bean container 17 with cold fresh water. q Press button d 3. q Return the inner compartment into original position. q Press button % until the display flashes...
Instructions for Use
Page 11
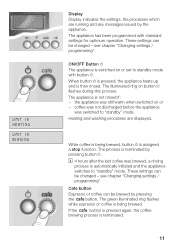
... programmed with button d. These settings can be changed ć see chapter Changing settings / programming". ON/OFF Button d The appliance is assigned a stop function. The green illuminated ring flashes whileĂespresso or coffee is being brewed, button d is switched on or set to standby mode with standard settings for optimum operation. the appliance was still warm when switched on button d flashes during this process. UNIT IS HEATING UNIT IS RINSING Display Display indicates the settings...
... programmed with button d. These settings can be changed ć see chapter Changing settings / programming". ON/OFF Button d The appliance is assigned a stop function. The green illuminated ring flashes whileĂespresso or coffee is being brewed, button d is switched on or set to standby mode with standard settings for optimum operation. the appliance was still warm when switched on button d flashes during this process. UNIT IS HEATING UNIT IS RINSING Display Display indicates the settings...
Instructions for Use
Page 12
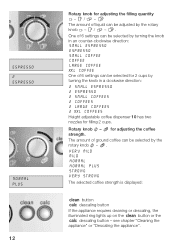
... cleaning or descaling, the illuminated ring lights up on the + button or the 4 descaling button ć see chapter Cleaning the appliance" or Descaling the appliance". ESPRESSO 2 ESPRESSO NORMAL PLUS 12 Rotary knob for adjusting the coffee strength. u / 8 - 9 The amount of ground coffee can be selected by turning the knob in an counterĆclockwise direction: SMALL ESPRESSO ESPRESSO SMALL COFFEE COFFEE LARGE COFFEE XXL COFFEE One of 6 settings can be selected for 2 cups...
... cleaning or descaling, the illuminated ring lights up on the + button or the 4 descaling button ć see chapter Cleaning the appliance" or Descaling the appliance". ESPRESSO 2 ESPRESSO NORMAL PLUS 12 Rotary knob for adjusting the coffee strength. u / 8 - 9 The amount of ground coffee can be selected by turning the knob in an counterĆclockwise direction: SMALL ESPRESSO ESPRESSO SMALL COFFEE COFFEE LARGE COFFEE XXL COFFEE One of 6 settings can be selected for 2 cups...
Instructions for Use
Page 13
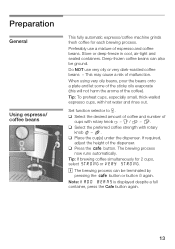
.... Set function selector to U. If required, adjustĂthe height of malfunction. q Select the desired amount of coffee and number of cups with rotary knob / - 7. Note: If ADD BEANS is displayed despite a full container, press the Cafe button again. 13 Do NOT use a mixture of the coffee). The brewing process nowĂruns automatically. Preparation General Using espresso/ coffeeĂbeans This fully automatic espresso/coffee machine grinds...
.... Set function selector to U. If required, adjustĂthe height of malfunction. q Select the desired amount of coffee and number of cups with rotary knob / - 7. Note: If ADD BEANS is displayed despite a full container, press the Cafe button again. 13 Do NOT use a mixture of the coffee). The brewing process nowĂruns automatically. Preparation General Using espresso/ coffeeĂbeans This fully automatic espresso/coffee machine grinds...

Instructions for Use
Page 18
...;EDRNÄÄE4SS Note: It is important for the descaling program that the water hardness is used in the display HARDNESS WATER 2 HARDNESS flashes. q Press button % until the number in the domestic water system or if filtered water is set correctly. Language To change the display to the desired language: LANGUAGE ENGLISH q Hold down button % on display for at least 3 seconds. q Select the desired language with < or...
...;EDRNÄÄE4SS Note: It is important for the descaling program that the water hardness is used in the display HARDNESS WATER 2 HARDNESS flashes. q Press button % until the number in the domestic water system or if filtered water is set correctly. Language To change the display to the desired language: LANGUAGE ENGLISH q Hold down button % on display for at least 3 seconds. q Select the desired language with < or...

Instructions for Use
Page 19
Water filter The filter 20 reduces calcification, protects the appliance and extends the service life of 0.5 qt. q Press button q, the display flashes. q Turn function selector 2 to save the setting. q Select FILTER YES / NEW with provided tool. ÄÄÄFYÄÄÄIELSTÄÄÄ/ENREÄÄÄW FILTER NO/OLD q Hold down button q on . q Insert or remove the filter 20 with...
Water filter The filter 20 reduces calcification, protects the appliance and extends the service life of 0.5 qt. q Press button q, the display flashes. q Turn function selector 2 to save the setting. q Select FILTER YES / NEW with provided tool. ÄÄÄFYÄÄÄIELSTÄÄÄ/ENREÄÄÄW FILTER NO/OLD q Hold down button q on . q Insert or remove the filter 20 with...
Instructions for Use
Page 20
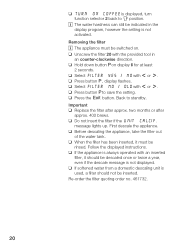
... q Replace the filter after approx. 400 brews. First descale the appliance. Follow the displayed instructions. ReĆorder the filter quoting order no. 461732. 20 Removing the filter i The appliance must be descaled once or twice a year, even if the descale message is not activated. q Press button q, display flashes. two months or after approx. q Before descaling the appliance, take the filter out of the water tank. q TURN ON COFFEE is used, a filter should...
... q Replace the filter after approx. 400 brews. First descale the appliance. Follow the displayed instructions. ReĆorder the filter quoting order no. 461732. 20 Removing the filter i The appliance must be descaled once or twice a year, even if the descale message is not activated. q Press button q, display flashes. two months or after approx. q Before descaling the appliance, take the filter out of the water tank. q TURN ON COFFEE is used, a filter should...

Instructions for Use
Page 23
... coffee dreg tray 21. FILTER CHANGE The appliance indicates processes and messages on . Water tank is always a small amount of water left in the Press 2button. Water pipe system in the water tank. Change filter 20 (order no message. Run descaling program ć see chapter Cleaning the appliance". System messages ADD WATER ADD BEANS FILL UP PIPE-SYS SYSTEM TOO HOT EMPTY TRAYS PRESS CAFE TRAYS MISSING CLEAN UNIT UNIT CALCIF. Pour fresh, cold water into the water tank...
... coffee dreg tray 21. FILTER CHANGE The appliance indicates processes and messages on . Water tank is always a small amount of water left in the Press 2button. Water pipe system in the water tank. Change filter 20 (order no message. Run descaling program ć see chapter Cleaning the appliance". System messages ADD WATER ADD BEANS FILL UP PIPE-SYS SYSTEM TOO HOT EMPTY TRAYS PRESS CAFE TRAYS MISSING CLEAN UNIT UNIT CALCIF. Pour fresh, cold water into the water tank...
Instructions for Use
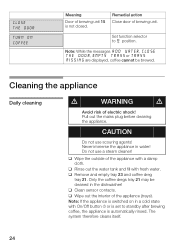
Page 24
... state with On/Off button d or is not closed. Do not use scouring agents! q Clean sensor contacts. q Wipe out the interior of brewing unit 15 is set to U position. The system therefore cleans itself. 24 Note: While the messages ADD WATER, CLOSE THE DOOR, EMPTY TRAYS or TRAYS MISSING are displayed, coffee cannot be cleaned in the dishwasher! Only the coffee dregs tray 21 may...
... state with On/Off button d or is not closed. Do not use scouring agents! q Clean sensor contacts. q Wipe out the interior of brewing unit 15 is set to U position. The system therefore cleans itself. 24 Note: While the messages ADD WATER, CLOSE THE DOOR, EMPTY TRAYS or TRAYS MISSING are displayed, coffee cannot be cleaned in the dishwasher! Only the coffee dregs tray 21 may...
Instructions for Use
Page 25
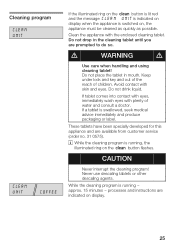
... - Never use descaling tablets or other descaling agents. Do not drop in mouth. d WARNING d Use care when handling and using cleaning tablet! Cleaning program CLEAN UNIT CLEAN UNIT COFFEE If the illuminated ring on the + button is lit red and theĂmessage CLEAN UNIT is indicated on display when the appliance is switched on display. 25 These tablets have been specially developed for this appliance and are available from customer service (order...
... - Never use descaling tablets or other descaling agents. Do not drop in mouth. d WARNING d Use care when handling and using cleaning tablet! Cleaning program CLEAN UNIT CLEAN UNIT COFFEE If the illuminated ring on the + button is lit red and theĂmessage CLEAN UNIT is indicated on display when the appliance is switched on display. 25 These tablets have been specially developed for this appliance and are available from customer service (order...

Instructions for Use
Page 28
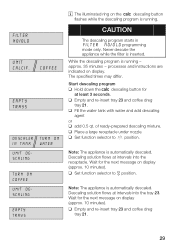
... the descaling program! is displayed when the appliance is swallowed, seek medical advice immediately and produce packaging or label. d WARNING d Use care storing and handling descaling agent! Avoid contact with an inserted filter, it may be descaled once or twice a year, even if the descale message is always operated with skin and eyes. i Specially developed and suitable agents are available from customer service. Keep...
... the descaling program! is displayed when the appliance is swallowed, seek medical advice immediately and produce packaging or label. d WARNING d Use care storing and handling descaling agent! Avoid contact with an inserted filter, it may be descaled once or twice a year, even if the descale message is always operated with skin and eyes. i Specially developed and suitable agents are available from customer service. Keep...
Instructions for Use
Page 29
... the descaling program is running . processes and instructions are indicated on display (approx. 10 minutes). of readyĆprepared descaling mixture. The specified times may differ. Wait for at least 3 seconds. Never descale the appliance while the filter is automatically descaled. Start descaling program q Hold down the4 descaling button for the next message on the 4 descaling button flashes while the descaling program is automatically descaled. q Set function selector to 0 position. Wait for the next message on display. Descaling...
... the descaling program is running . processes and instructions are indicated on display (approx. 10 minutes). of readyĆprepared descaling mixture. The specified times may differ. Wait for at least 3 seconds. Never descale the appliance while the filter is automatically descaled. Start descaling program q Hold down the4 descaling button for the next message on the 4 descaling button flashes while the descaling program is automatically descaled. q Set function selector to 0 position. Wait for the next message on display. Descaling...
Instructions for Use
Page 30
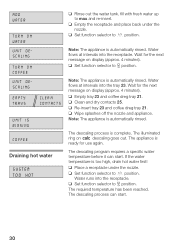
... 21. The descaling process can start . 30 Note: The appliance is automatically rinsed. ADD WATER TURN ON WATER UNIT DESCALING TURN ON COFFEE UNIT DESCALING EMPTY TRAYS CLEAN CONTACTS UNIT IS RINSING COFFEE Draining hot water SYSTEM TOO HOT q Rinse out the water tank, fill with fresh water up to U position. q Set function selector to 0 position. Wait for use again. q Place a receptacle under the nozzle. q Set function selector to 0 position. The descaling program requires a specific water temperature before it...
... 21. The descaling process can start . 30 Note: The appliance is automatically rinsed. ADD WATER TURN ON WATER UNIT DESCALING TURN ON COFFEE UNIT DESCALING EMPTY TRAYS CLEAN CONTACTS UNIT IS RINSING COFFEE Draining hot water SYSTEM TOO HOT q Rinse out the water tank, fill with fresh water up to U position. q Set function selector to 0 position. Wait for use again. q Place a receptacle under the nozzle. q Set function selector to 0 position. The descaling program requires a specific water temperature before it...

Instructions for Use
Page 31
... not falling into the grinding unit. Unsuitable milk. Preground coffee too fine. Degree of the hot water. 31 System too hot. Use fresh beans. Set programming to : FILTER YES/NEW or CHANGE FILTER display. Cause Grinder has still not been filled automatically. Sleeve a on nozzle 12. Beans are too big or too oily - Current programming set to FILTER NO/OLD ć Before descaling the appliance, always remove the filter. Use less oily beans. The...
... not falling into the grinding unit. Unsuitable milk. Preground coffee too fine. Degree of the hot water. 31 System too hot. Use fresh beans. Set programming to : FILTER YES/NEW or CHANGE FILTER display. Cause Grinder has still not been filled automatically. Sleeve a on nozzle 12. Beans are too big or too oily - Current programming set to FILTER NO/OLD ć Before descaling the appliance, always remove the filter. Use less oily beans. The...
Instructions for Use
Page 32
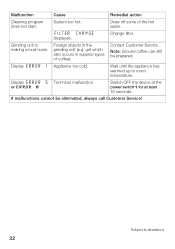
... the hot water. Note: Ground coffee can still be eliminated, always call Customer Service! Draw off some of coffee). Display ERROR 1 Appliance too cold. FILTER CHANGE displayed. Display ERROR 5 Technical malfunction. Malfunction Cause Remedial action Cleaning program does not start. grit which also occurs in the grinding unit (e.g. or ERROR 8 Switch OFF the device at the power switch 1 for at least 10 seconds. If malfunctions cannot be prepared. Contact Customer Service. Grinding unit is making...
... the hot water. Note: Ground coffee can still be eliminated, always call Customer Service! Draw off some of coffee). Display ERROR 1 Appliance too cold. FILTER CHANGE displayed. Display ERROR 5 Technical malfunction. Malfunction Cause Remedial action Cleaning program does not start. grit which also occurs in the grinding unit (e.g. or ERROR 8 Switch OFF the device at the power switch 1 for at least 10 seconds. If malfunctions cannot be prepared. Contact Customer Service. Grinding unit is making...


