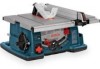
Bosch 4100 Support Question
Bosch 4100 Support Question
Find answers below for this question about Bosch 4100 - 10 Inch Worksite Table Saw.Need a Bosch 4100 manual? We have 1 online manual for this item!
Question posted by knotsailing on April 2nd, 2013
Vertical Blade Adjustment
My verticle adjustment is difficult to move and even gets stuck or jammed. I cannot see the problem from top or bottom. Any suggestions?
Current Answers
Related Bosch 4100 Manual Pages
Operating Instructions - Page 3
... the blade.
9.
cease operating immediately until you have repaired by keeping the guard and spreader in gaseous or explosive atmospheres. Motors in these tools normally spark, and may result in line with voltage greater than the nameplate rating is missing, malfunctioning, has been damaged or broken ... Getting To Know Your Table Saw 20, 22 4. Adjustments 34...
Operating Instructions - Page 4

... the top of the cutting tool rotates toward you stall or jam the sawblade in the workpiece, turn saw is in proper alignment with ...saw and disconnect the power cord when removing the table insert, changing the cutting tool, removing or replacing the blade guard, or making adjustments.
• Provide adequate support to the table slots or grooves and if the spreader is running. The blade...
Operating Instructions - Page 5
... polarized outlet only one blade is a design concept used to install the proper outlet. To reduce your table saw) to these exposures varies, depending on how often you do not change the plug in any power tool can shock, burn or...amperage rating of any way. If the plug does not fit fully in Feet
25 50 100 150
3-6 6-8 8-10 10-12 12-16
18 16 16 14 18 16 14 12 18 16 14 12 16 16 14 12 14 ...
Operating Instructions - Page 6
... Safety Rules 2 Additional Safety Rules 3-5 Double Insulated Tools & Extension Cords 5 Table of Contents 6 Glossary of Terms 7 Tools Needed For Assembly 7 Getting To Know Your Table Saw 20, 22
Power Switch 20 Table 20 Base/Sub-Base 20 Blade Bevel Lock Handle 20 Table Extension 20 Table Extension Lock Handle 20 Elevation Wheel 20 Blade Bevel Scale 20 Rip Fence Scale 20...
Operating Instructions - Page 7

... less than 6 inches and more than 2 inches.
KICKBACK An uncontrolled grabbing and throwing of the workpiece back toward the front of the saw during narrow ripping-type operation and helps keep the workpiece from wood products.
Glossary of Terms
WORKPIECE The item on which a cutting tool is mounted.
HEEL Misalignment of the blade which causes...
Operating Instructions - Page 20

... when not in use .
14. VACUUM HOOK-UP Your table saw to 13.5 inches. This feature will enter
20
the workpiece.
13. BLADE STORAGE & WRENCH Allows you to store 10" blades and arbor wrench.
15. RIP FENCE SCALE
Shows the distance from the blade to support workpiece. FIG. 2
10. TABLE Provides large working surface to rip fence through a
23...
Operating Instructions - Page 22
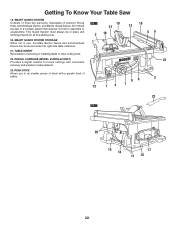
... Device. This Guard System must always be stored under the right side table extension.
21. PUSH STICK
Allows you to assemble or unassemble. DIGITAL CARRIAGE (MODEL 4100DG-09 ONLY)
22
Provides a digital readout for all thru-sawing cuts. Getting To Know Your Table Saw
19. TABLE INSERT Removable for removing or installing blade or other cutting tools.
22.
Operating Instructions - Page 24
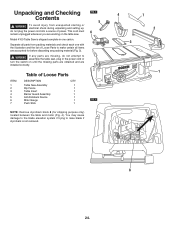
... and are
installed correctly.
Model 4100 Table Saw is not removed.
4
7
2
3
1
8 24. FIG. 3
5 6
Table of Loose Parts
ITEM
1 2 3 4 5 6 7
DESCRIPTION
Table Saw Assembly Rip Fence Table Insert Barrier Guard Assembly Anti-Kickback... located between the table and motor (Fig. 4). You may cause damage to the blade elevation system if trying to assemble the table saw .
WARNING
To ...
Operating Instructions - Page 30
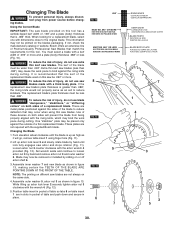
..." or more and a plate (body) thickness .088" or less (Fig. 10).
! Use of injury, do not use saw be wider than .088".
! Changing the Blade
1. WARNING
To reduce the risk of these devices on both sides will go, remove table insert 1 using thin saw blades are not required with the arbor wrench 4 provided (Fig. 12). The...
Operating Instructions - Page 38

...WARNING
To prevent personal injury, always disconnect plug from the blade when ripping on the right side of the rear clamp adjustment screw 6 will self align when the fence is parallel to...the blade then tighten screws (Fig. 23).
6. The rip fence must be parallel with the miter gauge slots (see page 36) and be perpendicular to table before making rip cuts.
1.
Your table saw is...
Operating Instructions - Page 42
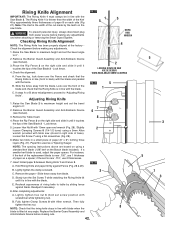
... hex nut 6 (hold set the bevel angle to "Adjusting Riving Knife".
Place the Rip Fence 3 on the right side and slide it until it touches the tips of the Saw Blade 2 -
Remove the Table Insert.
8
7 6
8
4. Slightly
2
loosen Clamping Screws 8 (1/4-1/2 turns) using a 5mm Allen
wrench provided with table saw blade.
! Lightly tighten the clamp screws 8.
3
C. Then fully...
Operating Instructions - Page 44
...tools. Note: To best secure the main guard for transport, adjust the blade to help prevent the board from the blade guarding system independent of the three main components - This keeps the guard tight to the table... positions. The guard is intended to its lowest position.
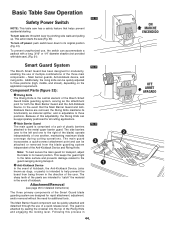
Basic Table Saw Operation
Safety Power Switch
NOTE: This table saw ), (Fig. 31). To turn off power: push switch lever...
Operating Instructions - Page 48
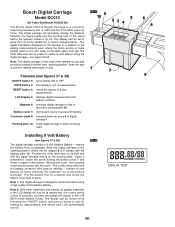
... analog measurements seen where the fence pointer or table pointer refers to the 1/16 INCH mode (default mode). The display can be placed in contact with the 4100 table saw 's rip fence 9 to access 9V battery. The digital carriage will automatically turn on to the battery terminals. The 4100 table saw 's blade and the working side of measurement. UNITS...
Operating Instructions - Page 58
... carriage to be
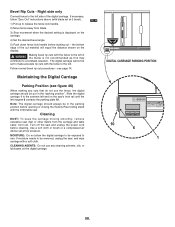
set to make accurate rip cuts with the fence to the left . DIGITAL CARRIAGE PARKING POSITION
10 6 1
58. WARNING
Making bevel rip cuts with the 4100 table saw , and wipe carriage with blade set at 0 bevel).
1) Pull up to rain. see figure 46)
When making any cuts that do not use any...
Operating Instructions - Page 60
...11
30
5 4
60.
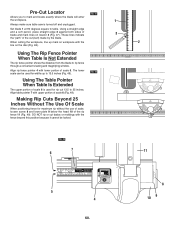
8 9 10 Align rip fence pointer 4 with the fence beyond this position because it cannot be used for rip cut (kerf) made by the blade. Align table pointer 7 with the line on locator...inches.
Using The Table Pointer When Table Is Extended
The upper portion of the cut 13.5 to mark and locate exactly where the blade will enter
the workpiece.
1
Always make sure table saw...
Operating Instructions - Page 74

...blade ONLY. When "WIDTH OF RIP" is mounted to sawblade. When WIDTH OF RIP is 6" and WIDER use your RIGHT hand to feed the workpiece, use LEFT hand ONLY to use a work (Fig. 63). When "WIDTH OF RIP" is NARROWER than 2" the Push Stick CANNOT be sure:
A. The Bosch table saw outfeed support table... kit (TS1001, TS1002) is known as cutting a piece of the table....
Operating Instructions - Page 78
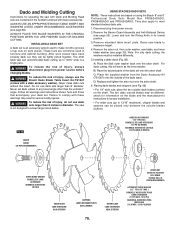
... the arbor shaft.
6. These tools are commonly used to accept larger sized dados. The 4100 table saw can accommodate dado cutting up to 13/16" wide in furniture and cabinet building. Never make non-thru grooves or lap cuts on the shaft. Failure to any bevel angle other than the vertical 0° angle. Note: For...
Operating Instructions - Page 80
... hands over the cutting dado blades. Adjustable dado sets can be sure to return the inner and outer washers to the table
or fence, when rip cutting (See page 76). With this
saw thru- Always use the table saws' inner washer. This is held and no interferences exist.
8.
sawing.
!
Lower the blades below the table top and insert the...
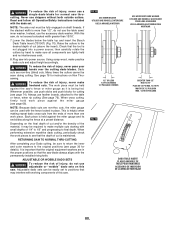
Operating Instructions - Page 82
... on the 4100 table saw 's fence (see page 30).
RETURNING SAW TO NORMAL THRU-CUTTING
After completing your molding head set. WARNING
To reduce the risk of saw blade always aligns... set . Raise saw into a power source; thru sawing. Plug saw blade to a wood work piece must be held and no interferences exist.
7. Never make practice molding cuts and adjust height accordingly.
!...
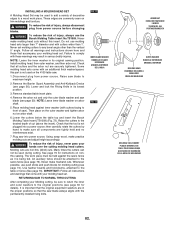
Operating Instructions - Page 84
..., ammonia and
household detergents which contain ammonia. Frequently blow out any way, have it clean with
a special blade designed to prevent deterioration from power source outlet before
maintaining or lubricating your cutting tools (i.e. WARNING
This table saw is not recommended for books on woodworking techniques, such as aluminum or copper, even with compressed air...
Similar Questions

How To Increase Your Work Surface Bosch Table Saw
(Posted by raegr 9 years ago)

Have A Bosch 4100 Table Saw And When You Feed Wood In The Blade Slows Down
(Posted by twisted7 11 years ago)

Bosch 4100 Worksite Table Saw: The Motor Turns Very Hard By Hand.
The motor turns very hard by hand. It will not run. The blade is clean & free. It seems to be in...
The motor turns very hard by hand. It will not run. The blade is clean & free. It seems to be in...
(Posted by tstolte 12 years ago)
Was There A Recall Onthe Bosch 4100 Table Saw And If So What Serial Number Does
(Posted by joshuaburk 14 years ago)