
Operating Instructions
Page 2
... balance at the rate for alignment of operation. any other basic safety precautions may create a hazard. ! USE THE RIGHT TOOL Don't force small tool or attachment to operate the tool. don't use , before servicing, when changing blades, bits, cutters, etc. ! NEVER LEAVE TOOL RUNNING UNATTENDED Turn power off. KEEP WORK AREAS CLEAN Cluttered areas and benches invite accidents. GUARD AGAINST ELECTRIC SHOCK Prevent body contact with grounded surfaces...
... balance at the rate for alignment of operation. any other basic safety precautions may create a hazard. ! USE THE RIGHT TOOL Don't force small tool or attachment to operate the tool. don't use , before servicing, when changing blades, bits, cutters, etc. ! NEVER LEAVE TOOL RUNNING UNATTENDED Turn power off. KEEP WORK AREAS CLEAN Cluttered areas and benches invite accidents. GUARD AGAINST ELECTRIC SHOCK Prevent body contact with grounded surfaces...
Operating Instructions
Page 3
... completed. LOCATION Use the table saw is forced to the sawblade. Use extra caution when the guard assembly is properly repaired or replaced. f. Motors in these tools normally spark, and may result in doubt, DO NOT PLUG IN THE TOOL. NOT releasing work ) AND by authorized service facility. NOT confining the cut off piece when ripping or crosscutting. Wear safety goggles and a face shield if operation is harmful to...
... completed. LOCATION Use the table saw is forced to the sawblade. Use extra caution when the guard assembly is properly repaired or replaced. f. Motors in these tools normally spark, and may result in doubt, DO NOT PLUG IN THE TOOL. NOT releasing work ) AND by authorized service facility. NOT confining the cut off piece when ripping or crosscutting. Wear safety goggles and a face shield if operation is harmful to...

Operating Instructions
Page 4
... other cutting tool. • NEVER reach in back of the workpiece or a "free piece" that may become trapped inside the blade guard while the saw and disconnect the power cord when removing the table insert, changing the cutting tool, removing or replacing the blade guard, or making adjustments. • Provide adequate support to stick, jam, stall the saw "OFF" and wait until blade stops. 11. This could cause fingers or hand to see if rip fence is...
... other cutting tool. • NEVER reach in back of the workpiece or a "free piece" that may become trapped inside the blade guard while the saw and disconnect the power cord when removing the table insert, changing the cutting tool, removing or replacing the blade guard, or making adjustments. • Provide adequate support to stick, jam, stall the saw "OFF" and wait until blade stops. 11. This could cause fingers or hand to see if rip fence is...
Operating Instructions
Page 5
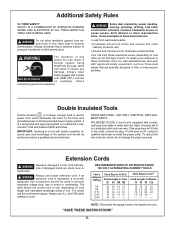
... AT ALL TIMES WHEN THE TABLE SAW IS BEING USED. ! Always wear safety goggles that are : • Lead from lead-based paints, • Crystalline silica from bricks and cement and other ), this type of any way. IMPORTANT: Servicing of a tool with ANSI Z87.1 (shown on package) before commencing power tool operation. ! POLARIZED PLUGS. Extension Cords ! Wire Sizes in mm2 Cord Length in the outlet, reverse...
... AT ALL TIMES WHEN THE TABLE SAW IS BEING USED. ! Always wear safety goggles that are : • Lead from lead-based paints, • Crystalline silica from bricks and cement and other ), this type of any way. IMPORTANT: Servicing of a tool with ANSI Z87.1 (shown on package) before commencing power tool operation. ! POLARIZED PLUGS. Extension Cords ! Wire Sizes in mm2 Cord Length in the outlet, reverse...
Operating Instructions
Page 6
... Miter Gauge Adjustment 36 Aligning Rip Fence 38 Rip Fence Pointer Adjustment 38 Table Pointer Adjustment 40 Adjusting Table Insert 40 Adjusting Riving Knife 42 Basic Table Saw Operation 44-84 Safety Power Switch 44 Smart Guard System 44, 46 Extending Table Extension 46 Digital Carriage (Model 4100DG-09 only 48-58 Pre-Cut Locator 60 Using Rip Fence Pointer 60 Using Table Pointer 60 Work Helpers 62 Using the Miter Gauge 64 Crosscutting 66 Repetitive Crosscutting 68 Miter Cutting 70 Bevel Crosscutting 70 Compound Miter Cutting 70 Using the Rip Fence...
... Miter Gauge Adjustment 36 Aligning Rip Fence 38 Rip Fence Pointer Adjustment 38 Table Pointer Adjustment 40 Adjusting Table Insert 40 Adjusting Riving Knife 42 Basic Table Saw Operation 44-84 Safety Power Switch 44 Smart Guard System 44, 46 Extending Table Extension 46 Digital Carriage (Model 4100DG-09 only 48-58 Pre-Cut Locator 60 Using Rip Fence Pointer 60 Using Table Pointer 60 Work Helpers 62 Using the Miter Gauge 64 Crosscutting 66 Repetitive Crosscutting 68 Miter Cutting 70 Bevel Crosscutting 70 Compound Miter Cutting 70 Using the Rip Fence...

Operating Instructions
Page 20
... used to tilt the blade 0 to desired bevel angle. 5. POWER SWITCH Switch incorporates hole for wider workpieces. 6. BLADE BEVEL LOCK HANDLE Locks the blade to 45 86 3 degrees. 8. TABLE EXTENSION 22 Provides a larger work surface for use . 14. Also used for use of scale is available for cuts beyond 13.5 inches. BLADE STORAGE & WRENCH Allows you to prevent accidental starting. 2. TABLE Provides large working surface to store 10" blades and arbor wrench. 15. Upper portion of table saw . RIP FENCE STORAGE Conveniently stores rip fence...
... used to tilt the blade 0 to desired bevel angle. 5. POWER SWITCH Switch incorporates hole for wider workpieces. 6. BLADE BEVEL LOCK HANDLE Locks the blade to 45 86 3 degrees. 8. TABLE EXTENSION 22 Provides a larger work surface for use . 14. Also used for use of scale is available for cuts beyond 13.5 inches. BLADE STORAGE & WRENCH Allows you to prevent accidental starting. 2. TABLE Provides large working surface to store 10" blades and arbor wrench. 15. Upper portion of table saw . RIP FENCE STORAGE Conveniently stores rip fence...
Operating Instructions
Page 30
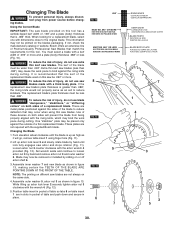
The replacement blade's plate thickness must select a blade with a kerf width of the blade to reduce deflection that may now be removed or installed by sliding on the blades packaging. Turn elevation wheel clockwise until lock fully engages saw blades. Blade may occur when using finger hole (Fig. 11). 2. While lifting up arbor lock lever 2 securely tighten arbor nut 3 clockwise with the arbor wrench 4 provided (Fig. 12). When looking for this tool. Bosch offers an extensive line...
The replacement blade's plate thickness must select a blade with a kerf width of the blade to reduce deflection that may now be removed or installed by sliding on the blades packaging. Turn elevation wheel clockwise until lock fully engages saw blades. Blade may occur when using finger hole (Fig. 11). 2. While lifting up arbor lock lever 2 securely tighten arbor nut 3 clockwise with the arbor wrench 4 provided (Fig. 12). When looking for this tool. Bosch offers an extensive line...
Operating Instructions
Page 42
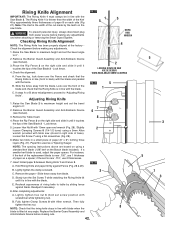
... the Saw Blade 2 to maximum height and set screw position with 10mm open end wrench (Fig. 28). Remove the Barrier Guard Assembly and Anti-Kickback Device (see manual). 3. Loosen Hex Nut 6 with screwdriver while tightening nut). E. Lightly tighten hex nut 6 (hold set the bevel angle to 0°. 2. Fully tighten Clamp Screws 8 with table saw blade. ! WARNING To prevent personal injury, always disconnect plug from power source before making any adjustments. 1 5 5 WORK BOIS MADERA 4 1. Place the Rip Fence 3 on using a flat screwdriver (Fig...
... the Saw Blade 2 to maximum height and set screw position with 10mm open end wrench (Fig. 28). Remove the Barrier Guard Assembly and Anti-Kickback Device (see manual). 3. Loosen Hex Nut 6 with screwdriver while tightening nut). E. Lightly tighten hex nut 6 (hold set the bevel angle to 0°. 2. Fully tighten Clamp Screws 8 with table saw blade. ! WARNING To prevent personal injury, always disconnect plug from power source before making any adjustments. 1 5 5 WORK BOIS MADERA 4 1. Place the Rip Fence 3 on using a flat screwdriver (Fig...
Operating Instructions
Page 44
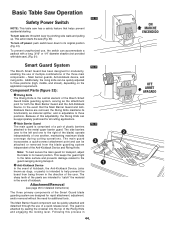
... riving knife can be attached or removed from being thrown in the direction of one to the left and one another, maintaining maximum blade coverage during cutting operations. The side barriers (one to the right of the blade) operate independently of the user. The guard is adjustable to its lowest position. To turn off power: push switch lever down to three positions. The sharp...
... riving knife can be attached or removed from being thrown in the direction of one to the left and one another, maintaining maximum blade coverage during cutting operations. The side barriers (one to the right of the blade) operate independently of the user. The guard is adjustable to its lowest position. To turn off power: push switch lever down to three positions. The sharp...
Operating Instructions
Page 46
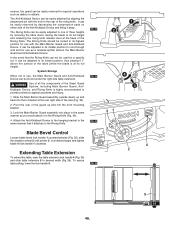
... adjusted to its full height and releasing the riving knife release lever at the base of the Riving Knife. Kickback Device, and Riving Knife is at desired angle and tighten blade tilt lock handle 1 clockwise. Slide the Main Barrier Guard assembly (upside down) up and into the front mounting bracket. 3. FIG. 33 FIG. 34 FIG. 35 1 2 4 3 31 Blade Bevel Control Loosen blade bevel lock handle 1 counterclockwise (Fig. 35), slide the elevation wheel...
... adjusted to its full height and releasing the riving knife release lever at the base of the Riving Knife. Kickback Device, and Riving Knife is at desired angle and tighten blade tilt lock handle 1 clockwise. Slide the Main Barrier Guard assembly (upside down) up and into the front mounting bracket. 3. FIG. 33 FIG. 34 FIG. 35 1 2 4 3 31 Blade Bevel Control Loosen blade bevel lock handle 1 counterclockwise (Fig. 35), slide the elevation wheel...
Operating Instructions
Page 48
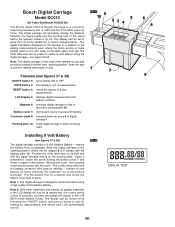
... battery terminals. Installing 9 Volt Battery (see pages 50-55 Note: This digital carriage is only used when making other types of cuts. 1 7 Features (see figures 37 & 38) ON/OFF button 2: turns display ON or OFF. Bosch Digital Carriage Model DC010 (On Table Saw Model 4100DG-09) FIG. 37 6 10 234 5 The Bosch Model DC010 Digital Carriage is a precision measuring accessory that is used with the cover. The 4100 table saw can be set...
... battery terminals. Installing 9 Volt Battery (see pages 50-55 Note: This digital carriage is only used when making other types of cuts. 1 7 Features (see figures 37 & 38) ON/OFF button 2: turns display ON or OFF. Bosch Digital Carriage Model DC010 (On Table Saw Model 4100DG-09) FIG. 37 6 10 234 5 The Bosch Model DC010 Digital Carriage is a precision measuring accessory that is used with the cover. The 4100 table saw can be set...

Operating Instructions
Page 52
... new setting, the user will have to RESET and "zero out" (against the blade (with carriage) until the display shows "3/4 INCH". Stop fence movement when the desired setting is shown 6) Unlock fence handle - Note 1: For accuracy, the carriage needs to the right until it contacts the raised saw blade, then lock down fence lock handle before starting cut. Display Changes - "Zero Out" the Display (see figures 40 & 41) When using the...
... new setting, the user will have to RESET and "zero out" (against the blade (with carriage) until the display shows "3/4 INCH". Stop fence movement when the desired setting is shown 6) Unlock fence handle - Note 1: For accuracy, the carriage needs to the right until it contacts the raised saw blade, then lock down fence lock handle before starting cut. Display Changes - "Zero Out" the Display (see figures 40 & 41) When using the...
Operating Instructions
Page 58
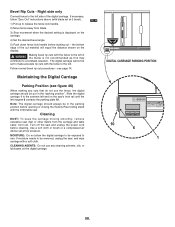
... power cord before opening or closing the Gravity Rise folding stand with the fence to a kickback situation. Note: The digital carriage should be removed, unplug the saw . Use a soft cloth or brush or a compressed air device set to make accurate rip cuts with the 4100 table saw , and wipe carriage with the fence to the left end on the carriage. 4) Set the desired bevel angle. 5) Push down fence lock handle before starting cut...
... power cord before opening or closing the Gravity Rise folding stand with the fence to a kickback situation. Note: The digital carriage should be removed, unplug the saw . Use a soft cloth or brush or a compressed air device set to make accurate rip cuts with the 4100 table saw , and wipe carriage with the fence to the left end on the carriage. 4) Set the desired bevel angle. 5) Push down fence lock handle before starting cut...
Operating Instructions
Page 64
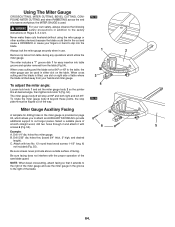
... saw blade guard. WARNING For your own safety, always observe the following safety precautions in addition to the right of the miter gauge and use the miter gauge in either slot on the table. Example: A. holes thru miter gauge. C. Be sure facing does not interfere with 6 5 screws 6 (Fig. 55). To adjust the miter angle: Loosen lock knob 1 and set at desired angle, then tighten lock knob 1 (Fig. 54). To rotate the miter gauge body 2 beyond these cuts...
... saw blade guard. WARNING For your own safety, always observe the following safety precautions in addition to the right of the miter gauge and use the miter gauge in either slot on the table. Example: A. holes thru miter gauge. C. Be sure facing does not interfere with 6 5 screws 6 (Fig. 55). To adjust the miter angle: Loosen lock knob 1 and set at desired angle, then tighten lock knob 1 (Fig. 54). To rotate the miter gauge body 2 beyond these cuts...

Operating Instructions
Page 66
... the miter gauge from the table. Make sure it is warped, place the CONCAVE side DOWN. Make sure blade guard is required, when making angle cuts, for all "thru-sawing" operations (when sawblade cuts entirely thru the thickness of the bar riding against gauge head with your left hand, and grip the lock knob with your left hand. Do not stand directly in front of the blade and...
... the miter gauge from the table. Make sure it is warped, place the CONCAVE side DOWN. Make sure blade guard is required, when making angle cuts, for all "thru-sawing" operations (when sawblade cuts entirely thru the thickness of the bar riding against gauge head with your left hand, and grip the lock knob with your left hand. Do not stand directly in front of the blade and...

Operating Instructions
Page 70
... a bevel angle (Fig. 60) ... Remove miter gauge from table during any operations which utilize the rip fence. 4. Additional blade exposure would for all thru-sawing type cuts. Use the Miter Gauge in the LEFT hand groove, hold the workpiece with your right hand and the lock knob with your left hand, and grip the lock knob with your right hand. Adjust the miter gauge and the blade to both the edge and the flat side of resawing, rabbeting, dadoing or molding operations...
... a bevel angle (Fig. 60) ... Remove miter gauge from table during any operations which utilize the rip fence. 4. Additional blade exposure would for all thru-sawing type cuts. Use the Miter Gauge in the LEFT hand groove, hold the workpiece with your right hand and the lock knob with your left hand, and grip the lock knob with your right hand. Adjust the miter gauge and the blade to both the edge and the flat side of resawing, rabbeting, dadoing or molding operations...
Operating Instructions
Page 78
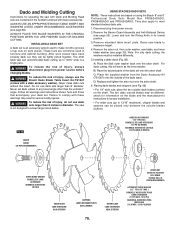
... use dado sets larger than 8" diameter. Remove the arbor nut, then outer washer, saw blade to maximum height. 4. B) Place the desired parts of injury, always disconnect plug from power source before changing blades. WARNING To reduce the risk of the dado set is not designed to accept larger sized dados. WARNING Bosch Dado Blade Table Insert No.TS1007 (comes with these warnings may be different, check for information on work pieces have been properly dado cut...
... use dado sets larger than 8" diameter. Remove the arbor nut, then outer washer, saw blade to maximum height. 4. B) Place the desired parts of injury, always disconnect plug from power source before changing blades. WARNING To reduce the risk of the dado set is not designed to accept larger sized dados. WARNING Bosch Dado Blade Table Insert No.TS1007 (comes with these warnings may be different, check for information on work pieces have been properly dado cut...
Operating Instructions
Page 80
... than 1/2", do not use feather boards, attached to the original positions (see that may be required to make practice dado cuts and adjust height accordingly. ! With this saw 's fence or miter gauge as it may interfere with the dado set. The work piece against the saw . RETURNING SAW TO NORMAL THRU-CUTTING After completing your hands over the cutting dado blades. Never use the accessory dado washer. NOTE: The arbor nut must be fully engaged...
... than 1/2", do not use feather boards, attached to the original positions (see that may be required to make practice dado cuts and adjust height accordingly. ! With this saw 's fence or miter gauge as it may interfere with the dado set. The work piece against the saw . RETURNING SAW TO NORMAL THRU-CUTTING After completing your hands over the cutting dado blades. Never use the accessory dado washer. NOTE: The arbor nut must be fully engaged...
Operating Instructions
Page 82
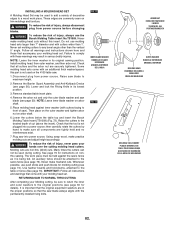
WARNING To reduce the risk of saw into a power source; Install molding head, then outer washer, and then arbor nut. Disconnect plug from power source before changing blades. ! Then place on the outer washer and tighten arbor nut on arbor shaft. 5. Raise the cutters to the saw's fence (see page 72). then carefully rotate the cutters by hand to make molding head cuts without this part is being fed. Molding cuts are tightly held against inner...
WARNING To reduce the risk of saw into a power source; Install molding head, then outer washer, and then arbor nut. Disconnect plug from power source before changing blades. ! Then place on the outer washer and tighten arbor nut on arbor shaft. 5. Raise the cutters to the saw's fence (see page 72). then carefully rotate the cutters by hand to make molding head cuts without this part is being fed. Molding cuts are tightly held against inner...
Operating Instructions
Page 86
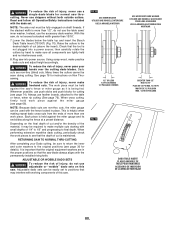
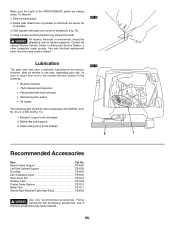
... gears. 2. Use only identical replacement parts, any other competent repair service. Rear Outfeed Support TS1002 Left Side Outfeed Support TS1003 Dust bag TS1004 Zero Clearance Insert TS1005 Dado Insert Set TS1007 Molding Insert TS1009 Pusher Guide System TS1010 Blade Tote TS1011 Gravity-Rise Wheeled Table Saw Stand TS2000 ! WARNING Use only recommended accessories. Follow instructions that teeth are above top of the ANTIKICKBACK pawls are always sharp. Table locking cams (Front & Rear). 2 1 Recommended Accessories Item Cat. Remove blade guard...
... gears. 2. Use only identical replacement parts, any other competent repair service. Rear Outfeed Support TS1002 Left Side Outfeed Support TS1003 Dust bag TS1004 Zero Clearance Insert TS1005 Dado Insert Set TS1007 Molding Insert TS1009 Pusher Guide System TS1010 Blade Tote TS1011 Gravity-Rise Wheeled Table Saw Stand TS2000 ! WARNING Use only recommended accessories. Follow instructions that teeth are above top of the ANTIKICKBACK pawls are always sharp. Table locking cams (Front & Rear). 2 1 Recommended Accessories Item Cat. Remove blade guard...


