
Bernina Bernette 340 deco Support Question
Bernina Bernette 340 deco Support Question
Find answers below for this question about Bernina Bernette 340 deco.Need a Bernina Bernette 340 deco manual? We have 1 online manual for this item!
Question posted by lsmfanisa on January 1st, 2013
Machine Does Not Start When I Press The Green Button
The person who posted this question about this Bernina product did not include a detailed explanation. Please use the "Request More Information" button to the right if more details would help you to answer this question.
Current Answers
Related Bernina Bernette 340 deco Manual Pages
User Guide - Page 2

...sewing computer is required around the sewing needle.
6. Never operate the sewing computer with the words «DOUBLE INSULATION» or «DOUBLE INSULATED». A double insulated product is intended for servicing of double-insulated machines... the environmental friendliness of our products by pulling on the sewing computer.
12. IMPORTANT SAFETY INSTRUCTIONS!
1
When using an...
User Guide - Page 5
... Overview
5
4
3
6 7 8
9 10
11
12
13
14
16
15
2
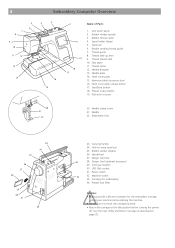
Name of Parts
1
19 18 17
1. Thread Cutter button 19. Bobbin winder stopper
26. Face plate 11. Pocket for the embroidery carriage
behind your machine before starting the machine. • Do not force to move the carriage by hand. • Return the carriage to the idle...
User Guide - Page 8
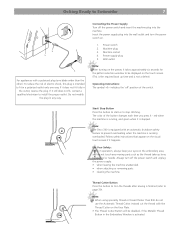
... and insert the machine plug into the wall outlet and turn off ' position of the switch.
Start/ Stop Button Press this button to start or to page 39). Thread Cutter Button Press this plug is...Cutter. red when the machine is activated. Note: The Deco 340 is equipped with an automatic shutdown safety feature to be disabled, if the Metallic Thread Button in operation, always ...
User Guide - Page 9
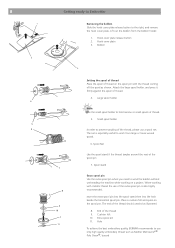
... extra spool pin is especially usefull to wind the bobbin without unthreading the machine while working with metallic thread the use only high quality embroidery thread such... loose wound spools.
6. Attach the large spool holder, and press it firmly against the spool of the thread, please use ... Slide the hook cover plate release button to use of thread on the spool pin with the thread coming...
User Guide - Page 10
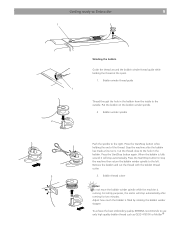
... bobbin thread cutter.
3
3. Bobbin winder thread guide
Thread through the hole in the bobbin. Press the Start/Stop button while holding the thread at the spool.
1. Bobbin thread cutter
Notes: Do not move the bobbin winder spindle while the machine is running for two minutes. Put the bobbin on the bobbin winder spindle.
2 Bobbin...
User Guide - Page 20
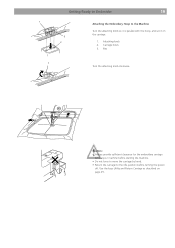
... the attaching knob clockwise. Caution: • Always provide sufficient clearance for the embroidery carriage
behind your machine before starting the machine. • Do not force to move the carriage by hand. • Return the carriage to the Machine
Turn the attaching knob so it is parallel with the hoop, and set it on page...
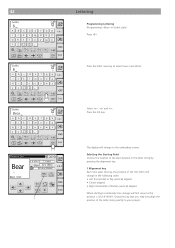
User Guide - Page 26
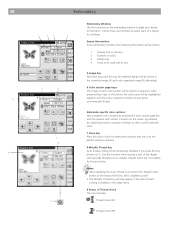
When the machine is not a defect.
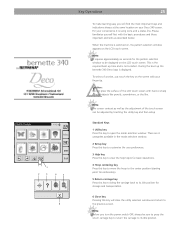
To select a function, just touch the key on your Deco 340 screen. This is the required boot up the bernette 340 Deco logo is using icons and a status line...topics for basic operations.
4 Hoop centering key Press this key to move the hoop to the center position (starting point for embroidery).
5 Return carriage key Press this key to bring the carriage back to...
User Guide - Page 28
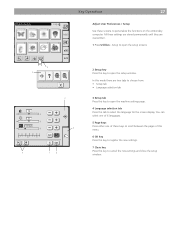
...Use these screens to open the machine settings page.
4 Language selection tab Press this mode there are overwritten.
1 Press Utilities - You can select one of 6 languages.
5 Page keys Press either one of these settings ... to choose from: • Setup tab • Language selection tab
3 Setup tab Press this key to personalize the functions on the emboridery computer. Setup to open the setup...
User Guide - Page 32
... X key.
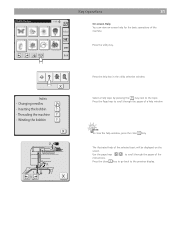
key next to scroll through the pages of a help window
Note: To close the help for the basic operations of the machine.
Press the help topic by pressing the ?
Threading the machine ? Winding the bobbin
?
Inserting the bobbin ? Use the page keys
to the topic.
The illustrated help of the
instructions. Key Operations...
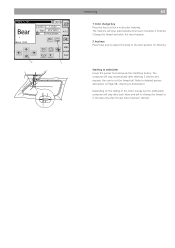
User Guide - Page 37
... Thread Cut function the Thread Cutter
Button at the head of the Deco 340 is disabled as the recommended thread. Screen Information In the embroidery window, the following information will be shown in minutes 2 Number of colors 3 Design size 4 Hoop to be shown.
1 Sewing time in sequence when pressing these keys. Embroider specific color sections...
User Guide - Page 39
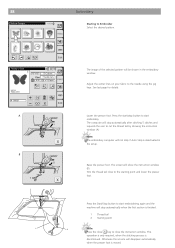
...stop automatically when the first section is deactivated in the embroidery window.
Press the start/stop button to the needle using the jog keys. See last page for ...Starting point
2
Note:
Press the close the instruction window. 38
Embroidery
Starting to the starting point and lower the presser foot. Adjust the center lines on your fabric to start embroidering again and the machine...
User Guide - Page 40
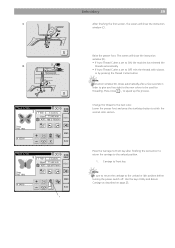
Raise the presser foot. Lower the presser foot and press the start/stop button to the unload or idle position before turning the power switch off... Thread Cutter is set to ON, the machine has trimmed the
threads automatically. • If Auto Thread Cutter is set to OFF, trim the threads with scissors
or by pressing the Thread Cutter button
Note: Instruction window (D) closes automatically after ...
User Guide - Page 41
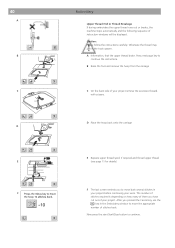
... End or Thread Breakage If during embroidery the upper thread runs out or breaks, the machine stops automatically and the following sequence of stitches back. Otherwise the thread may jam in your... reminds you pressed the Cancel key use the key in the Embroidery window to move the appropriate number of instruction windows will be displayed. Now press the start Start/Stop button to
continue ...
User Guide - Page 43
...) or Top (vertical) aligned • Center aligned • Right (horizontal) of Button (vertical) aligned When starting to emborider the carriage will change to this position = Stich # 00001. Selecting the Starting Point Choose the location of the start position in Gothic style) Press «B».
Press the letter case key to your project.
42
Gothic
B
ABCD IJKL...
User Guide - Page 44
... embroidery computer will stop after each character is finished. The machine will stop only after the last letter has been stitched. Change the thread and stitch the next character.
2 Jog keys Press these keys to adjust the hoop to the start position for lettering
1
Starting to stitch a multi-color lettering. Refer to detailed process...
User Guide - Page 46
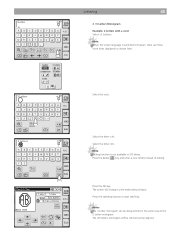
...
Example: 2 Letters with a crest Select «2 Letters». The screen will be programmed in 2/3 letters. Select the letter «B».
Press the start/stop button to the embroidery window. Select the letter «A». Press the OK key. Note: When the screen language is not available in the same way as the 2 Letter monogram...
User Guide - Page 52
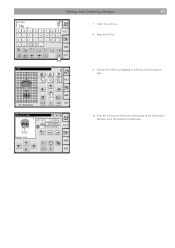
Select «k» and «y». 8. Start the machine to the Embroidery Window. Position the letters by dragging or with by using the position keys.
10. Press the OK key and the screen will change to embroider. Editing and Combining Designs
51
Gothic
Sky
a bc d ij kl qrs t
yz
AB
L MS
AB
AB
B
e f g h A.B.C mn o p uvwx
A A
Aa
AA
Edit
7. Press the OK key.
9.
User Guide - Page 57
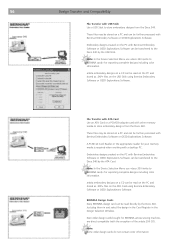
... to store embroidery designs from the Deco 340. Embroidery designs created on the USB Stick using Bernina Embroidery Software or OESD Exploratinons Software. artista embroidery designs on a CD can be read directly by the ATA Card. A PCMCIA Card Reader or the appropriate reader for BERNINA artista sewing machine, are direct compatible (with a desktop PC...
User Guide - Page 62

..., 23, 24 See pages 11, 12
Replace the needle.
Troubleshooting
61
Problem
Cause
Reference
The machine is noisy.
1 Threads have been caught in the hook mechanism.
2 Lint has collected in the
thread holder when starting the machine. 6 Sewing speed is too high for some
reason when embroidering. 5 The needle thread tension is too tight...
User Guide - Page 63
...
Save Embroidery Designs
52
Screen Information
36
Selecting a design to edit
47
Starting Point, Selecting the
42
Stabilizer
20
Standard accessories
5
Standard keys
25
Start/ Stop Button
7
Starting to embroider
38, 43
T
Templates
17
Thread Tension
15
Threading the Machine
11
Troubleshooting
61
U
User Preferences / Setup
27
W
Winding the bobbin
9
11/10...
Similar Questions

Machine Thread Cut
Machine Does Not Stop To Cut Thread When Moving From One Place To Another On The design
Machine Does Not Stop To Cut Thread When Moving From One Place To Another On The design
(Posted by pule 1 year ago)

New Bulb Not Working In Sewing Machine Bernette 12 What Can It Be
(Posted by Anonymous-152221 8 years ago)

How Do You Make An Applique On A Deco 340 Embroidery Machine
(Posted by viJg 10 years ago)

How Do I Reset Timing On Bernette 340 Embroidery Machine?
I have an Bernina Bernette 340 deco embroidery machine. I desperately need instructions for resettin...
I have an Bernina Bernette 340 deco embroidery machine. I desperately need instructions for resettin...
(Posted by amykcamp 10 years ago)

My Sewing Machine Bernette 15 Stops Working
After 1 day using my Bernette 15 stops working - engine hoots but doesn't rotate spindle and hand wh...
After 1 day using my Bernette 15 stops working - engine hoots but doesn't rotate spindle and hand wh...
(Posted by sgrayxx 12 years ago)