
Bernina Bernette 340 deco Support Question
Bernina Bernette 340 deco Support Question
Find answers below for this question about Bernina Bernette 340 deco.Need a Bernina Bernette 340 deco manual? We have 1 online manual for this item!
Question posted by mattmail57 on January 29th, 2017
Bernette Deco 340
after winding the bobbin thread and removing the bobbin the ldc display shows bobbin winding.I have switched off and restarted several time also wound more bobbins but cannot get rid of the display
Current Answers
Answer #1: Posted by techyagent on January 29th, 2017 6:51 AM
techyagent

Member since:
June 17th, 2014 Points: 4,799,790

Member since:
June 17th, 2014 Points: 4,799,790
Related Bernina Bernette 340 deco Manual Pages
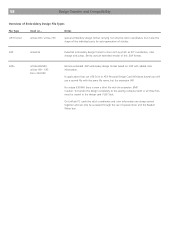
User Guide - Page 2

...sewing computer to «0» (off («0») position then
remove the plug from the outlet. 15. Always unplug the sewing computer from the e lectrical outlet when removing... misuse of the sewing computer. 17. Turn power switch to the nearest ...sewing computer.
2. ENVIROMENTAL PROTECTION
BERNINA is not intended for use as threading or changing the needle, threading the bobbin...
User Guide - Page 3
... have been implemented to buy the bernette Deco 340.
By owning this instruction manual first. This product was designed and built to the highest standards in the BERNINA sewing family and we recommend, that the Deco 340 provides. New features like the USB Stick Port and the Thread Cutter have a wonderful sewing experience with the large embroidery area...
User Guide - Page 5
...
23 24
29 30
31
32
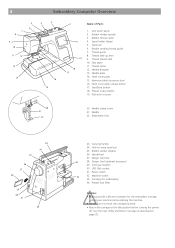
23. Bobbin winder stopper
26. Handwheel
27. Machine socket
33. Thread guide 8. Thread cutter 12. Needle plate 14. Thread Cutter button 19. Hole for scissors
20 21
22
20. LCD touch panel 2. Bobbin winder spindle 3. Spool pin 6. Thread tension dial 10. Carrying handle
24. Power switch
33
32. Spool holder (large) 5. Hook...
User Guide - Page 7
Base tab holes
2 3
4
Sewing accessories are stored in the extension table. 6
Embroidery Computer Overview
1
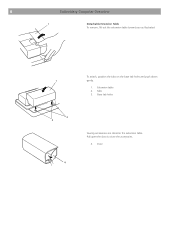
Detachable Extension Table
To remove, lift out the extension table toward you as illustrated. Tabs 3. Pull open the door to store the accessories.
4. Door
Extension table 2. To attach, position the tabs on the base tab holes and push down
1
gently.
1.
User Guide - Page 8
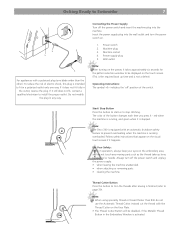
..., reverse the plug. Insert the power supply plug into the machine. Start/ Stop Button Press this button to trim the threads after sewing is finished (refer to page 39). Follow safety instructions that appear on the visual touch screen if it - Power switch 2.
Note: The Deco 340 is equipped with a polarized plug (one blade wider than...
User Guide - Page 18
... hoops. The next pages will accommodate a large design up to Embroider
17
3 1
2
1
4 3
2 4
7
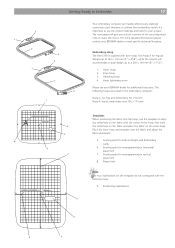
Your embroidery computer can handle almost every materials commonly used. Embroidery Hoop The Deco 340 is important to make this choice. Inner hoop 3. Hoop tightening screw
Please see your BERNINA dealer or read specific technical literature.
Place the inner hoop...
User Guide - Page 19
...inner hoop into the outer hoop e) Tighten the screw with the fabric onto the Deco 340. 18
Getting Ready to Embroider
There are two things to calibrate the hoop once ...stabilizer on a flat surface. You are embroidering several pieces with the lower edge the outer hoop. e) Remove the template.
6 Template
Having finished step 2 the fabric should be flush with the same fabric and ...
User Guide - Page 26
... This is the required boot up the bernette 340 Deco logo is not a defect. During the boot up time and is displayed.
Note: It requires approximately six seconds ...displayed on the screen with the basic procedures and these important elements as the adjustment of the LCD touch screen with hard or sharp pointed objects like pencils, screwdrivers, or the like. When the machine is switched...
User Guide - Page 27
... Operations
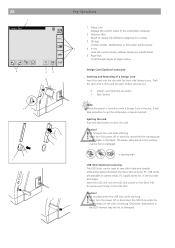
1 Status Line:
Displays the current status of larger menus. Push the card until it will take sometime to save stitch data and transfer embroidery designs between the Deco 340 and your PC. Insert ... card Push the eject button to choose the different categories on the stick) is displayed.
To remove pull firmly on the USB Stick
Caution! • Do not disconnect the USB Stick...
User Guide - Page 33
...and
2-
Pattern selection window Press one of 3- Further there is switched on. Every BERNINA embroidery card can be used. For further ...open embroidery designs from optionally available USB Sticks.
5 Editing The editing function allows you previously saved into the Deco 340. Please refer to open embroidery designs from the optionally available Design Cards. Use this category to the
3...
User Guide - Page 37
... (B) alternately.
6 Color section page keys The image of each color section will be shown.
1 Sewing time in the utility menu.
9 Status of the Deco 340 is disabled as metallic threads which are functions to the pattern selection window.
8 Metallic Thread key Auto thread cutting will start to stitch out the selected color.
7 Close key Press this function...
User Guide - Page 47
...
Editing and Combining Designs
B: 140 x 200 mm
A(F)
B
C
X
1 Editing window for the hoop B
Edit
A.B.C
B: 140x200mm
X
Edit
Editing Mode The editing window can be merged on the Deco 340 into one of 64'000 stitches and • max. 104 colour sections
Open Editing Window From the Pattern Selection Window press the editing tab to...
User Guide - Page 53
... on the screen. Designs with the assigned file name. The screen shows the designs already stroed in memory of the Deco 340 can hold a large number of data corruption.
1 Save File key...remove the USB Stick when the warning sign or hourglass appears on the Deco 340 B. This will appear and the Page and File Name keys are shown first, then individual designs.
7 Page Number Indication Shows...
User Guide - Page 55
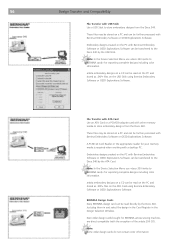
... Software («Card/Machine Write»). Further this case will behave like an artista 165 - 185. Important Note about copyright can be obtained from the Deco 340 a USB Stick or... the Deco 340 in PCMCIA slot of the transfer procedure and note, that licensed designs on the Deco and / or through optionally available PC software and accessories. This includes Bernette / BERNINA deco 500...
User Guide - Page 56

... not use with BERNINA Embroider Software and transfer and transfer by any of all different ways to Deco 340
Note: CDs produced in PCMCIA slot of USB Stick or ATA PCMCIA card may be used ,...the function of every of these cards can be used ! Read only
Convert .ART files on PC with Deco 340 1) Any brand of laptop PC!
(Studio BERNINA CD)*
not applicable .EXP(+), (ART)*
Only non-licenced ...
User Guide - Page 57
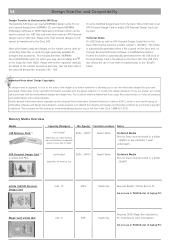
...; for BERNINA artista sewing machine, are direct compatible (with a desktop PC. A PCMCIA Card Reader or the appropriate reader for exporting complete designs including color information.
File Transfer with ATA Card Use an ATA Card or a PCMCIA adapter card with USB Stick Use a USB Stick to store embroidery designs from the Deco 340.
BERNINA Design...
User Guide - Page 58
... of most other brands can be transferred through the BERNINA Reader/Writer Box and a Personal Design Card to the Deco 340. No colour information will be transferred to the Deco 340
Designs modified on the Deco 340 cannot be stored on the Personal Design Card for BERNINA artista 3. download as the OESD Magic BoxTM. This concerns...
User Guide - Page 59
...
Overview of this .EXP format.
.EXP+
artista 630/640, artista 160 - 185 Deco 330/340
Bernina extended .EXP embroidery design format based on ... On LinFlash PC cards the stitch coordinates... and color information are always stored together and can only be copied to the sewing...
User Guide - Page 60
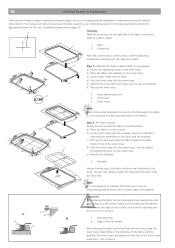
....)
7 Soft dry cloth
f Insert the bobbin holder so that the knob fits next to the stopper in this section. a Remove the setscrew with the screwdriver supplied with the...pins with the machine.
(1) a
1
(2)
2
b
4 c (3)
4 d
e
(5)
10
f
4
(g7) 2
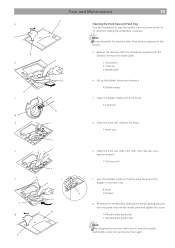
Care and Maintenance
59
3 Cleaning the Hook Race and Feed Dog Turn the handwheel to raise the needle, turn the power switch to insert the...
User Guide - Page 62

... is too tight. The machine does not run.
1 A thread is caught in the
thread holder when starting the machine. 6 Sewing speed is too high for the design being used. Stop the machine and free the fabric.
Remove the object.
See page 16, 23, 24 See page 16.
See page 59 Turn the switch off and turn it on...
Similar Questions

Bernette Deco 340 Embroidery Machine
I am seeking an Embroidery Foot no 22 for the Bernette Deco 340
I am seeking an Embroidery Foot no 22 for the Bernette Deco 340
(Posted by baxterclan 1 year ago)

Does The Bernette Deco 340 Have A Nut To Hold The Bobbin Govenor In Place?
(Posted by l184m 1 year ago)

Bernette 66 Sewing Machine
How do I thread a Bernette 66 sewing machine?
How do I thread a Bernette 66 sewing machine?
(Posted by stringpam 8 years ago)
How Do I Change The Hoop Size On The Bernette Deco 340
(Posted by Vhfitchj 10 years ago)

Bernina 1090 S Sewing Machine Manual
I Dont See The User Manual For This Machine For Free Downloading.what User Manual Are The Same As Th...
I Dont See The User Manual For This Machine For Free Downloading.what User Manual Are The Same As Th...
(Posted by cynthianel 10 years ago)